The first iteration was a success, and as the Fall semester approached, I decided to spend my time honing it into the Captury Unity Toolkit. The goal: an input system for a Captury skeleton, treating the body as a controller — making it far easier to build interactive markerless-tracking experiences in Unity and saving future developers valuable time.
UnityC#Captury Motion CaptureUnity Input SystemThe Body as a Controller5 Modular Tracking Systems4-Player Multiplayer SupportOpen Source
Demo Video
01 / OriginThe Origin: Games for Good
“How do you make a stroke rehabilitation game with markerless motion capture?”
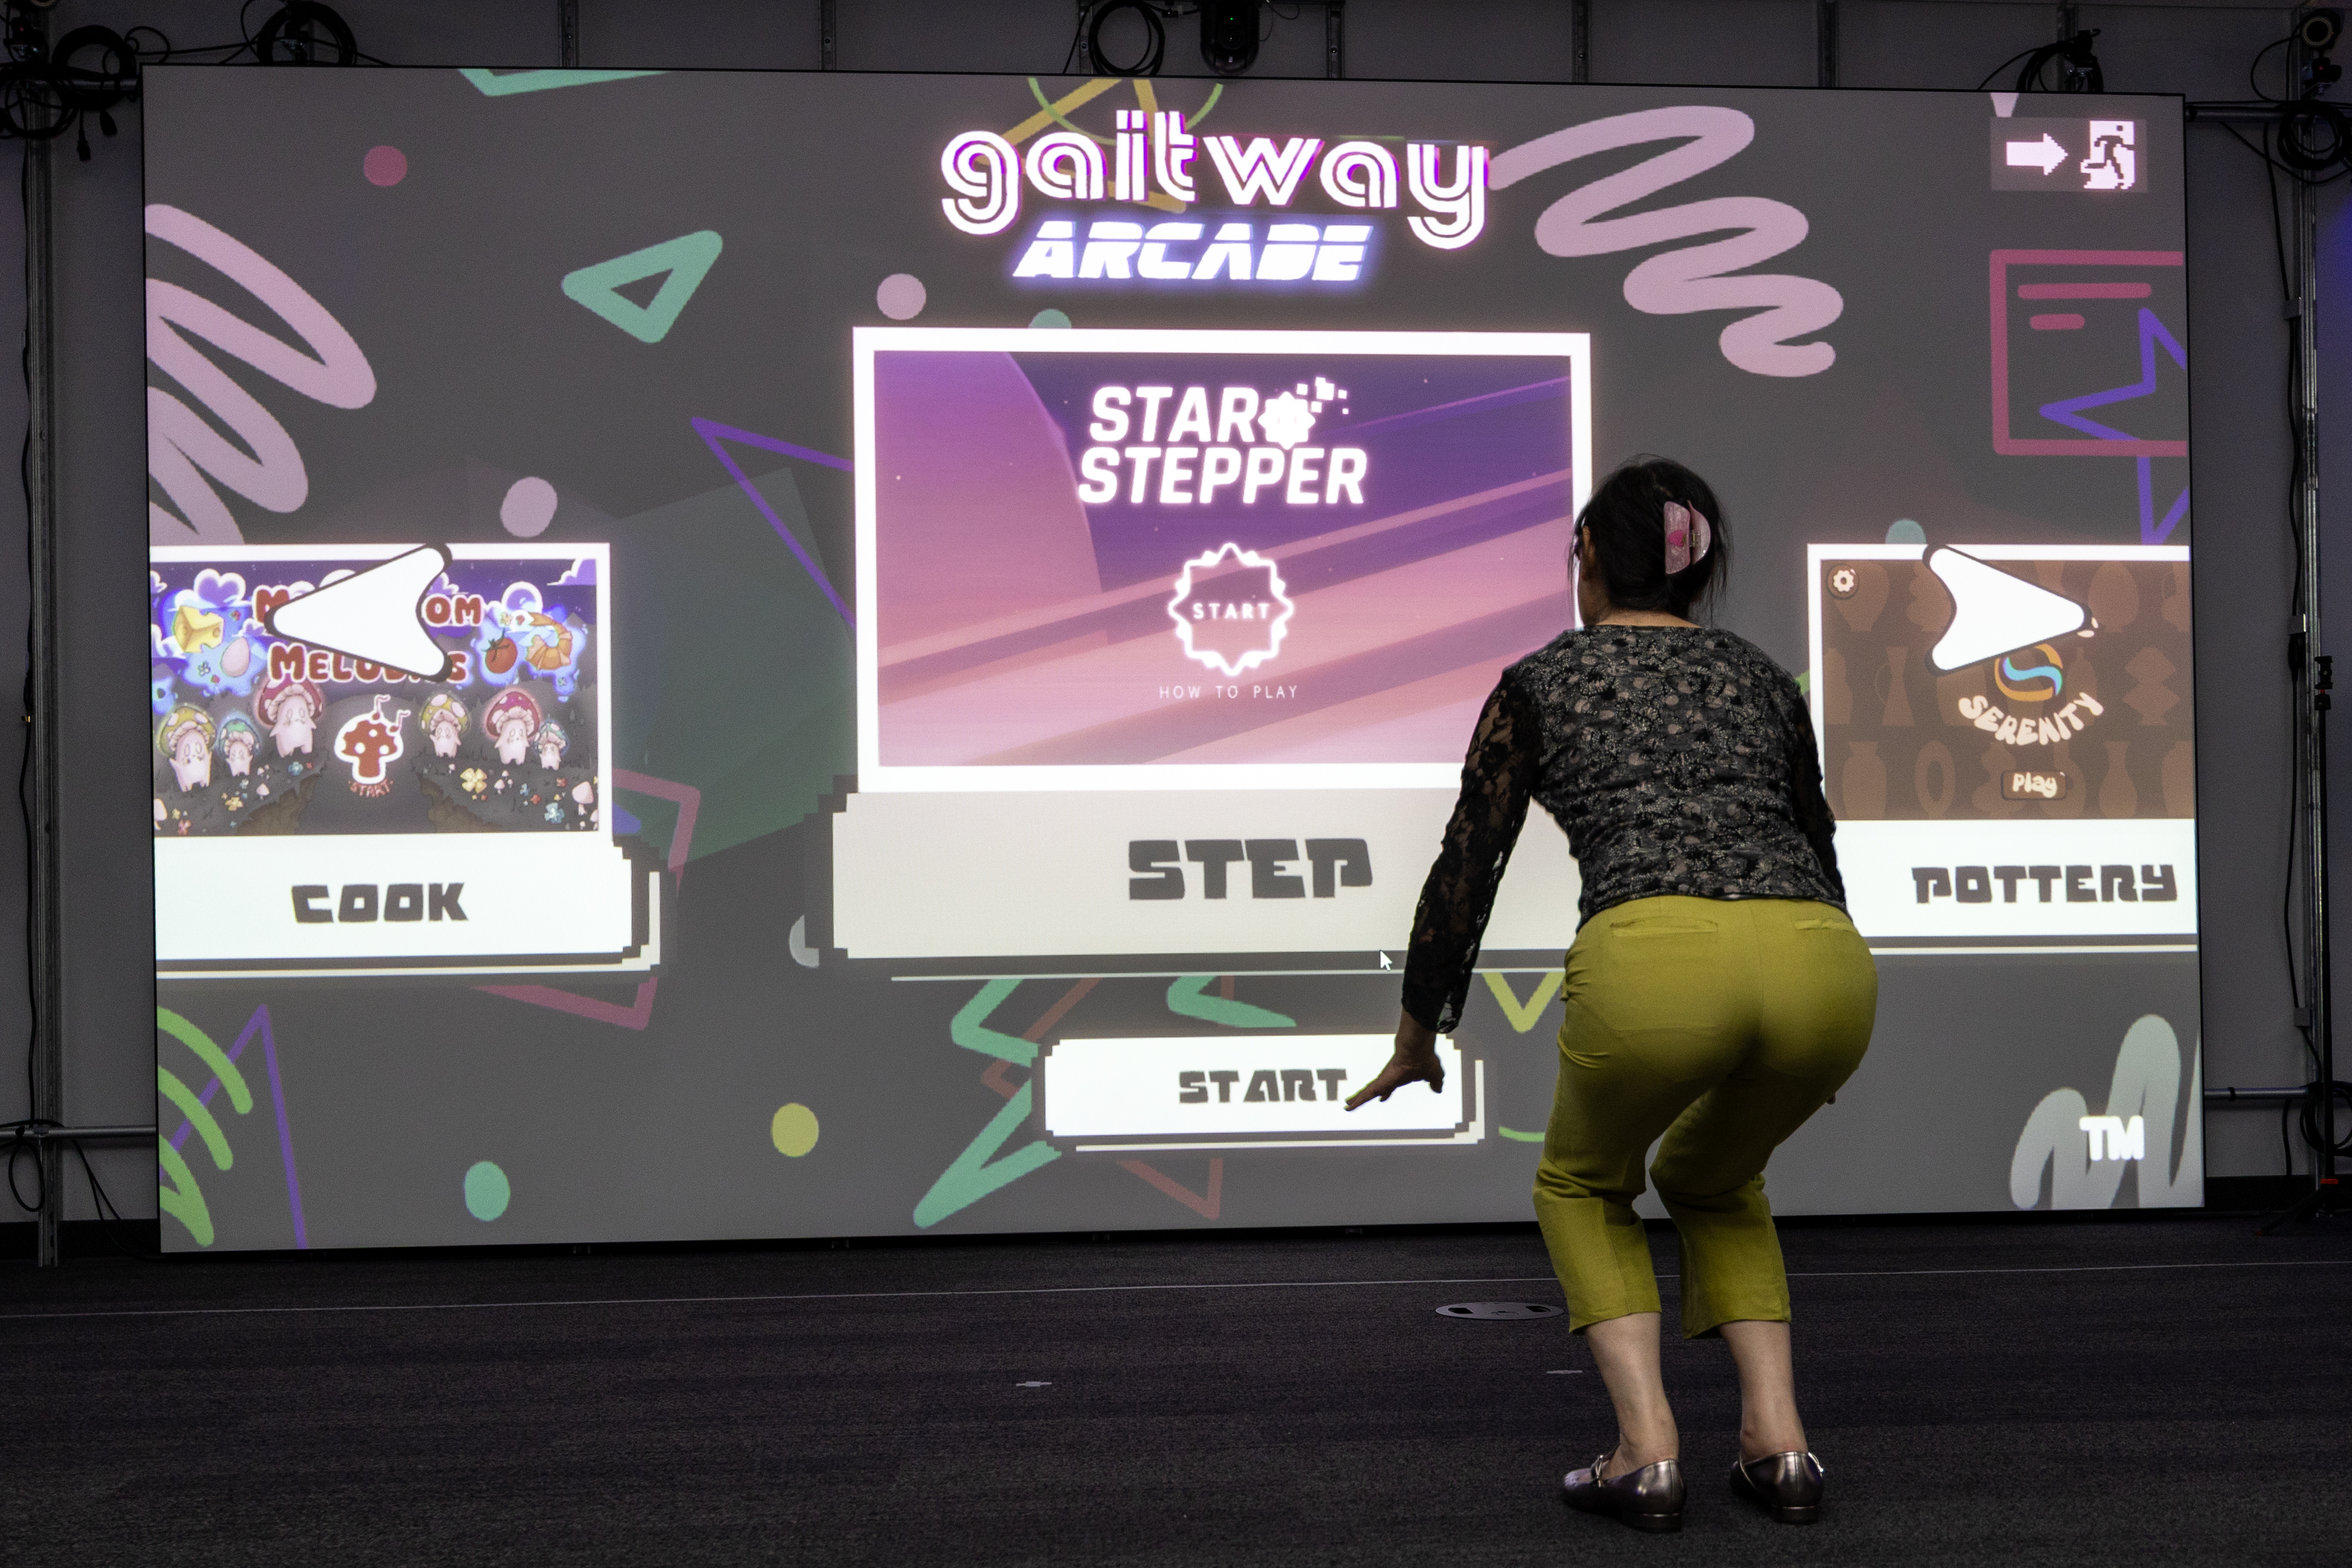
In my early years in Arts and Entertainment Technologies at UT Austin, I envied the few students with the technical know-how to use the cutting-edge equipment in the Lab for Immersive Media (the LIM Lab) — marker-based and markerless motion capture among it — which seemed elevated and inaccessible at the time.
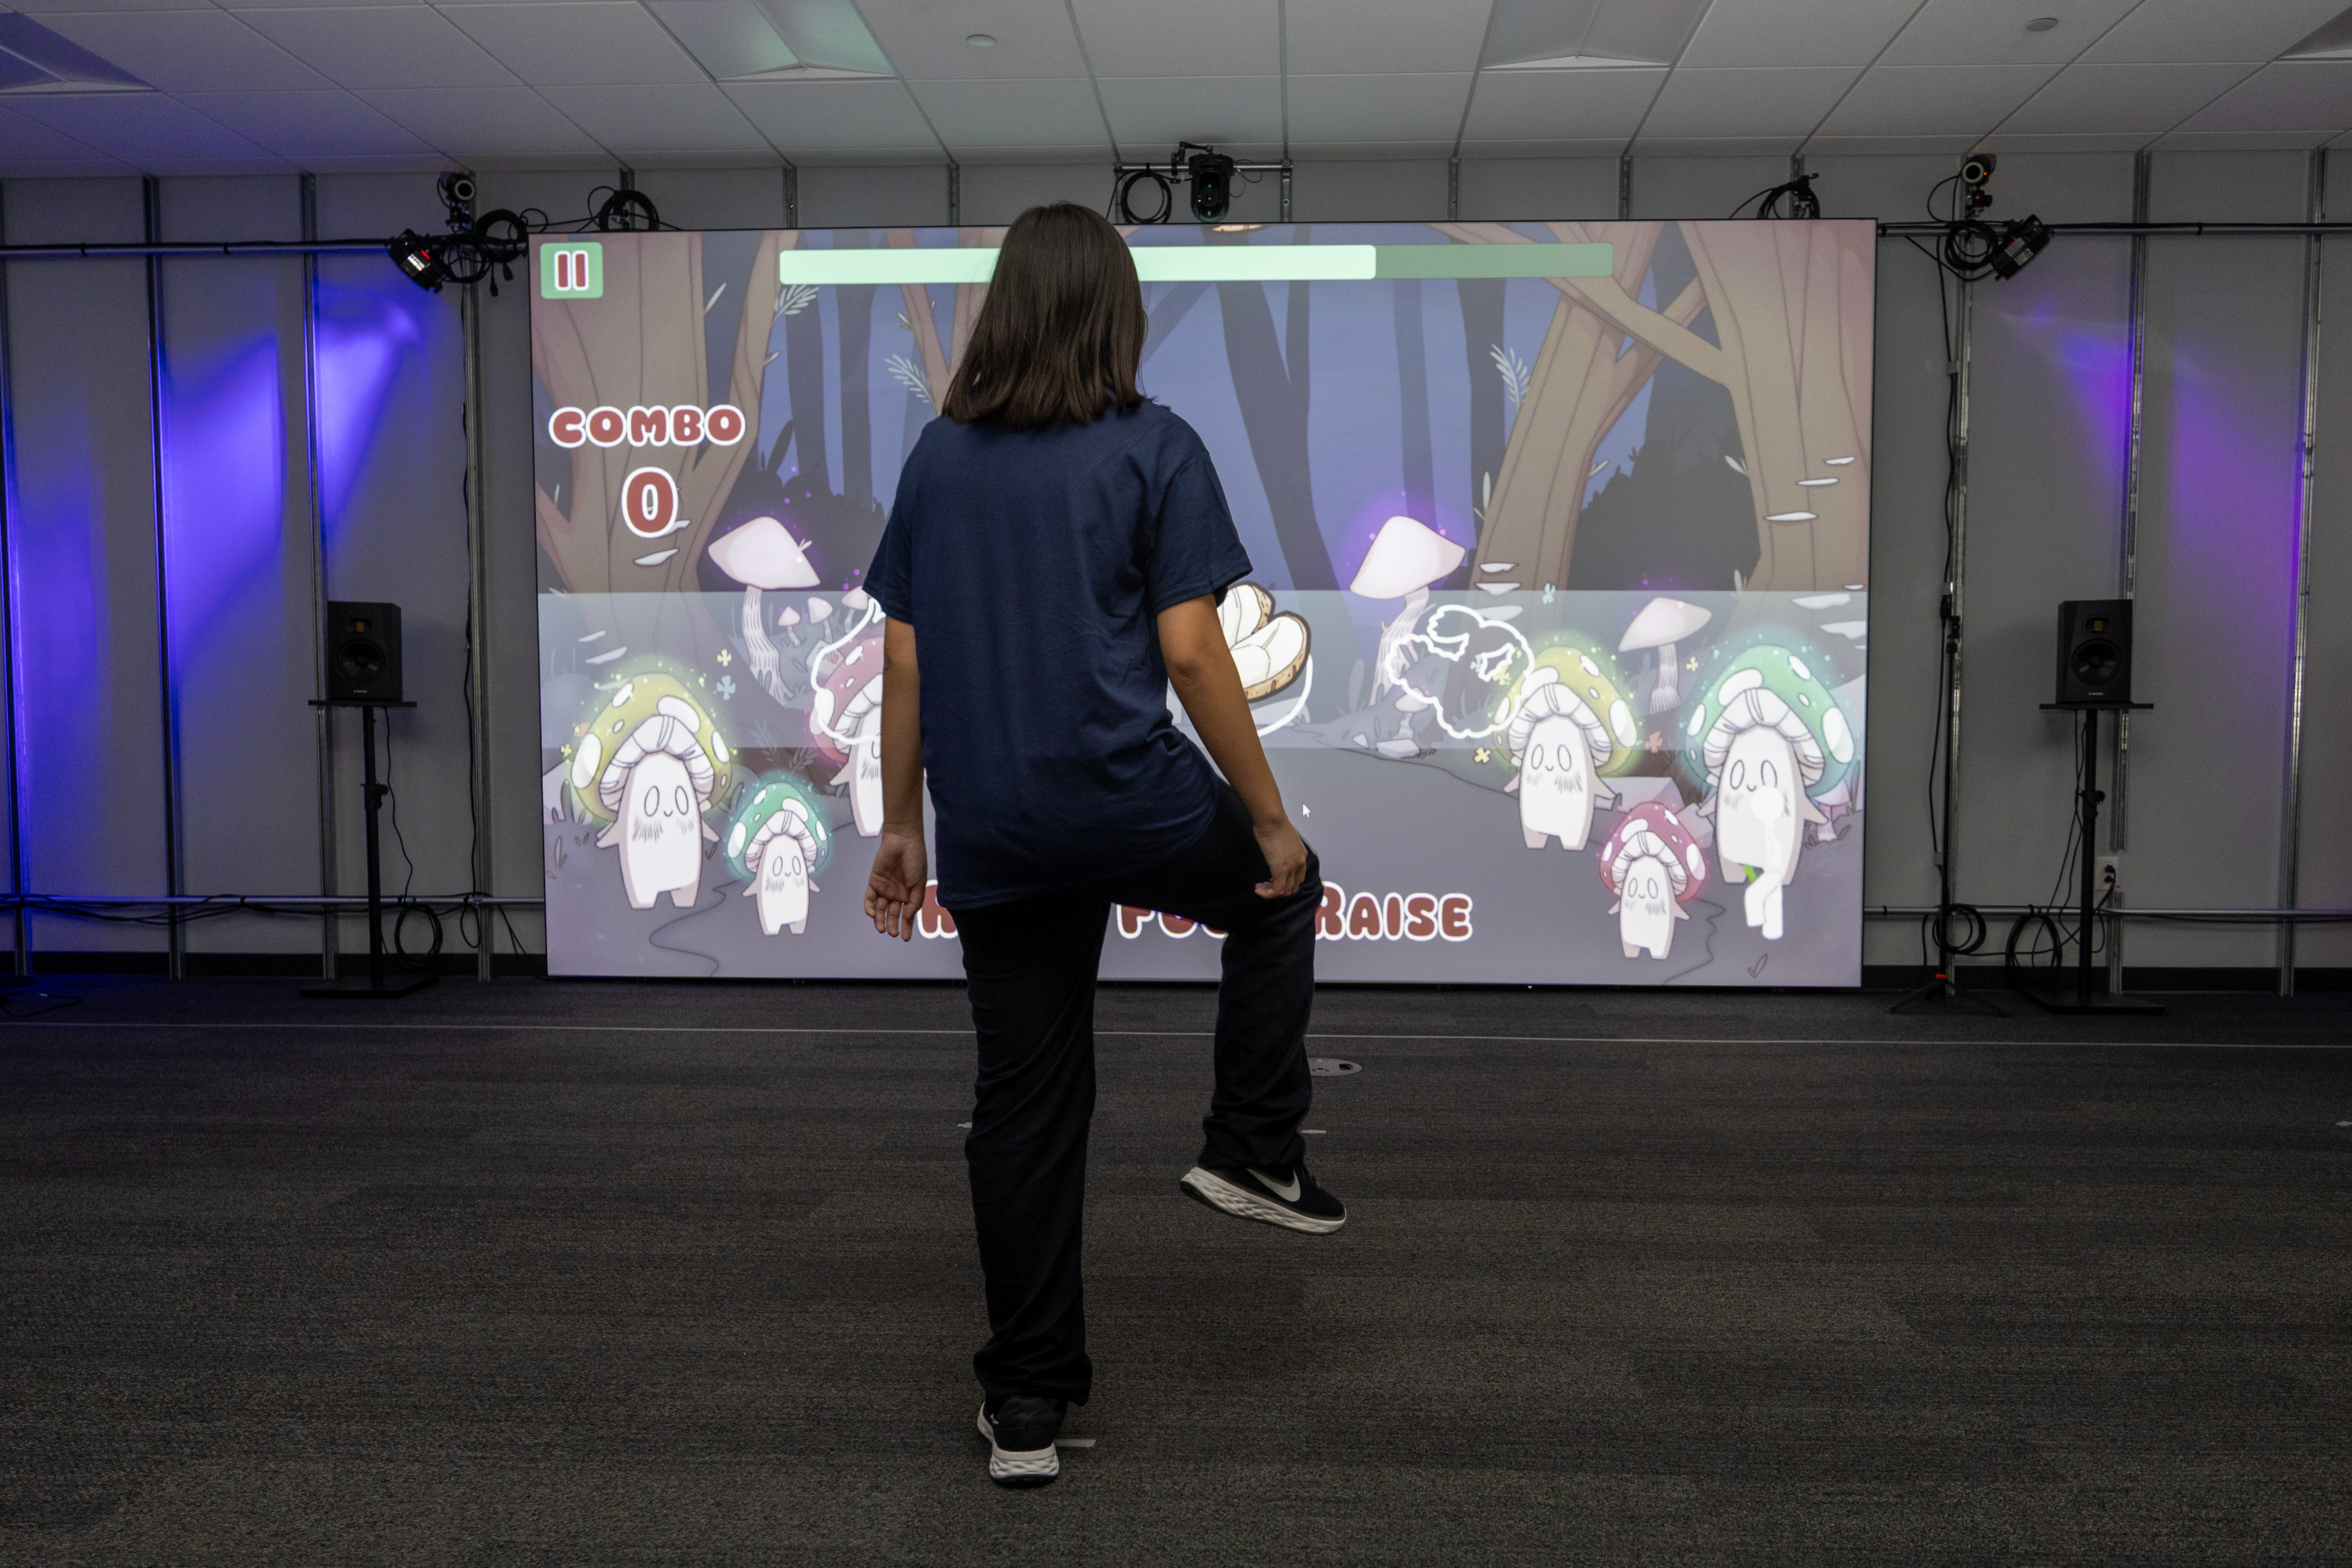
In Spring 2025, I took a class called Games for Good, where we worked with a researcher to build a game for the health sector. We decided to use the LIM Lab to make stroke-survivor rehabilitation physical therapy feel less grueling, and there I created the beginnings of what became the Captury Unity Toolkit.
I had never built a Unity toolkit or used motion capture before. But I saw an opportunity: rather than have all five minigames our 30 students were building each reinvent the wheel, I’d create one system that benefited all of us.
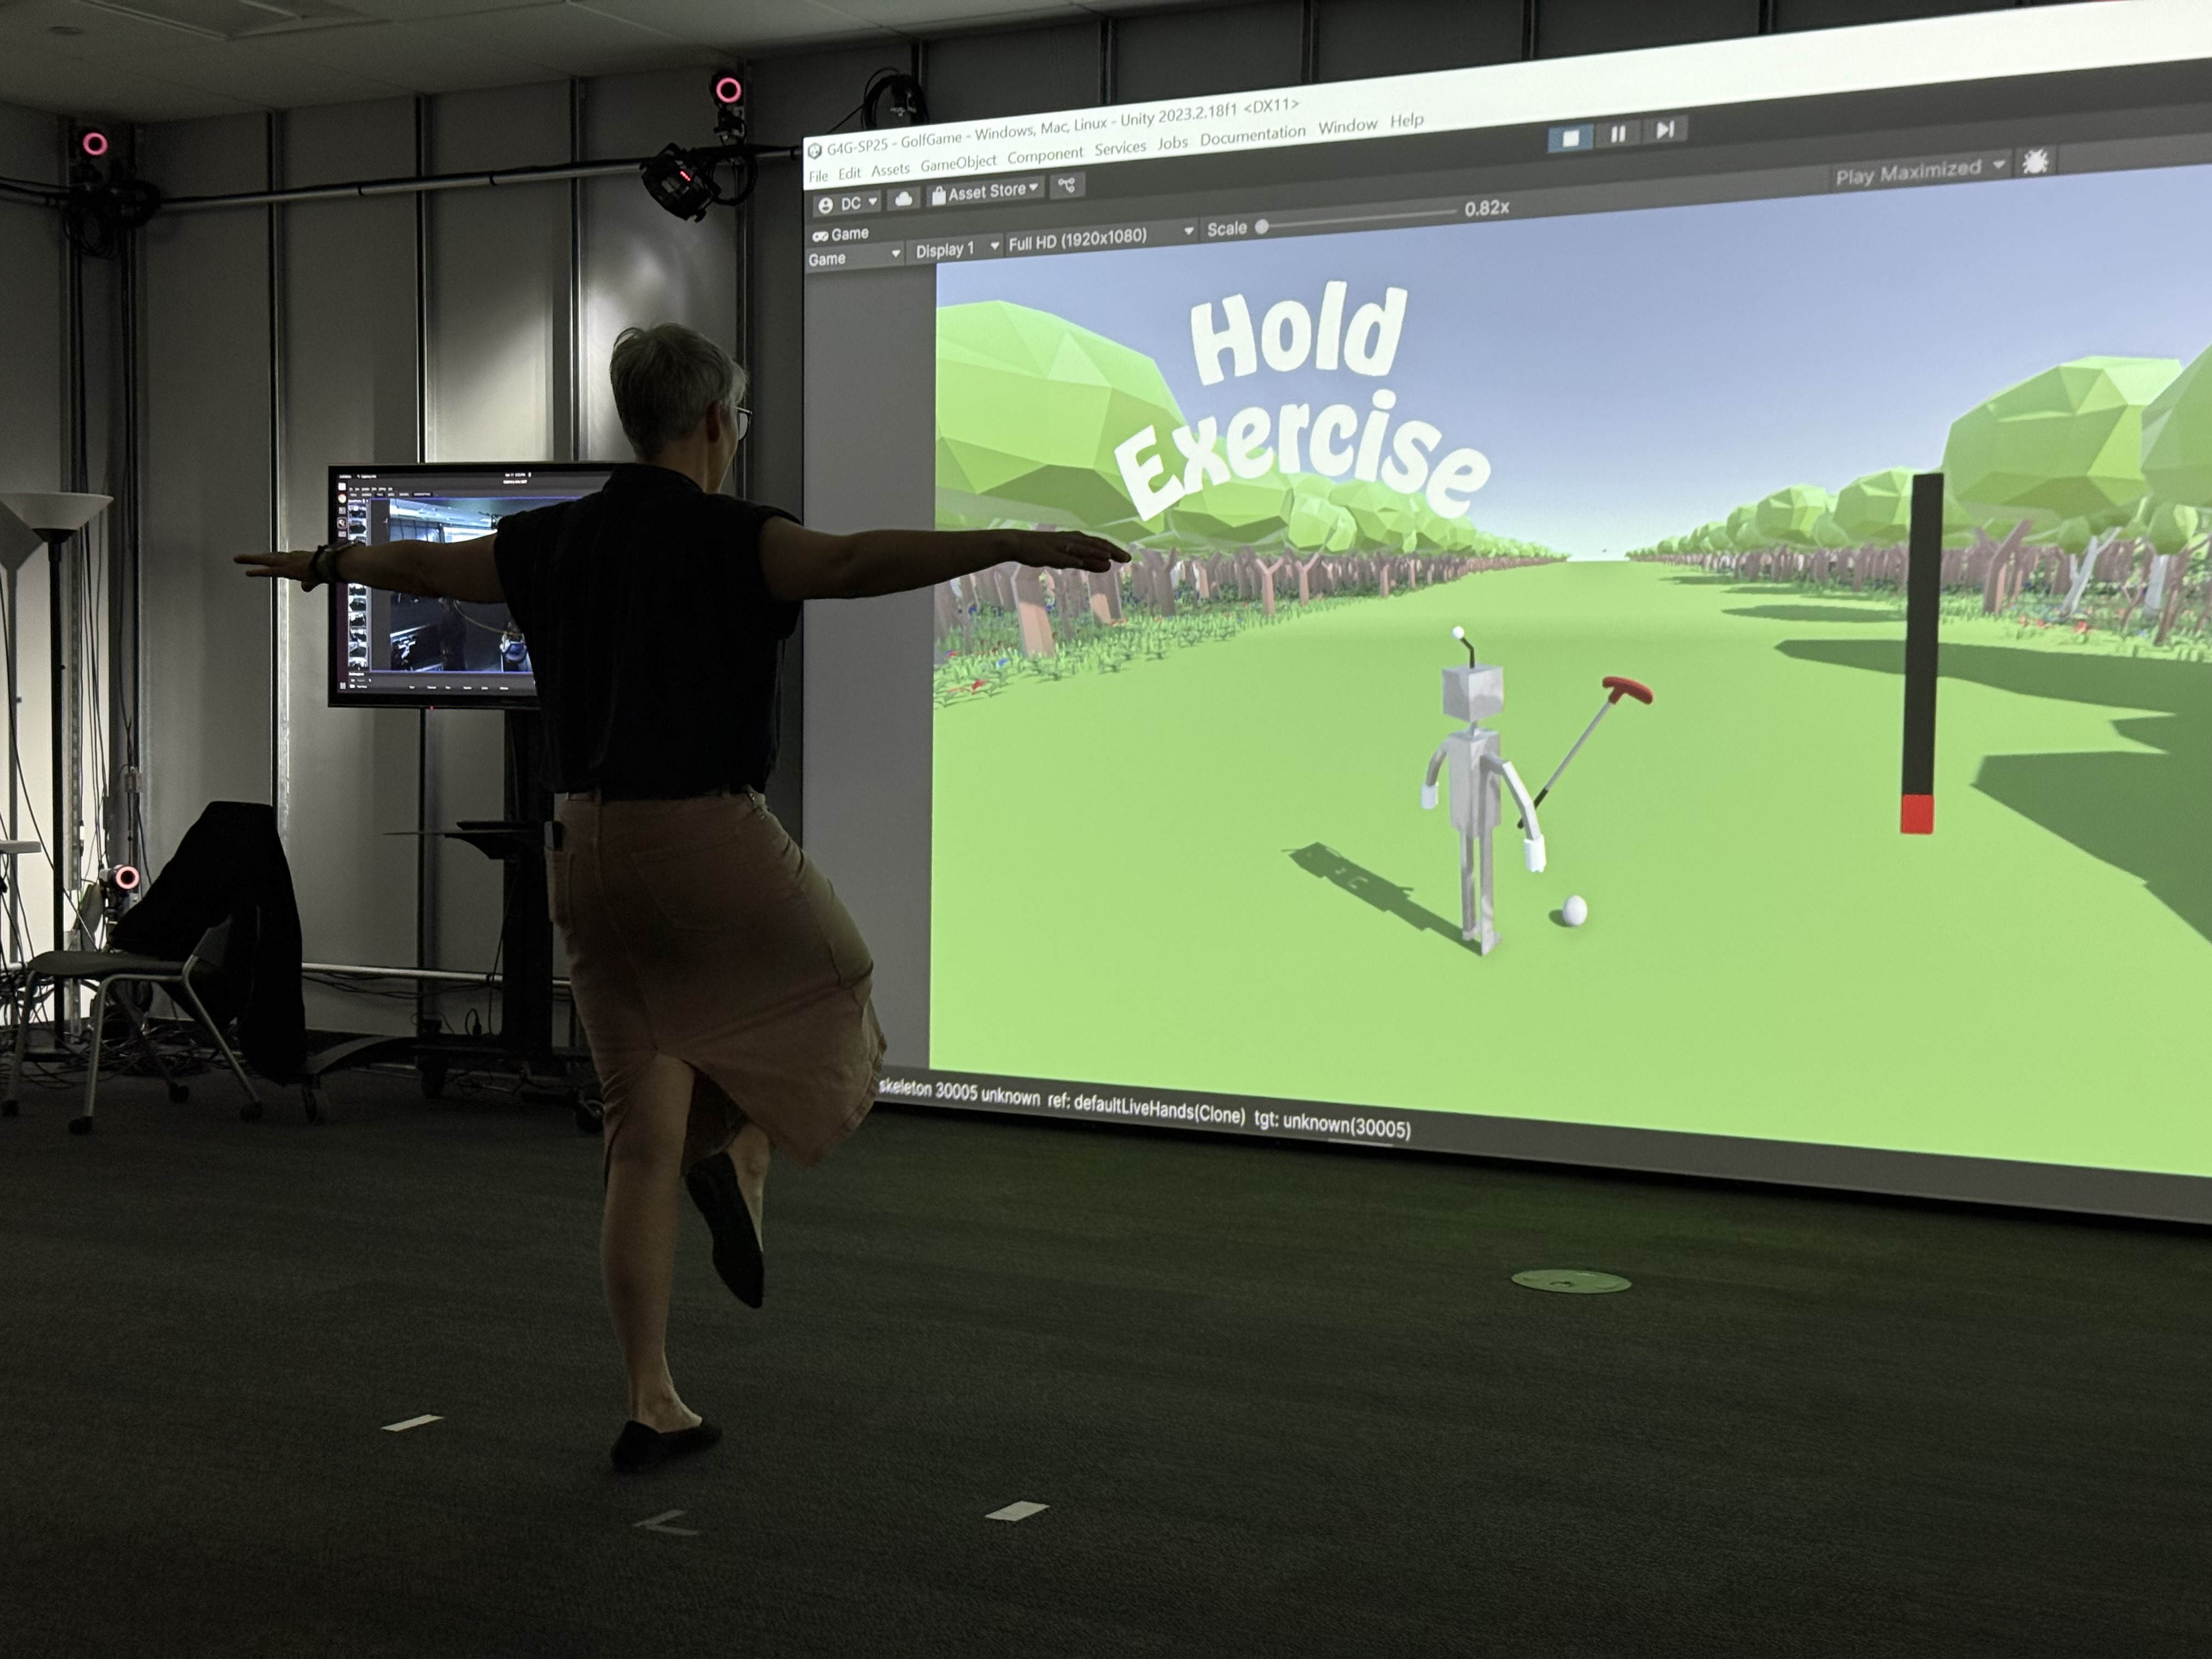
From Prototype to Toolkit
The proposal
The primary goal was a Unity toolkit and documentation that let users easily add motion capture input to their games. I aimed to:
- Provide easy-to-use tools for capturing body, arm, leg, and hand motion data
- Develop customizable settings to map movements to gameplay actions
- Create example projects, using the Fall 2025 Games for Good class as a test case
This connects directly to my career aspirations in interactive technologies, motion capture, experimental game design, and XR development. By building a tool others could build on, I wanted to deepen my own skills and contribute to the AET community.
Core principles
Modular
Enable only what you need
Configurable
Different presets for different games
Intuitive
5 minutes to set up, not 5 hours
Extensible
Future developers can build on it
Your Body as a Controller
03 / Architecture
Just like a gamepad has buttons and joysticks, the body has natural input points. This toolkit maps those movements to very usable numbers and buttons using Unity’s Input System. My vision for this project is to see people make unique, interesting experiences that stretch the possibilities of XR development. If they don’t have to spend as much time developing inputs, future developers can focus on stretching the limits of immersive development.
Architecture Overview
One of the biggest challenges with the original Spring 2025 prototype was that only one script can read a bone at a time, so the new system had to be modular. Different projects also need different control schemes, so users had to be able to enable only what they need and swap configurations easily. That pushed me toward a modular approach with a centralized control system.
Basic structure
MotionTrackingManager (Core)
  ├── TorsoTrackingModule
  ├── FootTrackingModule
  ├── ArmTrackingModule
  ├── HeadTrackingModule
  └── BalanceTrackingModule
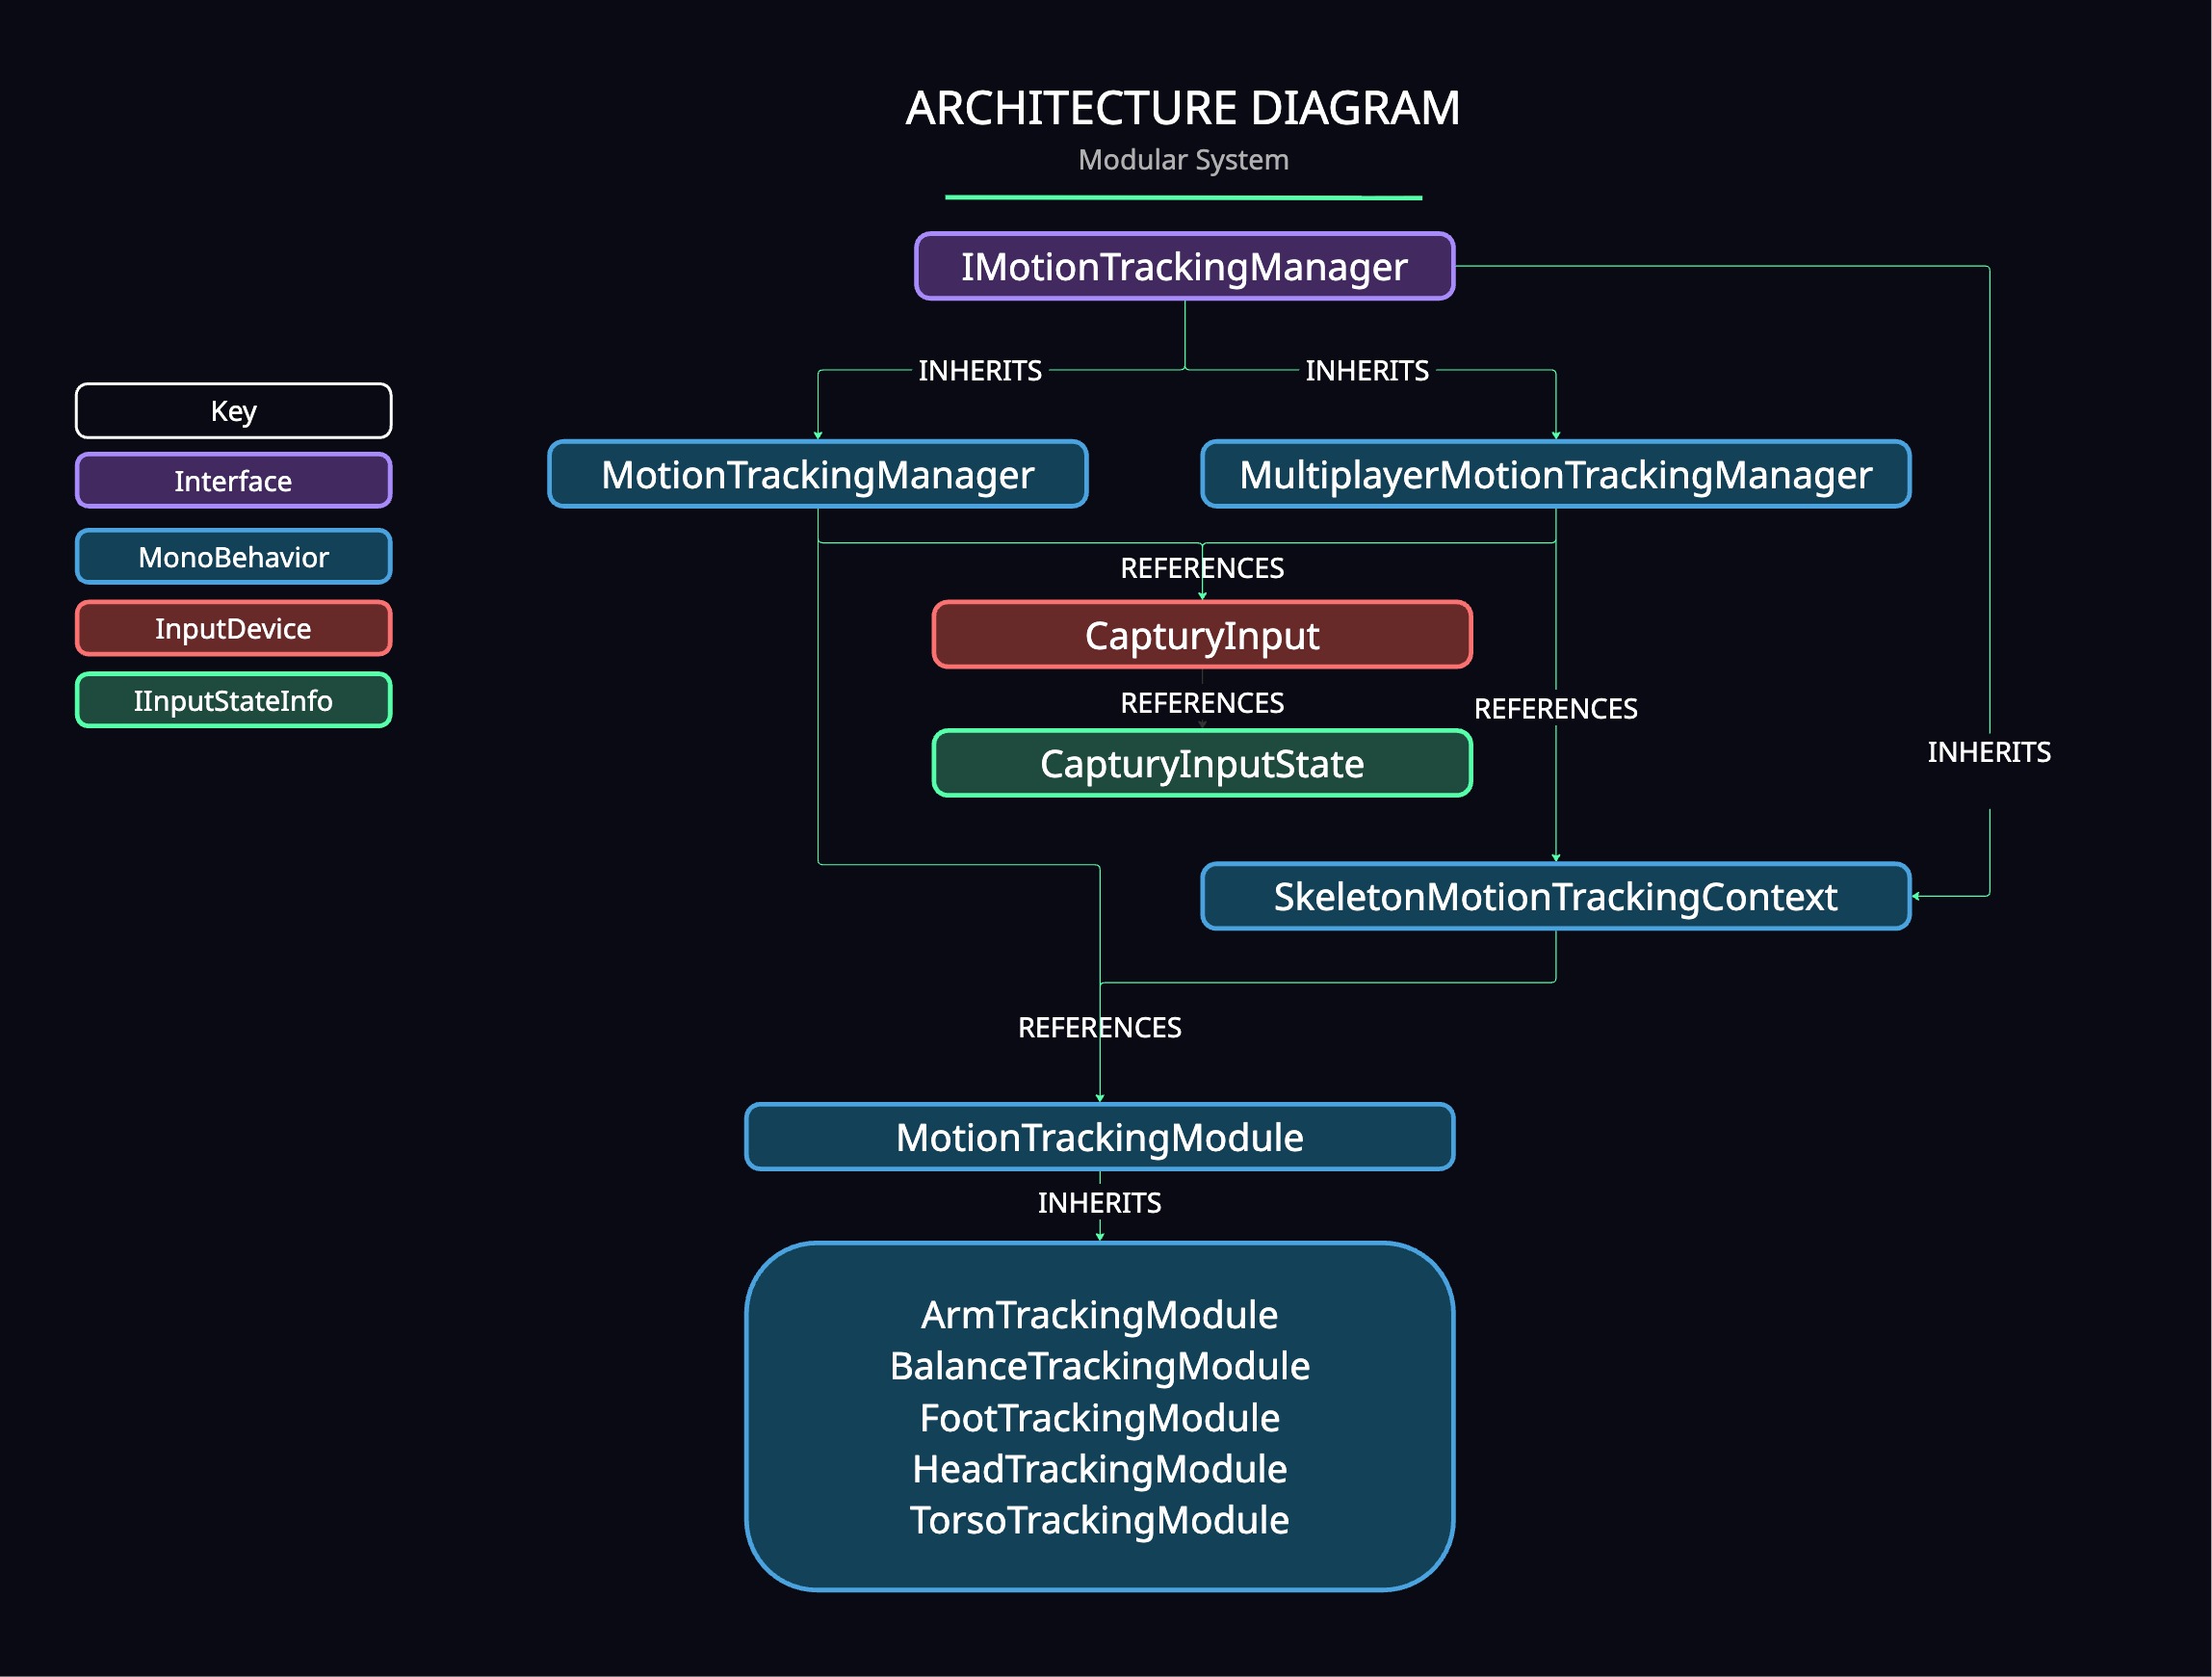
The IMotionTrackingManager interface is inherited by both MotionTrackingManager and MultiplayerMotionTrackingManager — central to the multiplayer system described below. Both reference CapturyInput, which uses CapturyInputState to create the states for different movements, reflected in the InputActionsAsset that exposes the actions in code.
The main difference between the two managers is the SkeletonMotionTrackingContext struct: for multiplayer, it holds skeleton data and motion modules per player to distinguish between skeletons. Both the manager and the context hold a list of MotionTrackingModules, and all five module types inherit that base class, created based on configurations.
Configuration system
Configurations are easy to create thanks to a ScriptableObject class, MotionTrackingConfiguration, that holds every exposed variable for the modules: whether modules/movements should be tracked, sensitivity, thresholds, and tracking settings. It also contains the names of every joint on the skeleton, defaulting to the correct names from the Captury plugin. Swapping configurations is simple via a method in the MotionTrackingModule class.
Calibration system
Many modules depend on relative positioning and knowing where “neutral” is. The previous version taught me that calibration is critical and developers need as much control over it as possible. Alongside an exposed calibration delay parameter, I included a Recalibrate function in MotionTrackingModule so users can reset neutral positions as needed.
The Pipeline: From Movement to Input
Before diving into the modules, it helps to understand how movement actually becomes game input. The pipeline has three stages.
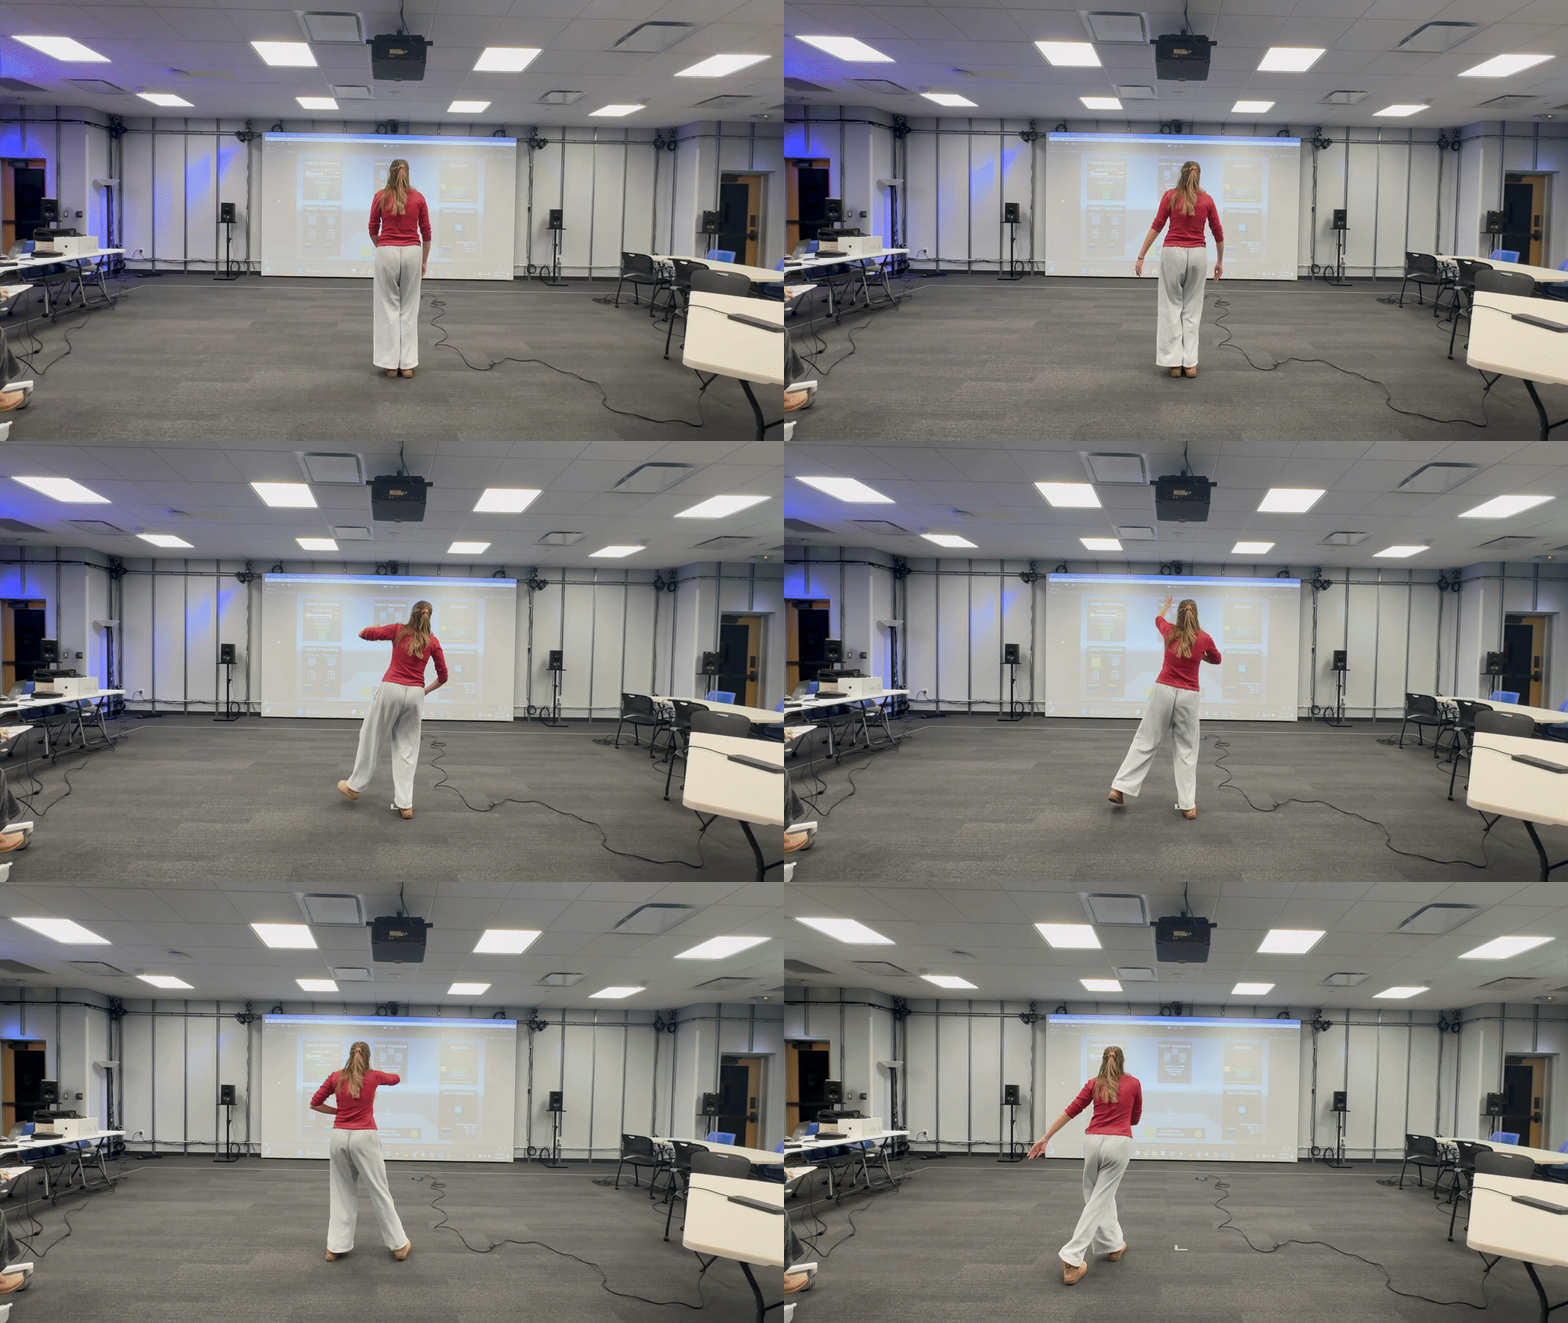
Stage 1: Camera capture
The LIM Lab’s array of high-speed infrared cameras captures the player from multiple angles, constantly tracking anyone in the volume. Unlike marker-based capture, the Captury system needs no special suit — it reconstructs your skeleton from camera footage alone.
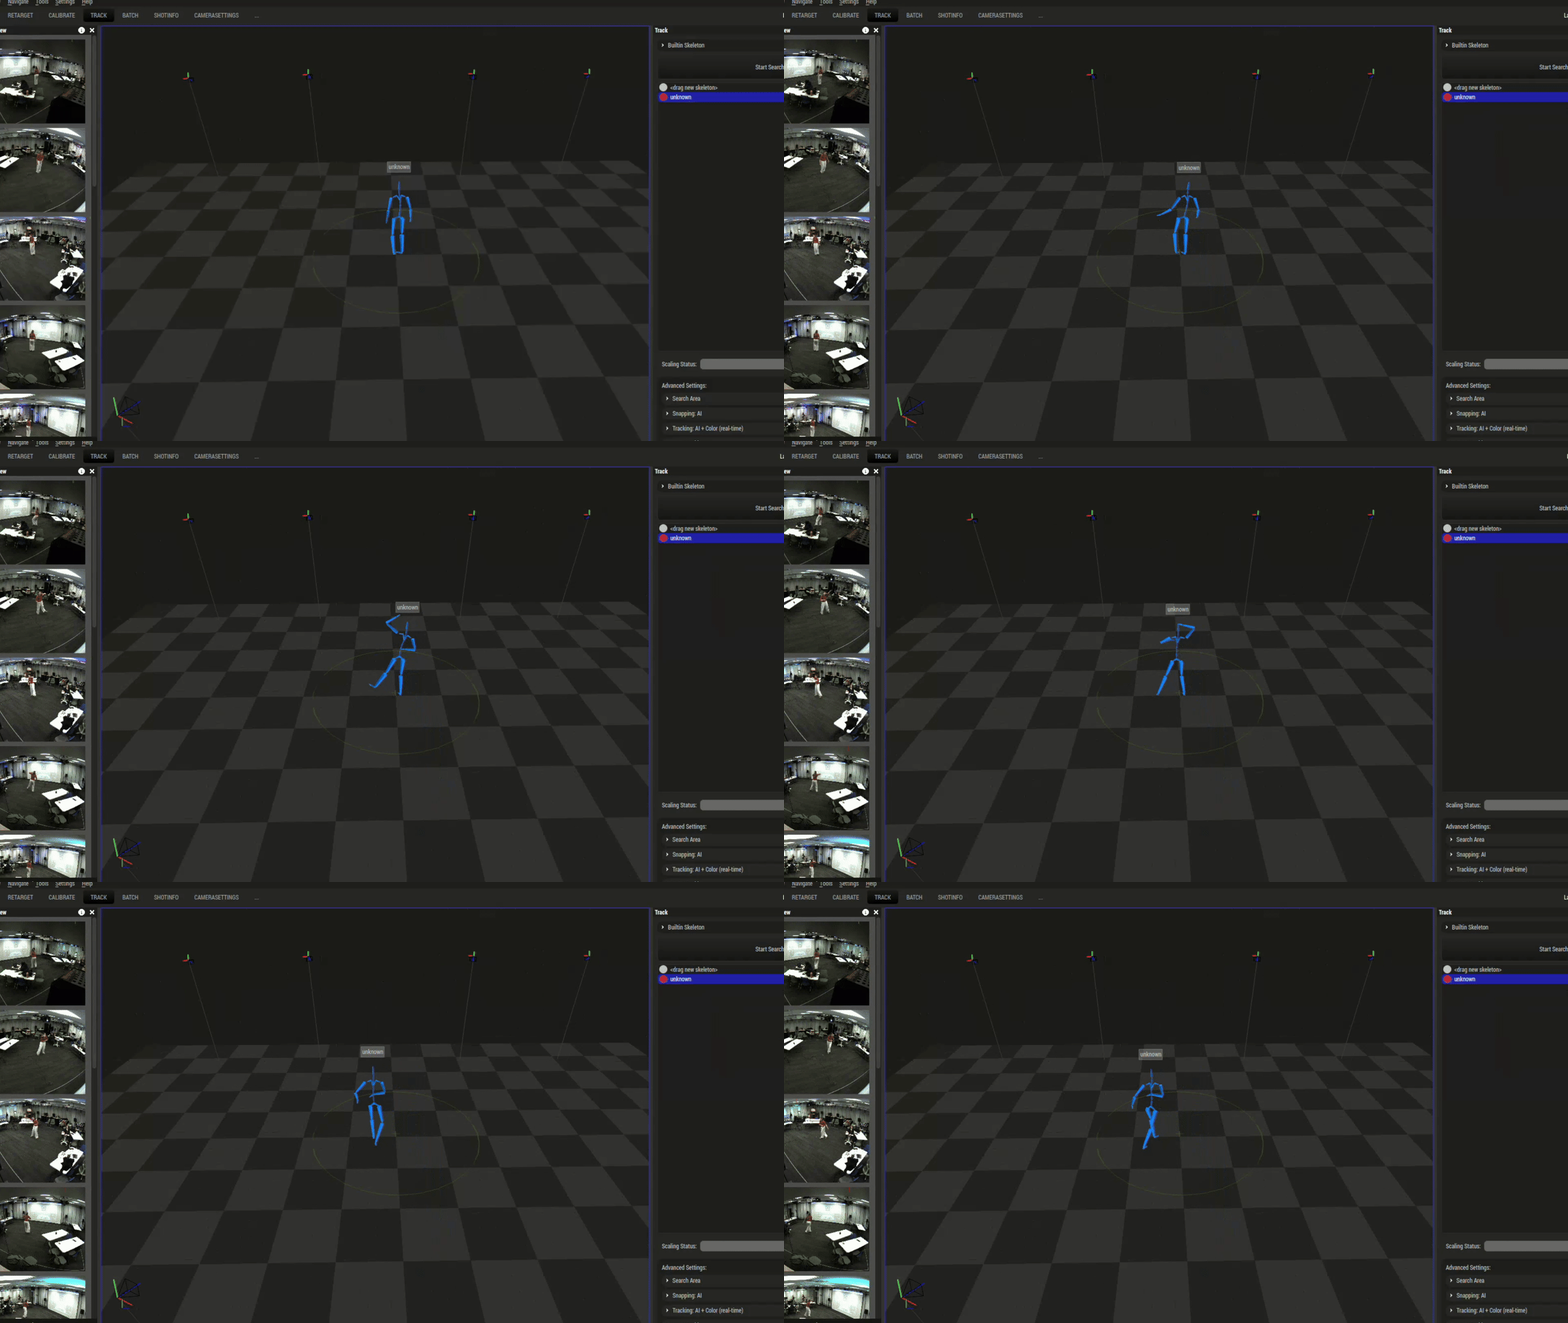
Stage 2: Skeleton generation
The Captury software processes those feeds in real time into a 3D skeleton: a hierarchy of joints — head, spine, shoulders, elbows, wrists, hips, knees, ankles — each with position and rotation updating dozens of times per second. Captury streams this over the network.
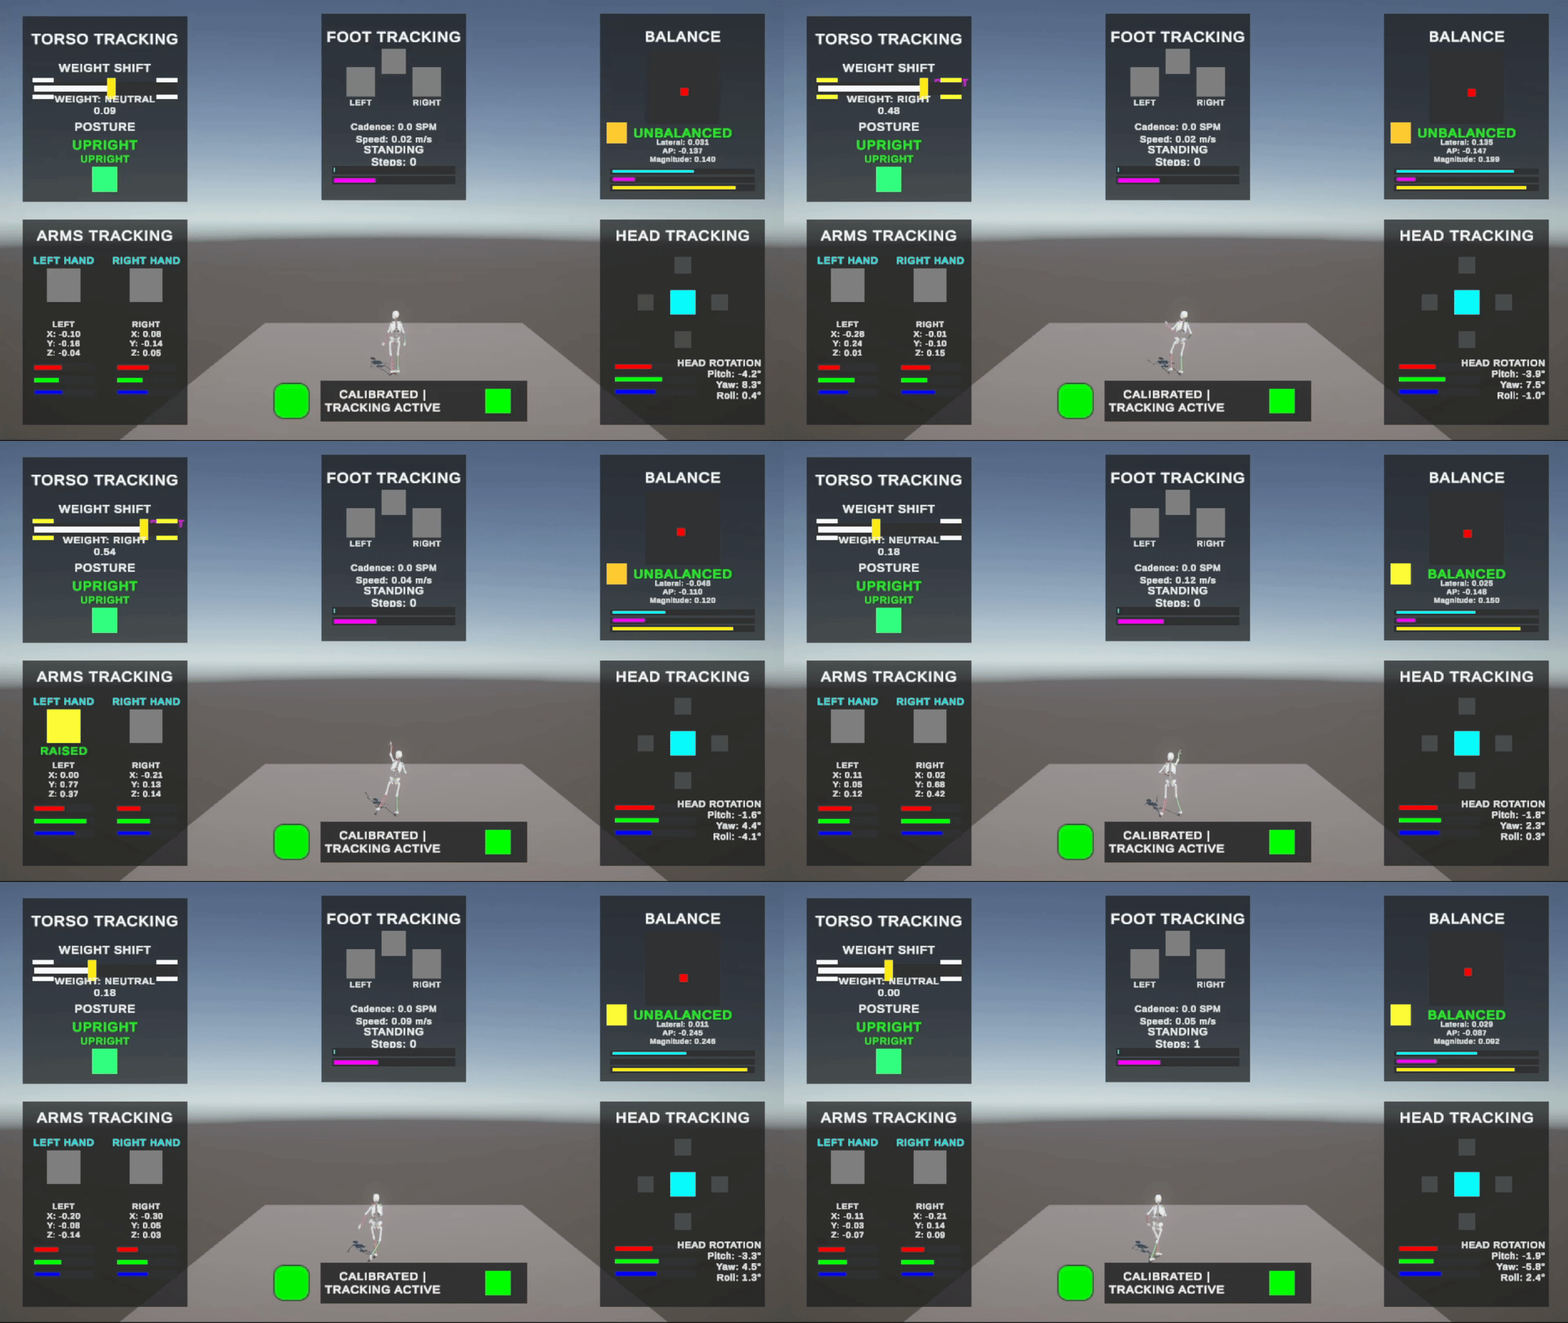
Stage 3: Toolkit interpretation
Unity receives that stream through the Captury plugin. At this point we have a moving skeleton, but it’s just raw joint data. That’s where the toolkit comes in: it interprets the skeleton’s movements and translates them into input actions developers already know how to use.
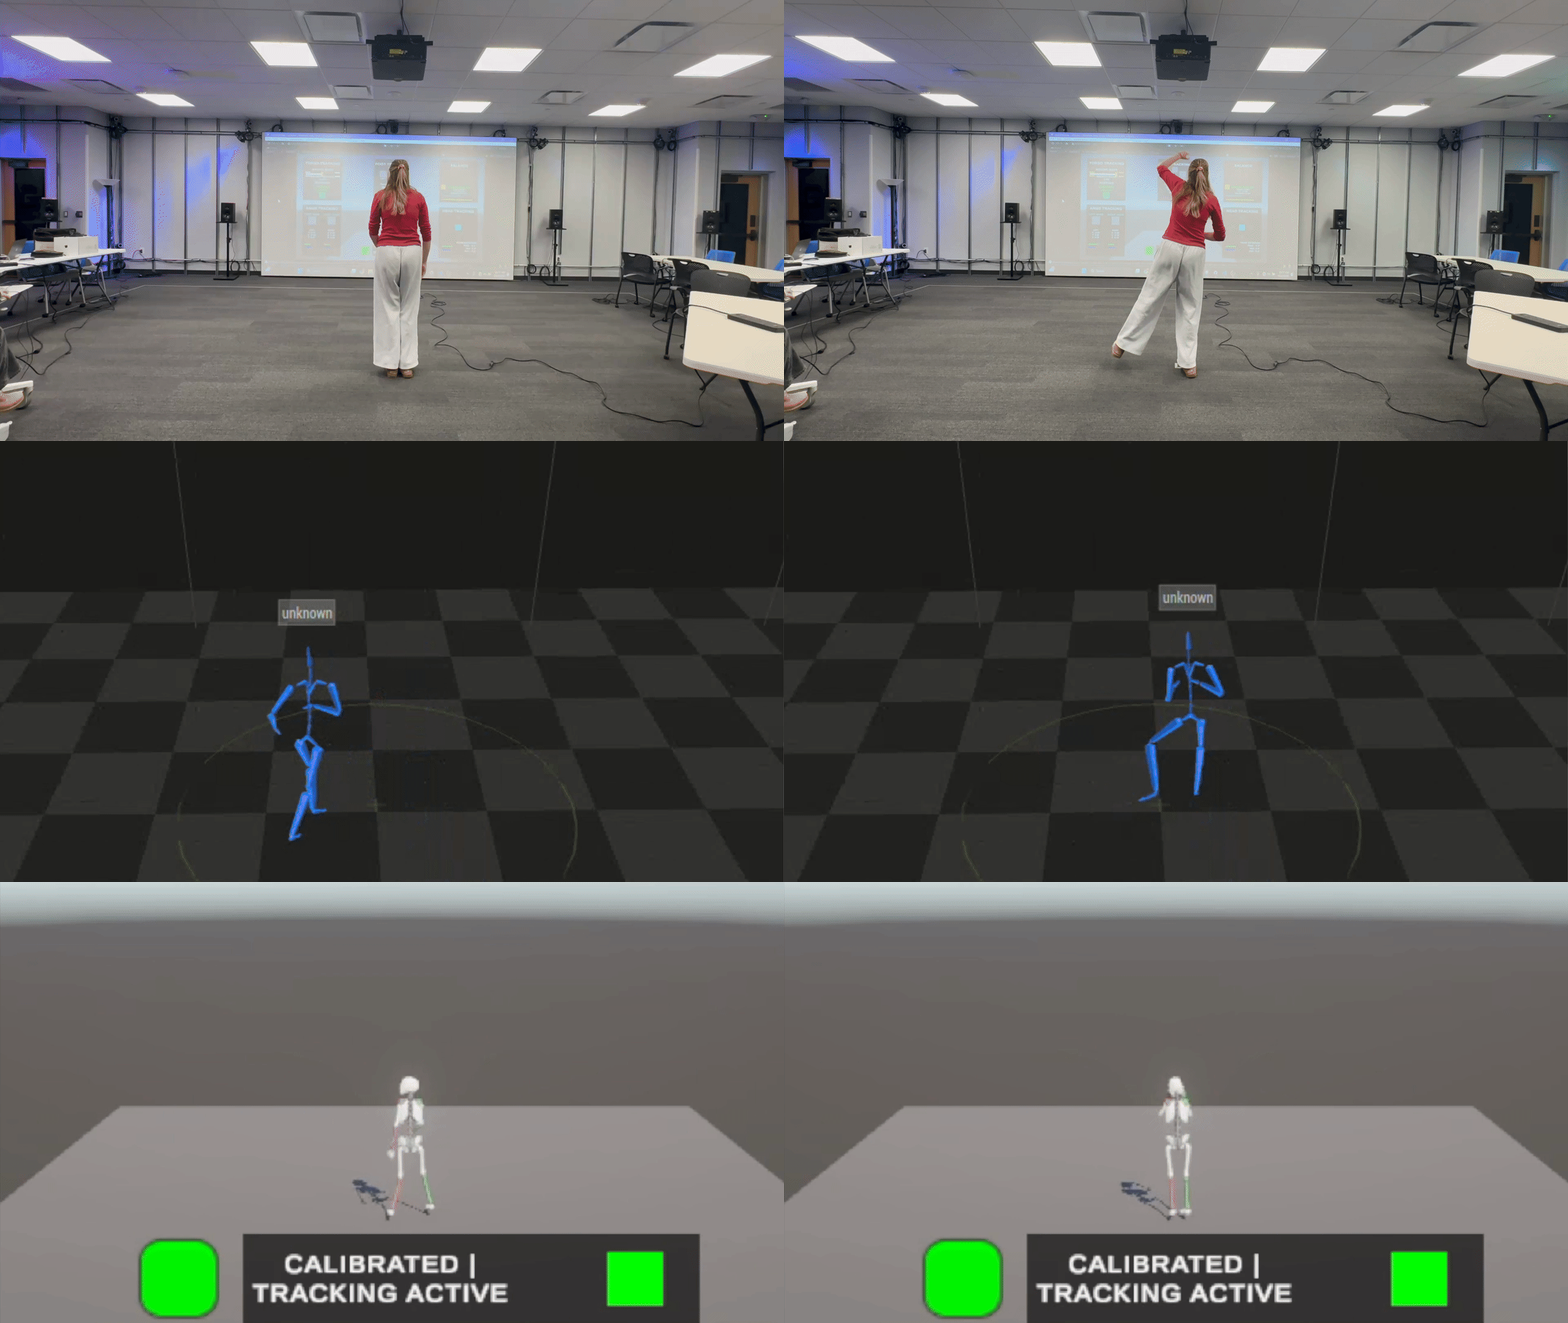 05 / Modules
The Five Modules
Each module inherits from a base class, MotionTrackingModule, which holds shared logic and several abstract methods each module overrides: Calibrate, UpdateTracking, the boolean HasRequiredMethods, and the string array GetRequiredJointNames. For each module below, I cover the joints it tracks, the movements it detects, how, and the technical challenges I hit.
Torso Module
I began with Torso because I’d already developed weight-shift controls for it in Games for Good — along with the relative-positioning problems that became a recurring theme. I wanted a system that worked regardless of the player’s position in the room, so I needed a workaround for that.
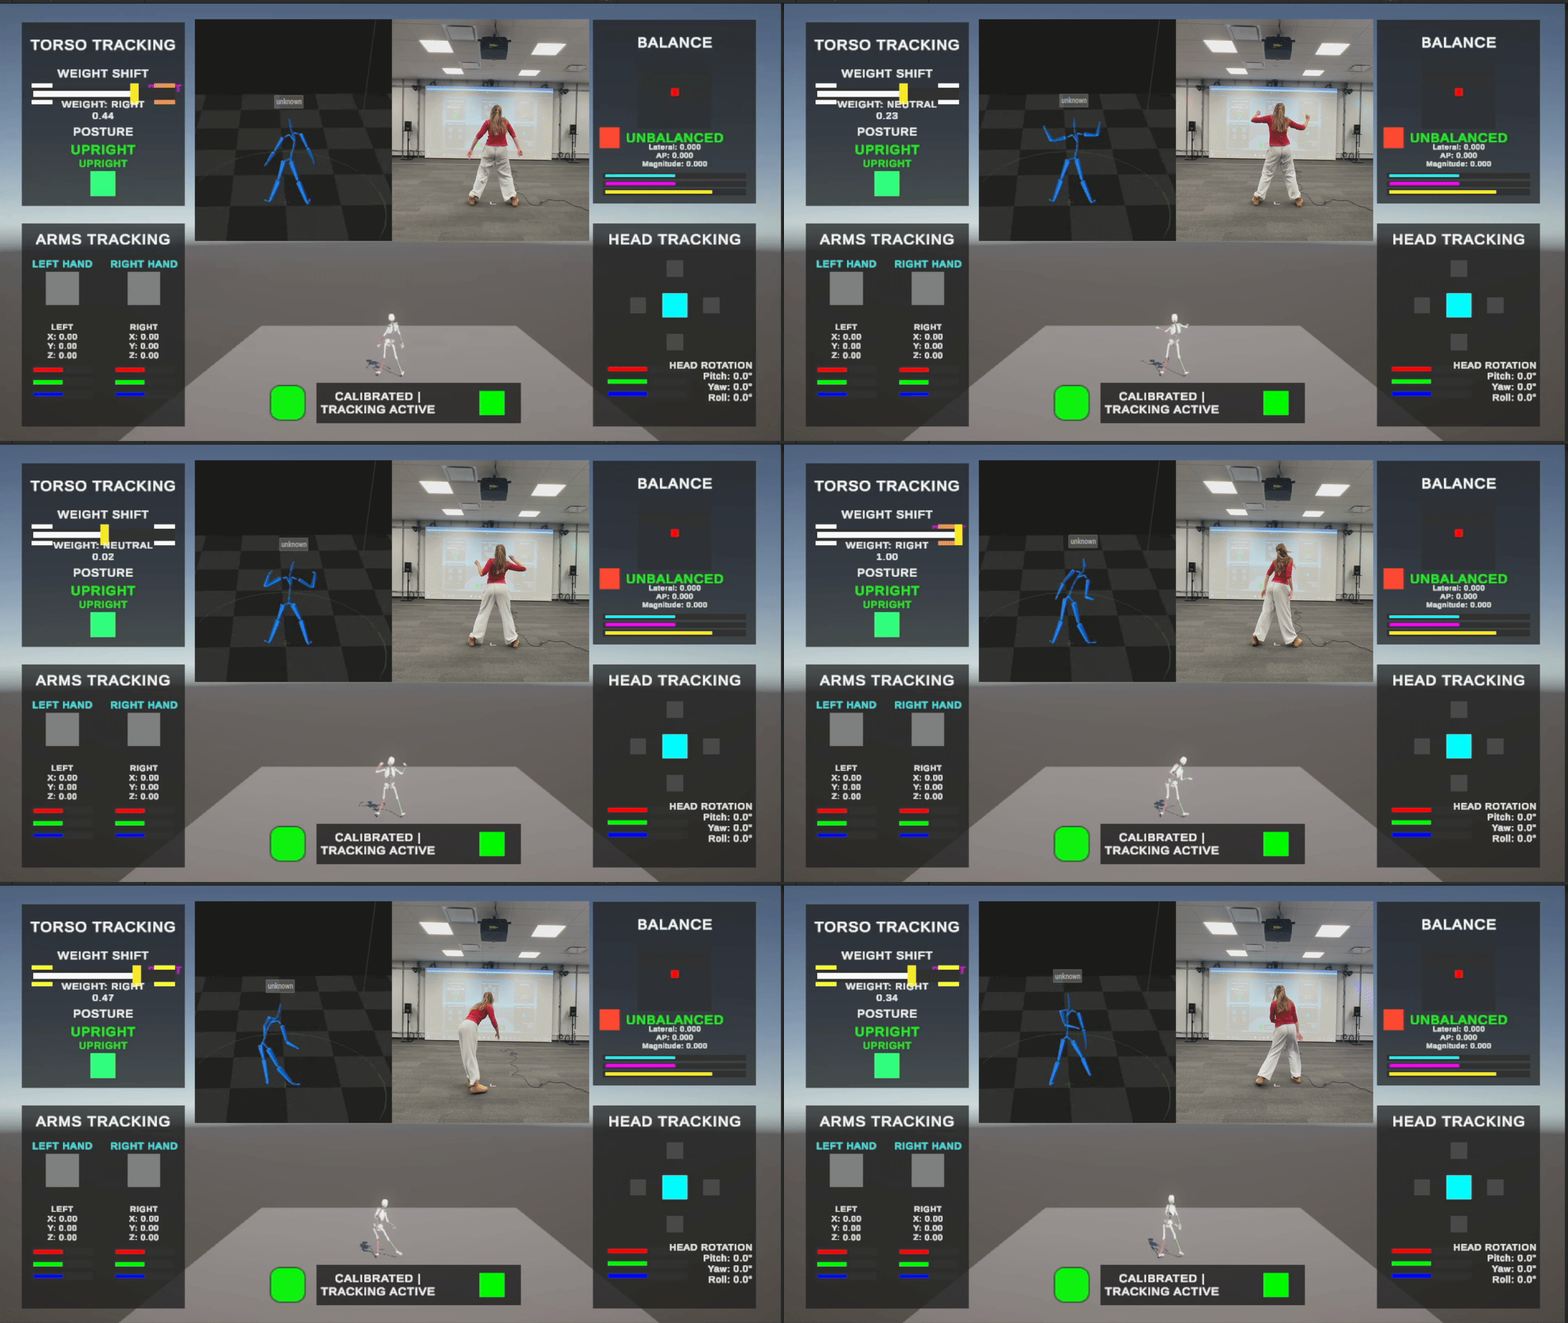
The Torso module tracks: weight shift (left/right), posture (upright vs. bent over), and pelvis position (XYZ).
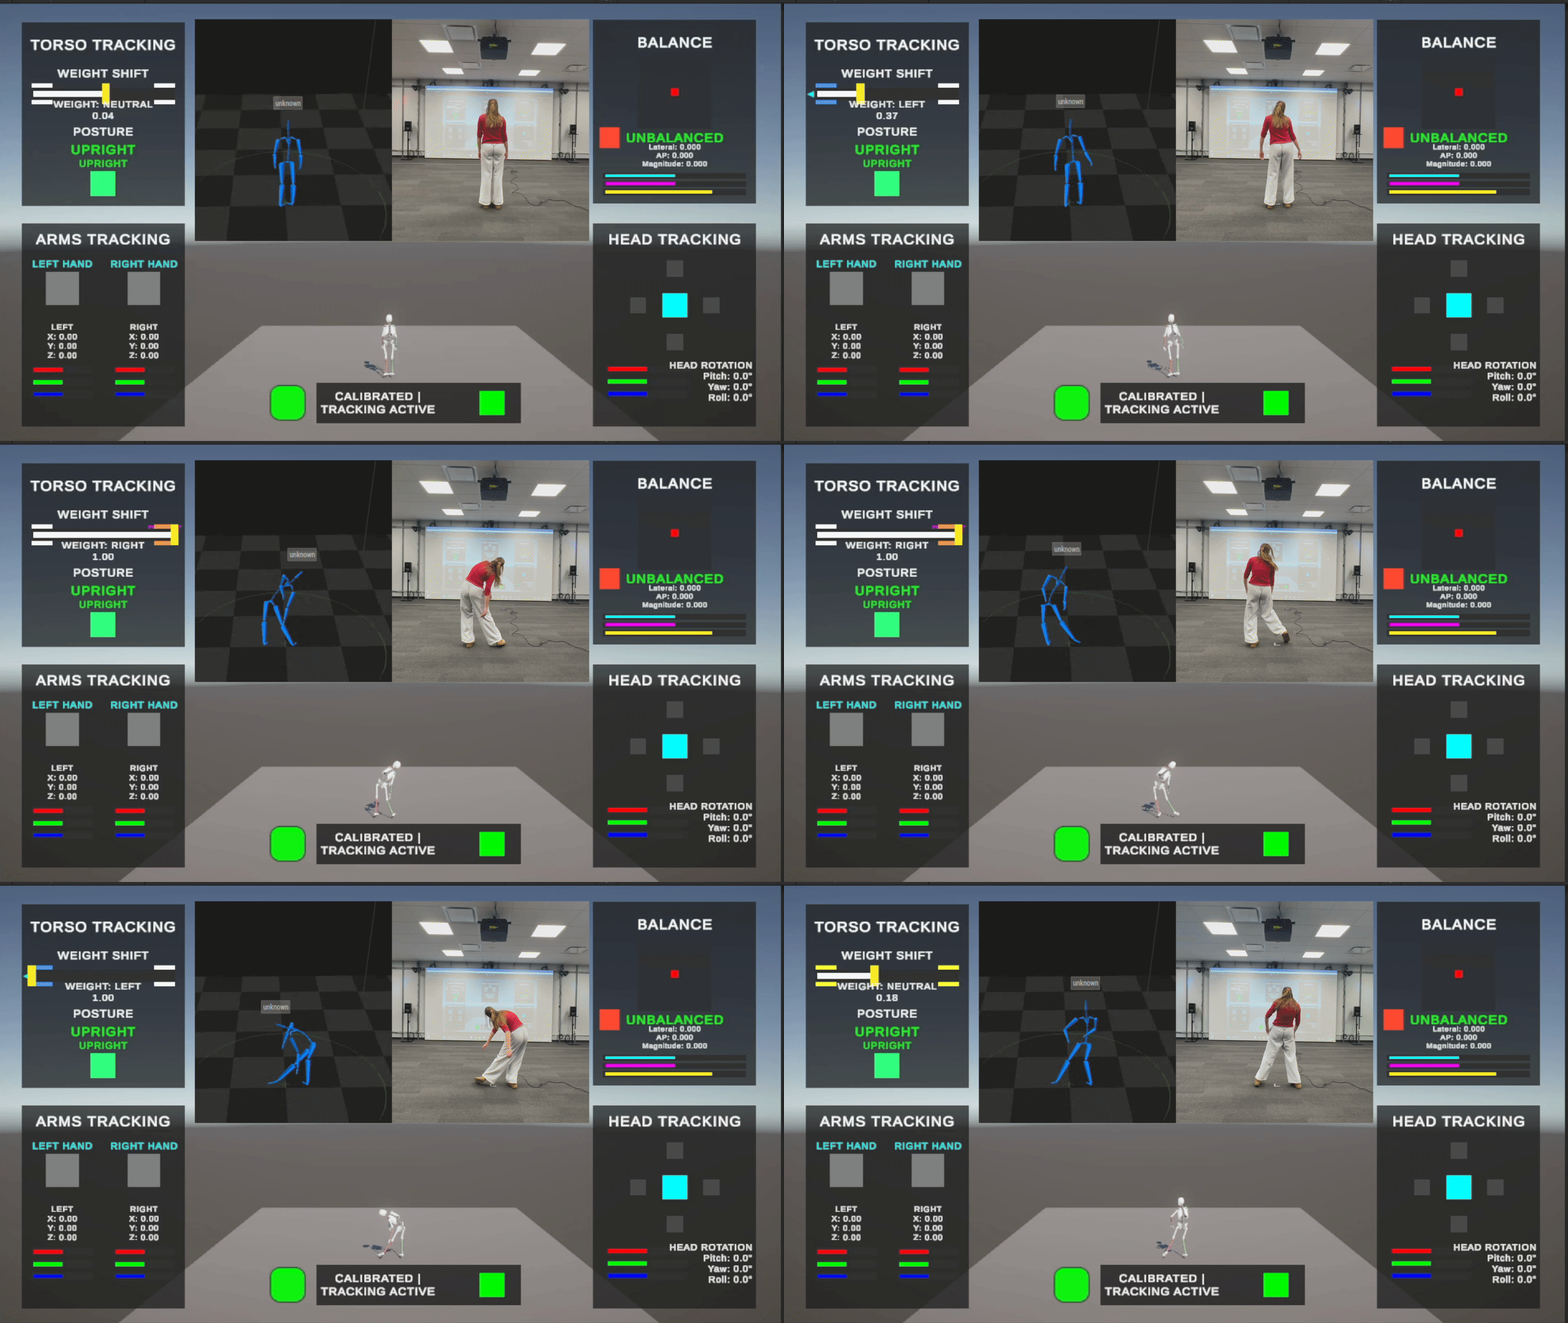
Weight shift
Weight shift is calculated by initially taking the position of the pelvis as compared to the lowest joint in the spine and then multiplying it by the sensitivity level of the module. This number is divided by the weight shift threshold defined by the configuration, then mapped from -1 to 1 to create an axis. The WeightShiftLeft and WeightShiftRight button states activate based on threshold crossings.
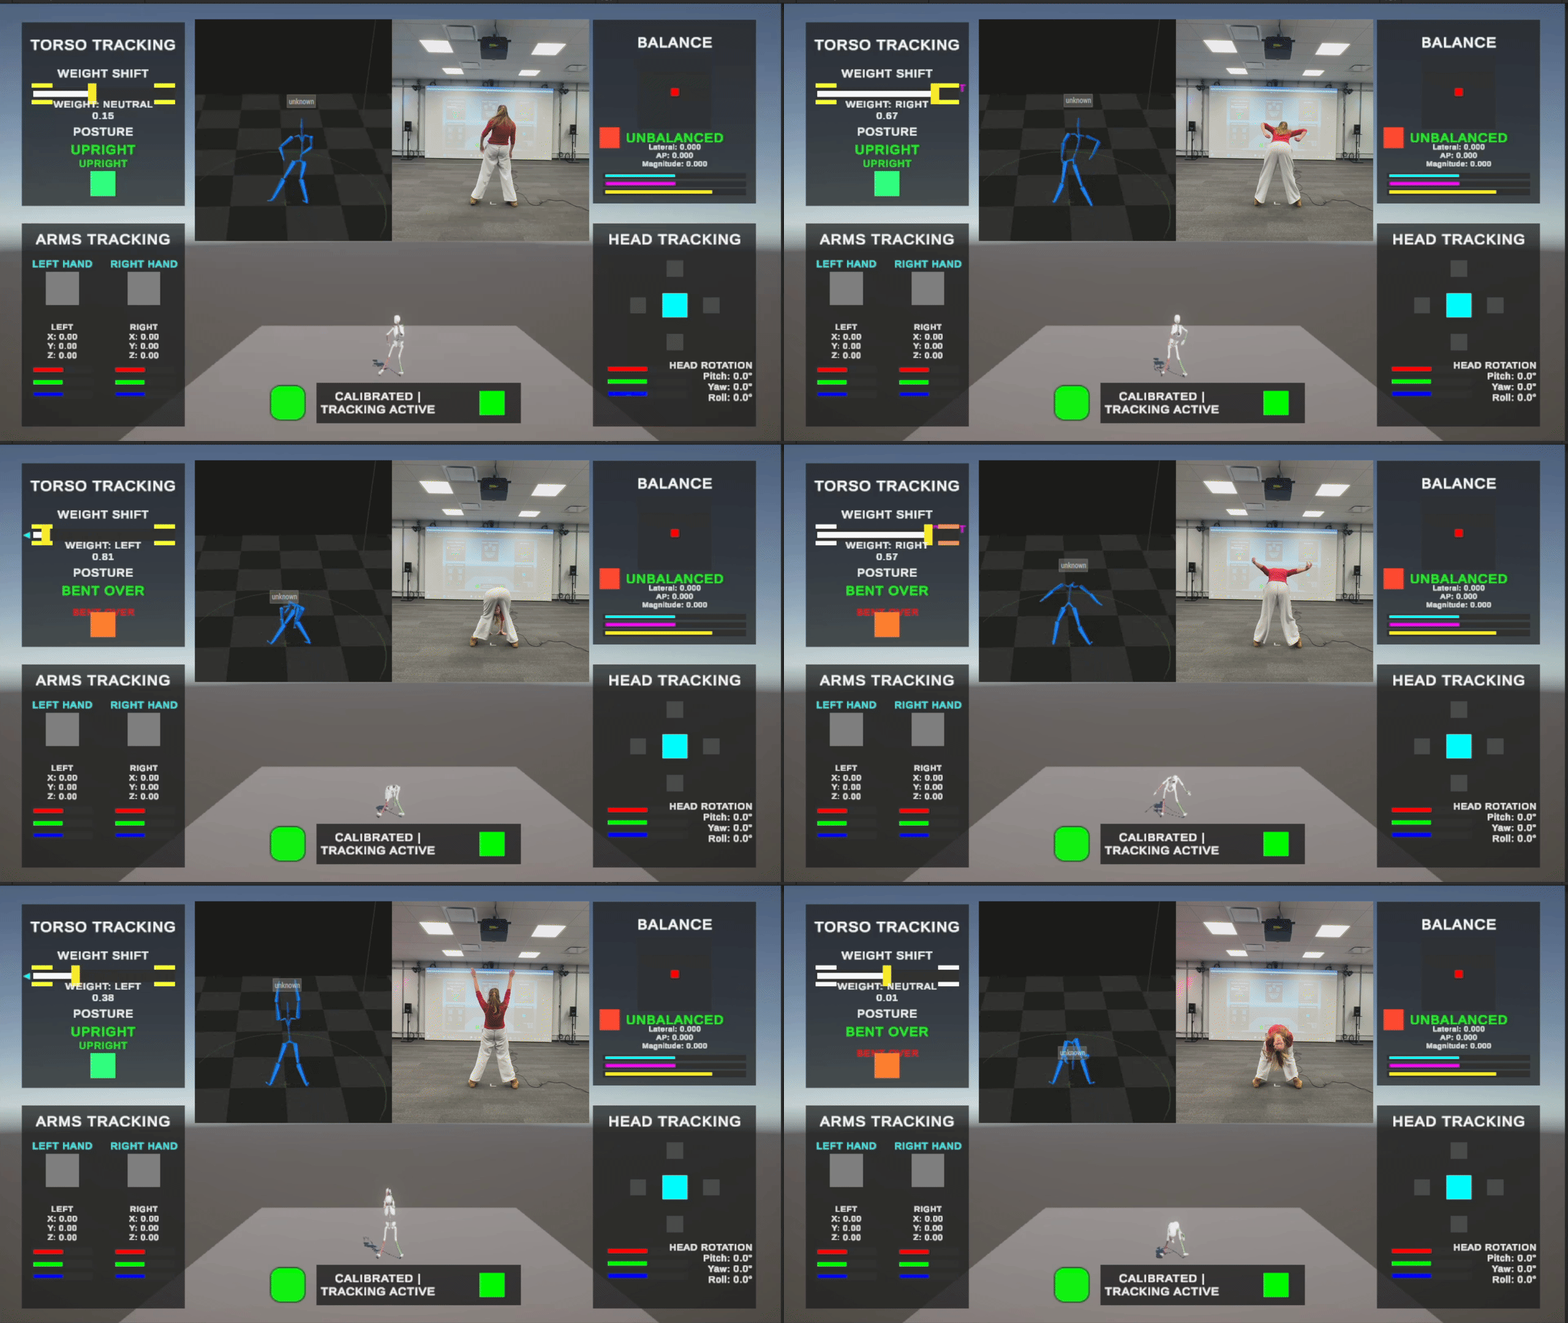
Posture detection
To determine if the skeleton is bent over, the absolute value of the relative rotation is taken. If the rotation difference is more than the bent over angle threshold (set at 30 degrees in the default configuration), the skeleton is determined to be bent over. This is communicated through a button state.
Technical Challenge
Distinguishing weight shift from walking. The solution was to track the relative position between pelvis and spine, as well as have a whole body movement threshold (set at 3 in the default configuration). If the movement ratio of the spine to pelvis is greater than the threshold, then the shift amount is automatically set to 0.
Foot/Leg Module
The second module was Foot/Leg, which I again had a basis for from Games for Good. I knew Dr. Hsiao, the researcher from that class, is particularly interested in walk detection — specifically gait analysis, the study of how people walk and the stride-to-stride fluctuations that can reveal everything from fall risk to neurological conditions.
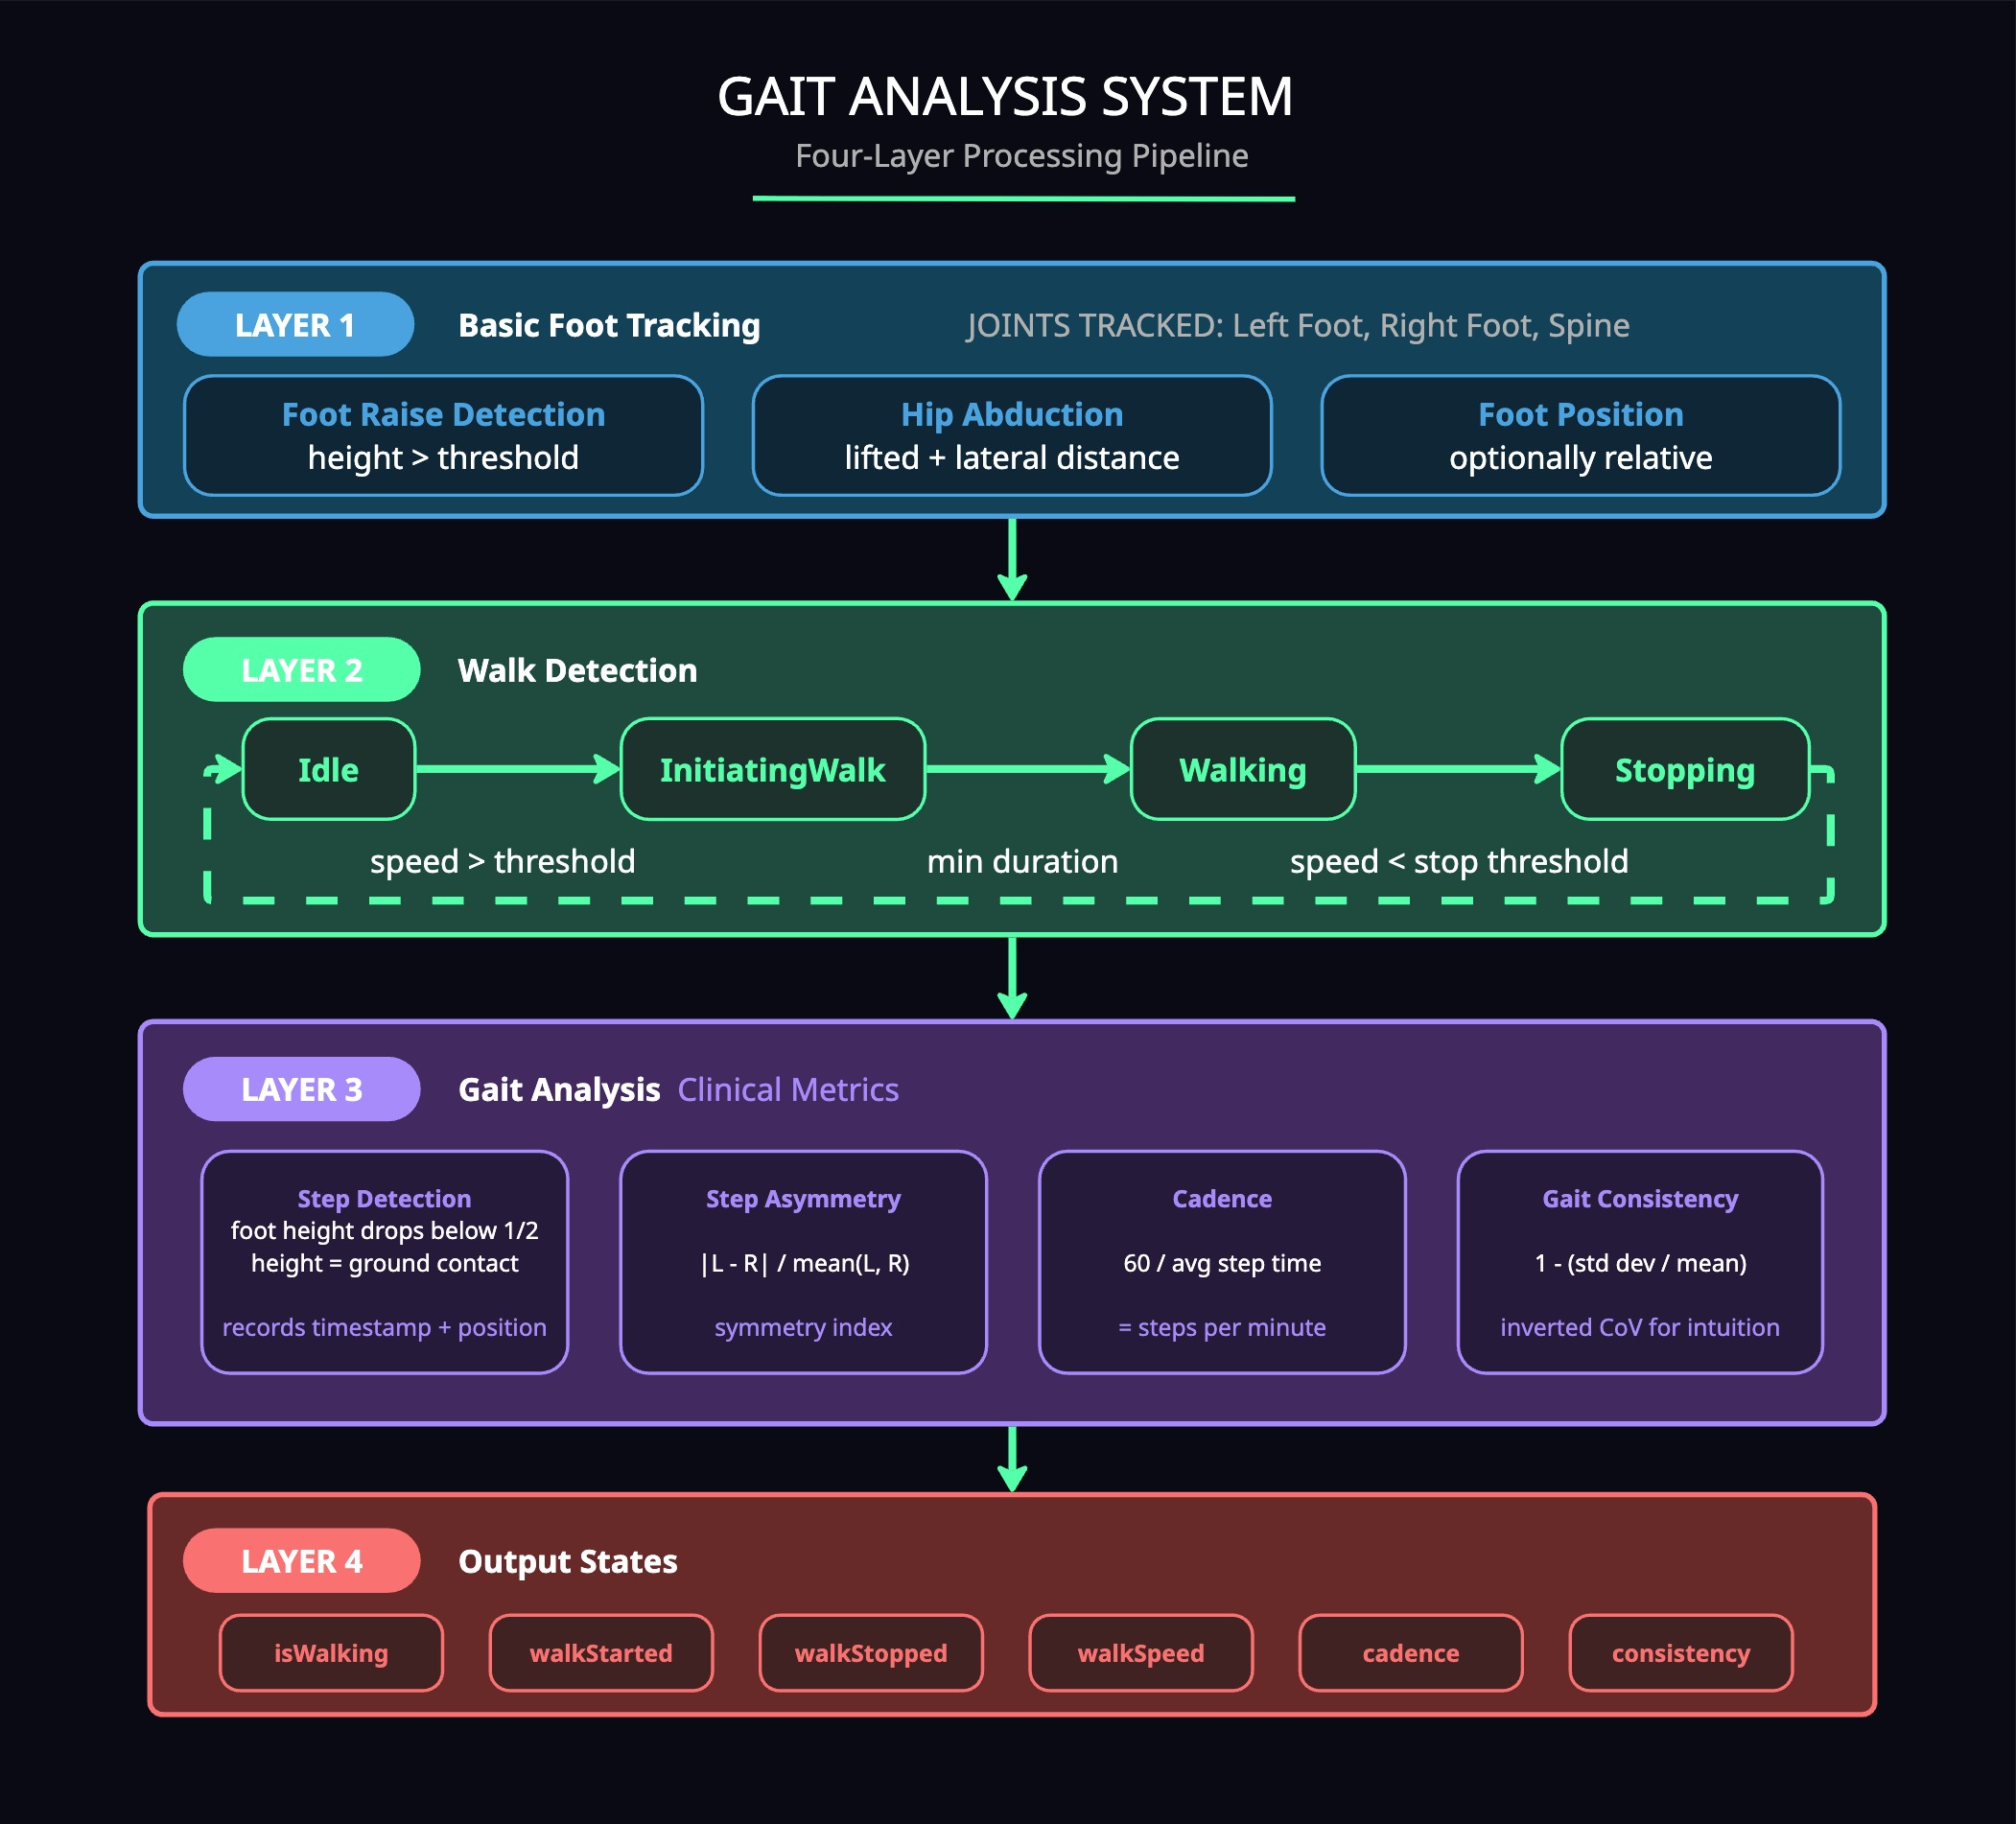
The module tracks: foot raised/lowered states, hip abduction, foot position, step detection, walking state, walking speed, and various gait analysis metrics, including step timing, step asymmetry, cadence, and overall gait consistency.
Joints tracked: Left foot, right foot, spine (used instead of pelvis to avoid conflicts with Torso module).
I designed a four-layer system where each layer builds on the previous, allowing for varying layers of complexity for the end-user.
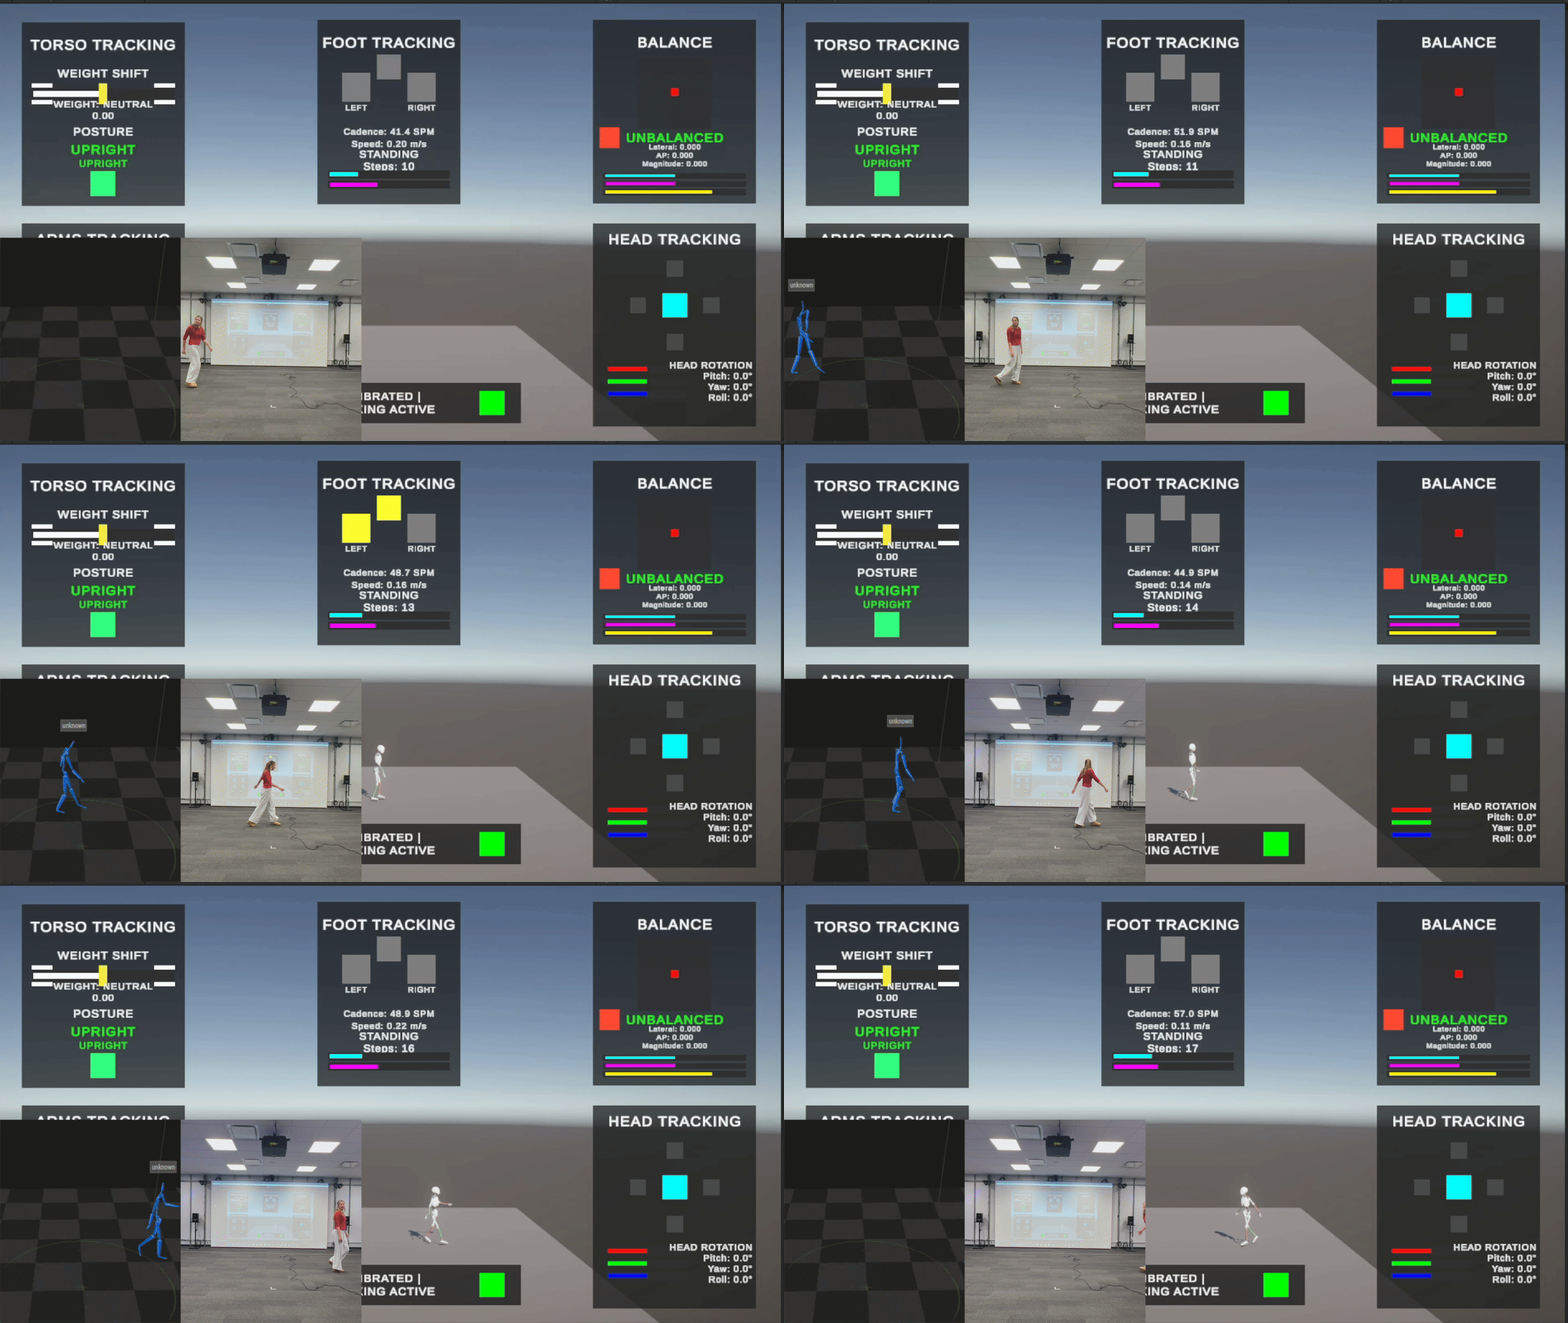
Layer 1: Basic foot tracking
This layer always runs. Foot raise detection checks if the foot height above the calibrated ground exceeds a threshold. Hip abduction tracking checks two conditions: the foot must be lifted past a minimum height, AND the 2D distance from the foot to its neutral position must exceed the abduction threshold. This prevents false positives from just lifting your foot straight up.
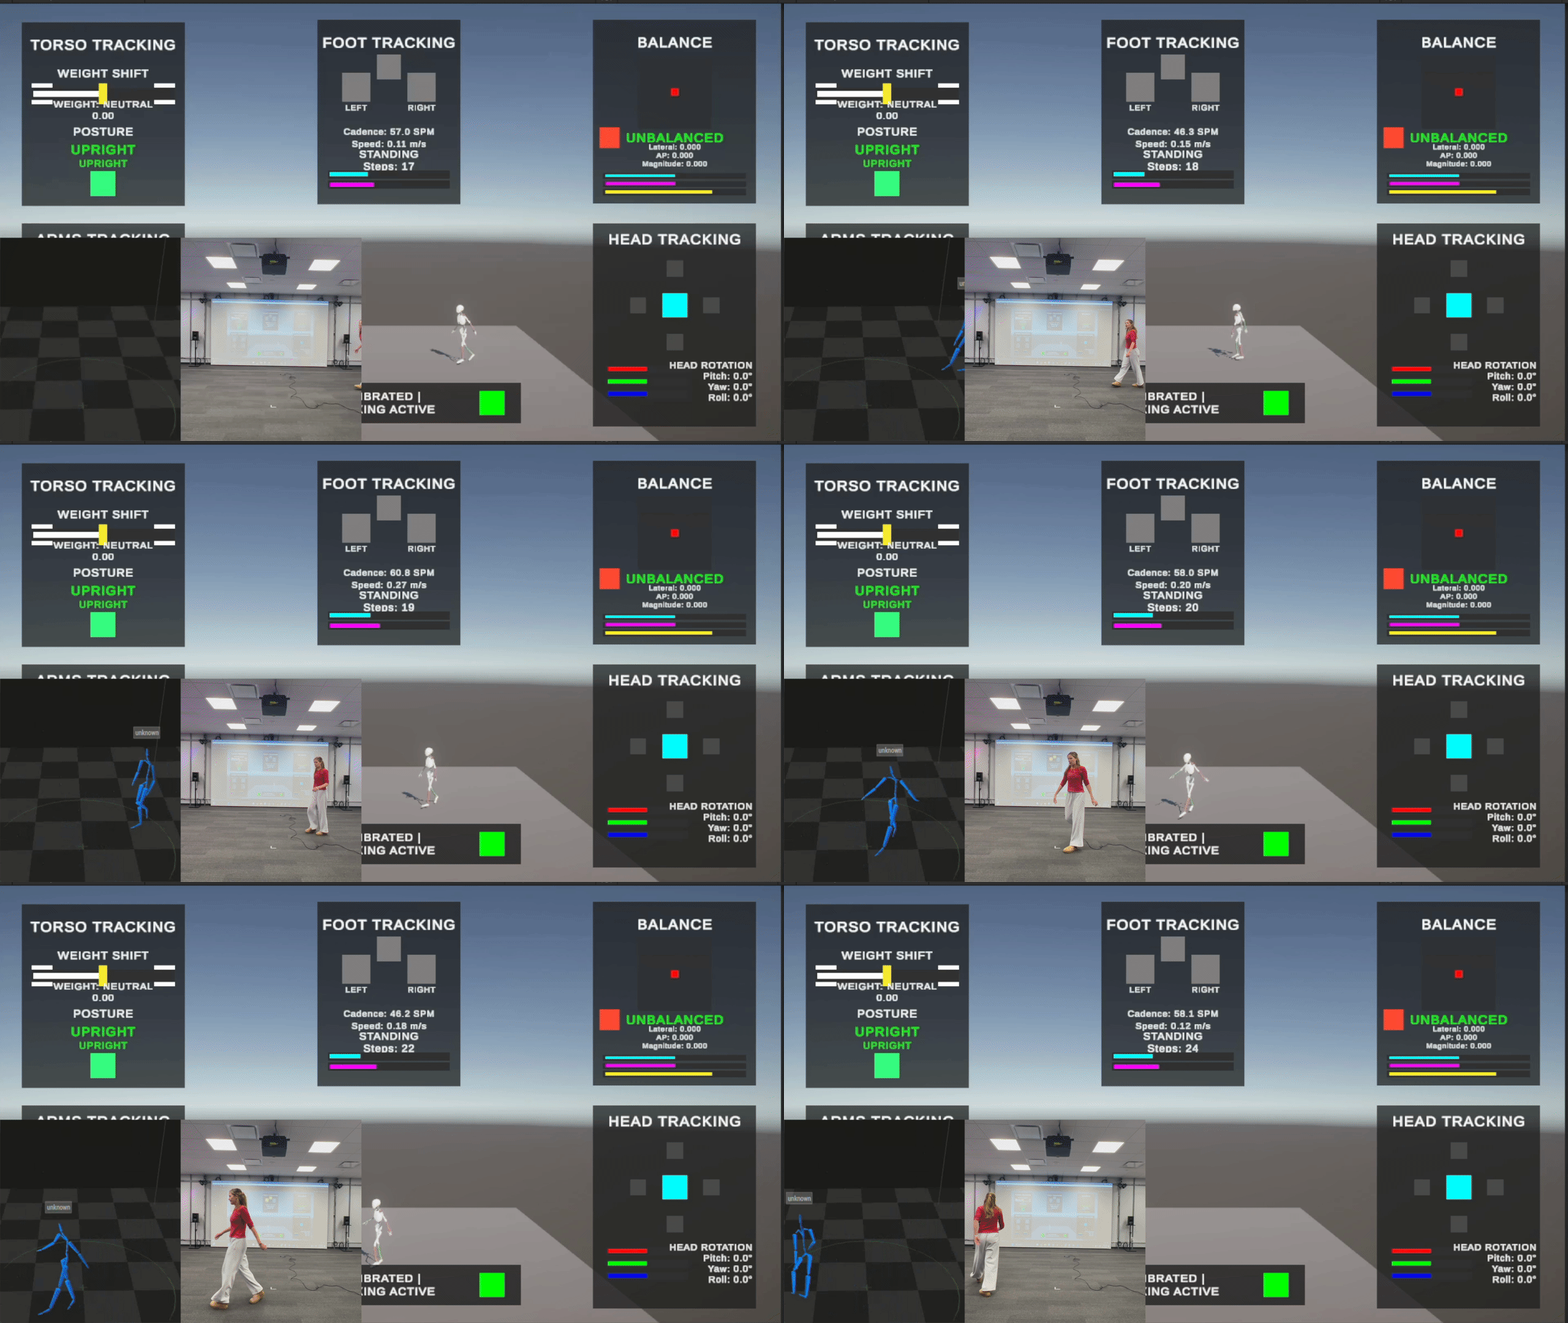
Layer 2: Walk detection
Uses a state machine with four states: Idle → InitiatingWalk → Walking → Stopping. I calculate current speed by looking at the last 30 frames of spine position history (~half a second at 60fps). The state machine uses separate start and stop thresholds to prevent jitter — you have to cross above the walk threshold to start, but you don’t stop until you drop below a lower threshold.
Layer 3: Gait analysis
This layer took the most research. When a foot drops below half of the minimum lift height, the system considers that ground contact and records a step event with timestamp and position. I maintain separate contact times for each foot and a history of recent step times.
Step time asymmetry
Uses the symmetry index: |L - R| / mean(L, R). This approach is scale-invariant — it doesn’t depend on overall walking speed — and doesn’t require knowing which side is the “bad” side, important for rehabilitation applications. Studies show that a symmetry index below 10% indicates normal, symmetrical gait.
Cadence
Calculated as 60 / average step time = steps per minute. Clinical research indicates healthy adults average 90–120 steps per minute for comfortable walking, so I had clear target ranges for the default configuration.
Gait consistency
Based on coefficient of variation (standard deviation / mean). Clinical research shows gait variability is closely related to fall risk, but presenting variability directly is counterintuitive — a higher number meaning “worse.” So I inverted it: consistency = 1 - CoV, clamped 0 to 1, so 1 means perfectly consistent and 0 highly inconsistent — much more intuitive for game feedback.
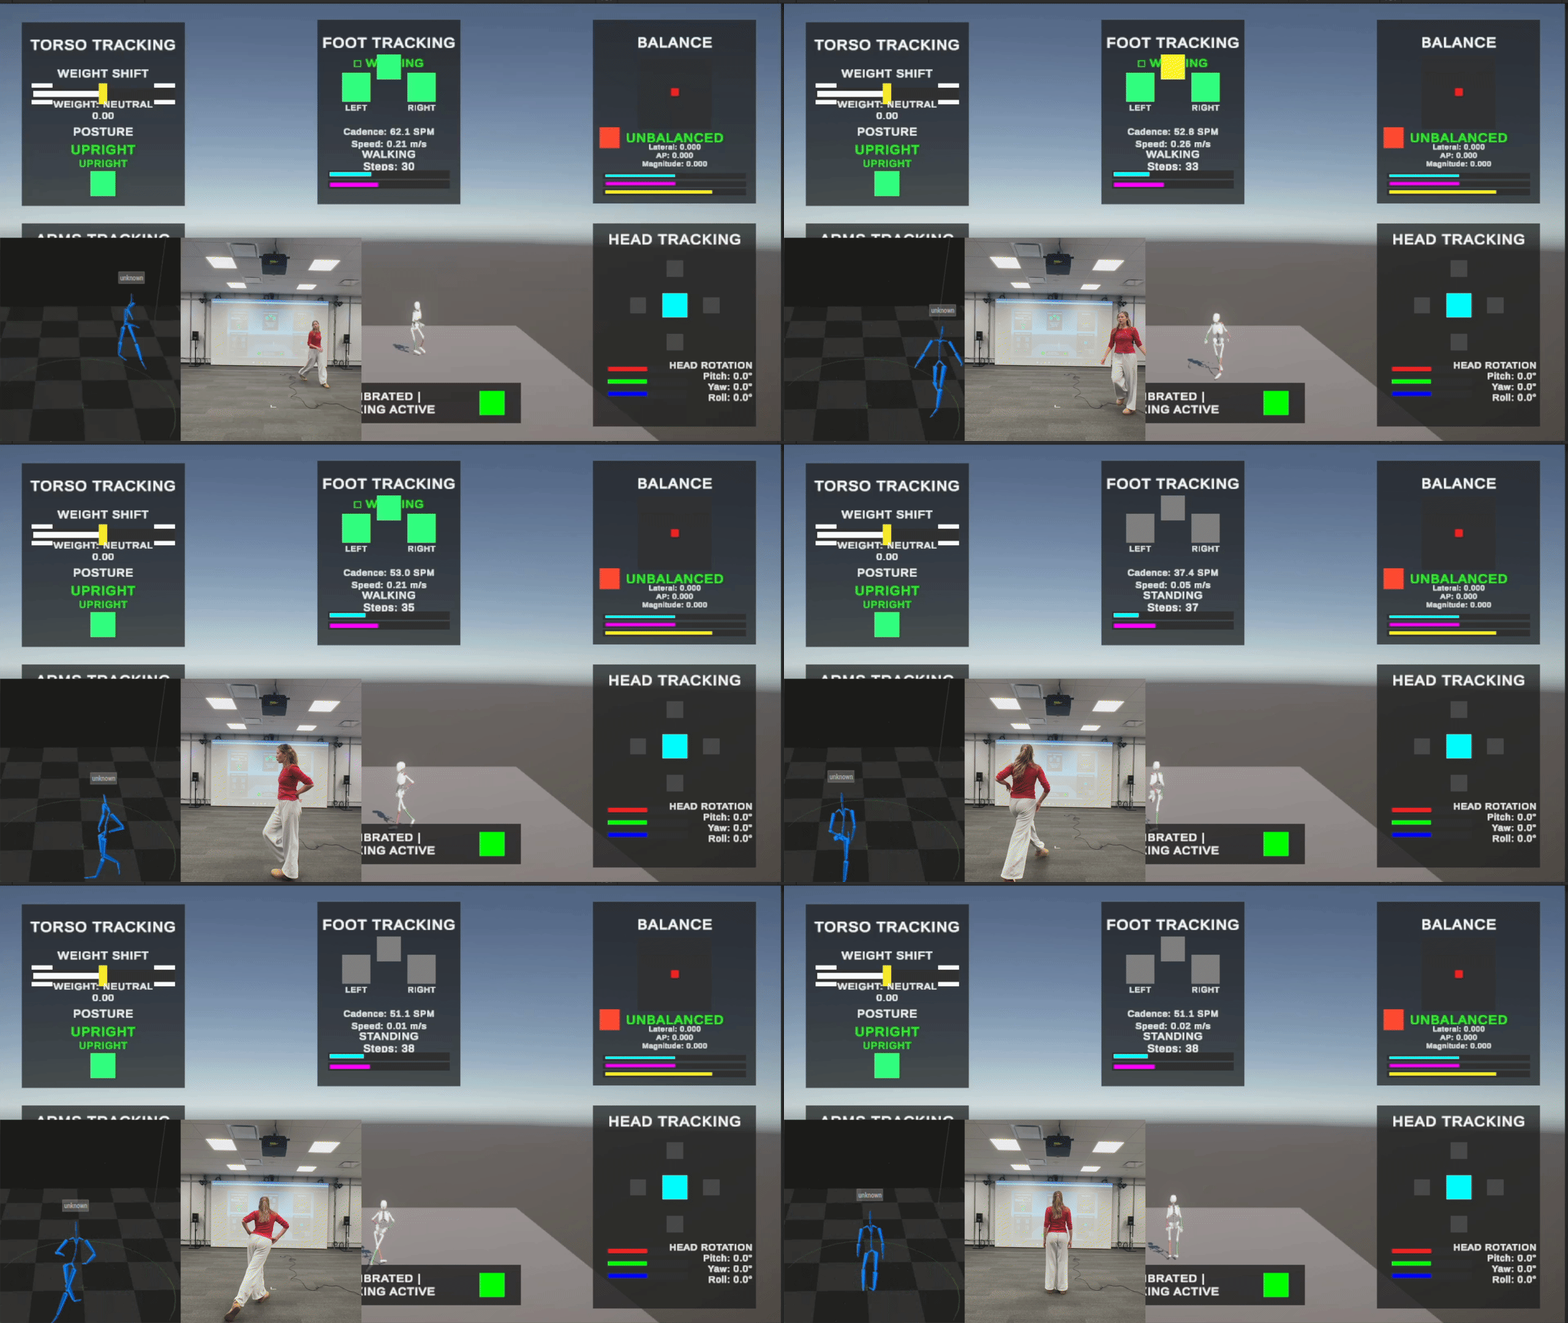
Layer 4: Output states
The final layer outputs the walk states. The isWalking state is true when in the Walking state, and walkStarted and walkStopped fire on the frames when those transitions happen. Walk speed is also exposed for games that want to use it.
Technical Challenges
Clinical-grade gait analysis required maintaining 300 frames of position history, detecting the exact moment of heel strike from position data alone, filtering false positives from body sway, and doing real-time step time calculations. I also needed at least several gait cycles before the consistency calculation would be meaningful, so I created a requirement for a minimum number of steps before reporting that metric.
Arm Module
The Arm module tracks hand position and hand raise states for both arms. Joints tracked include the hands and shoulders on both sides.
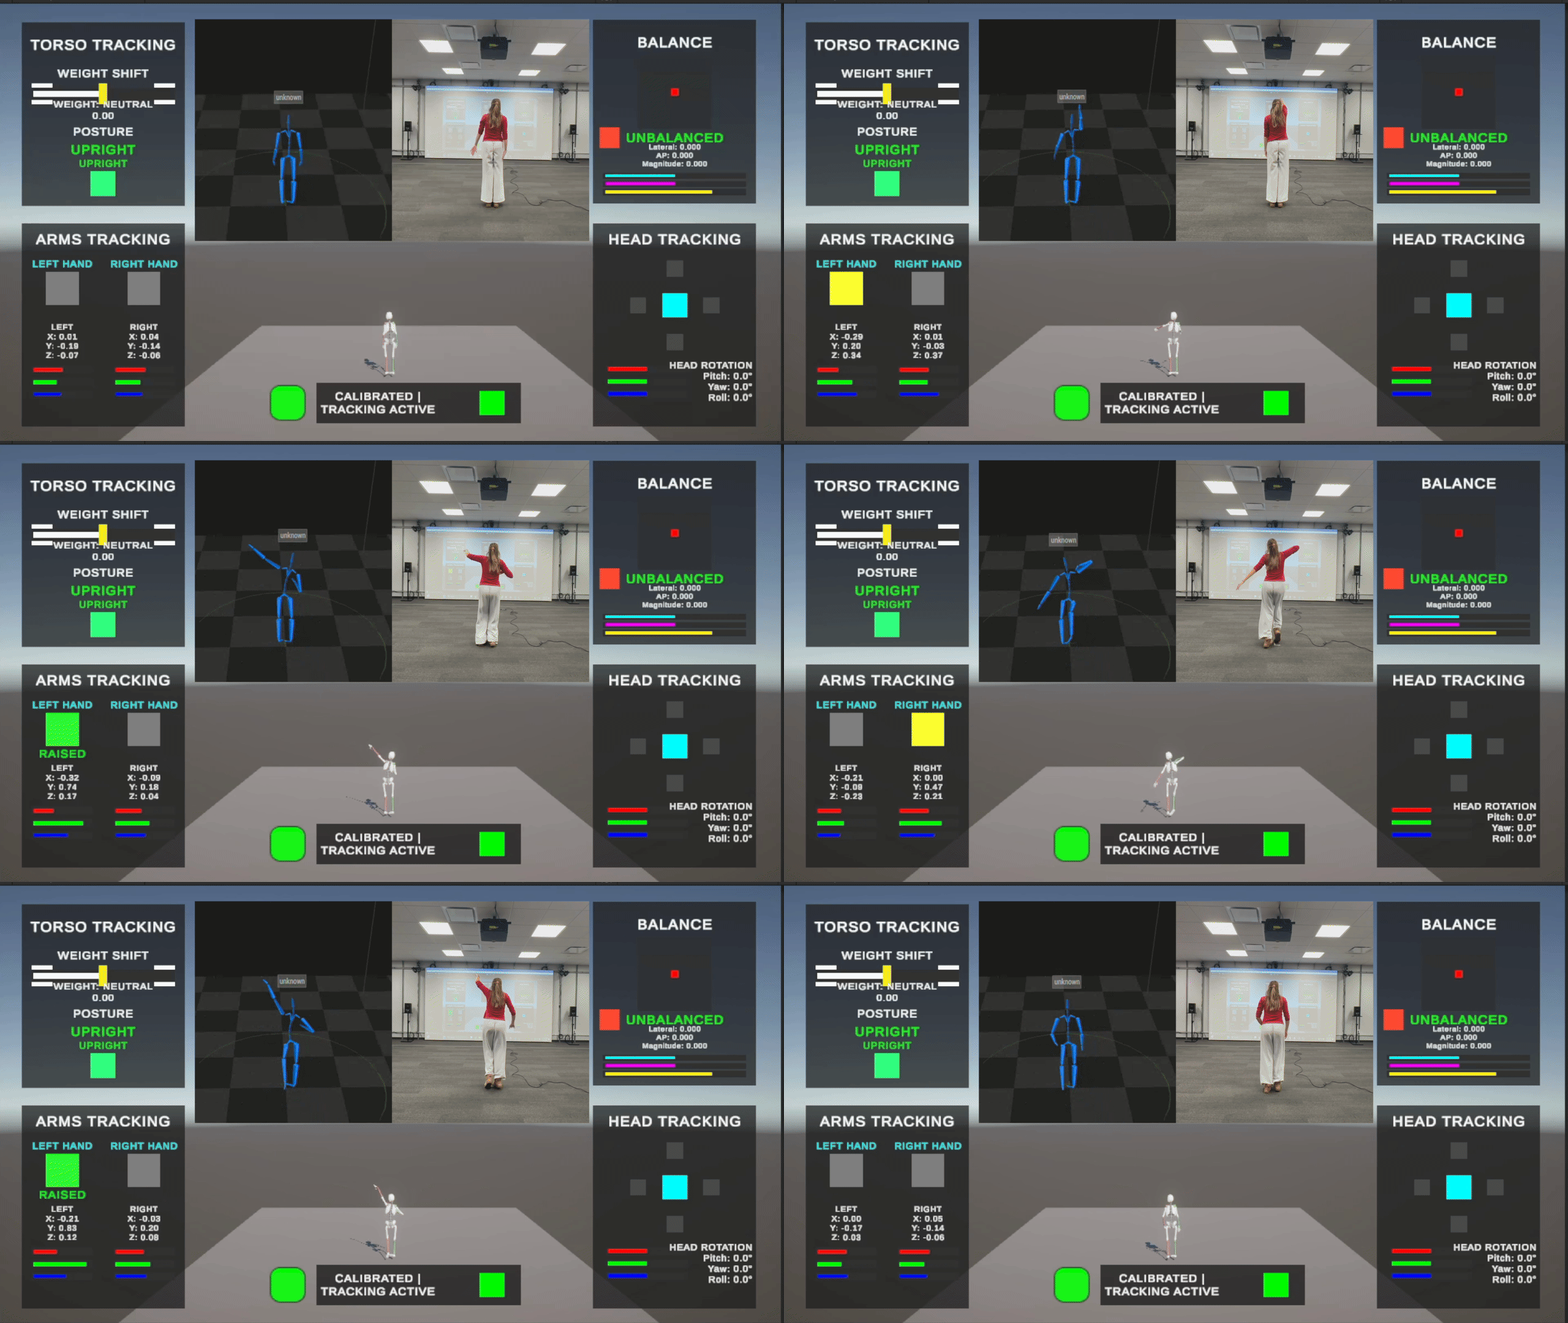
Relative positioning
Like the other modules, the Arm module uses relative positioning — measuring the hand relative to the shoulder rather than in world space. During calibration, I store the neutral hand-to-shoulder offset. During tracking, I calculate the current offset and subtract the neutral to get relative movement. This works consistently no matter where you’re standing in the capture volume.
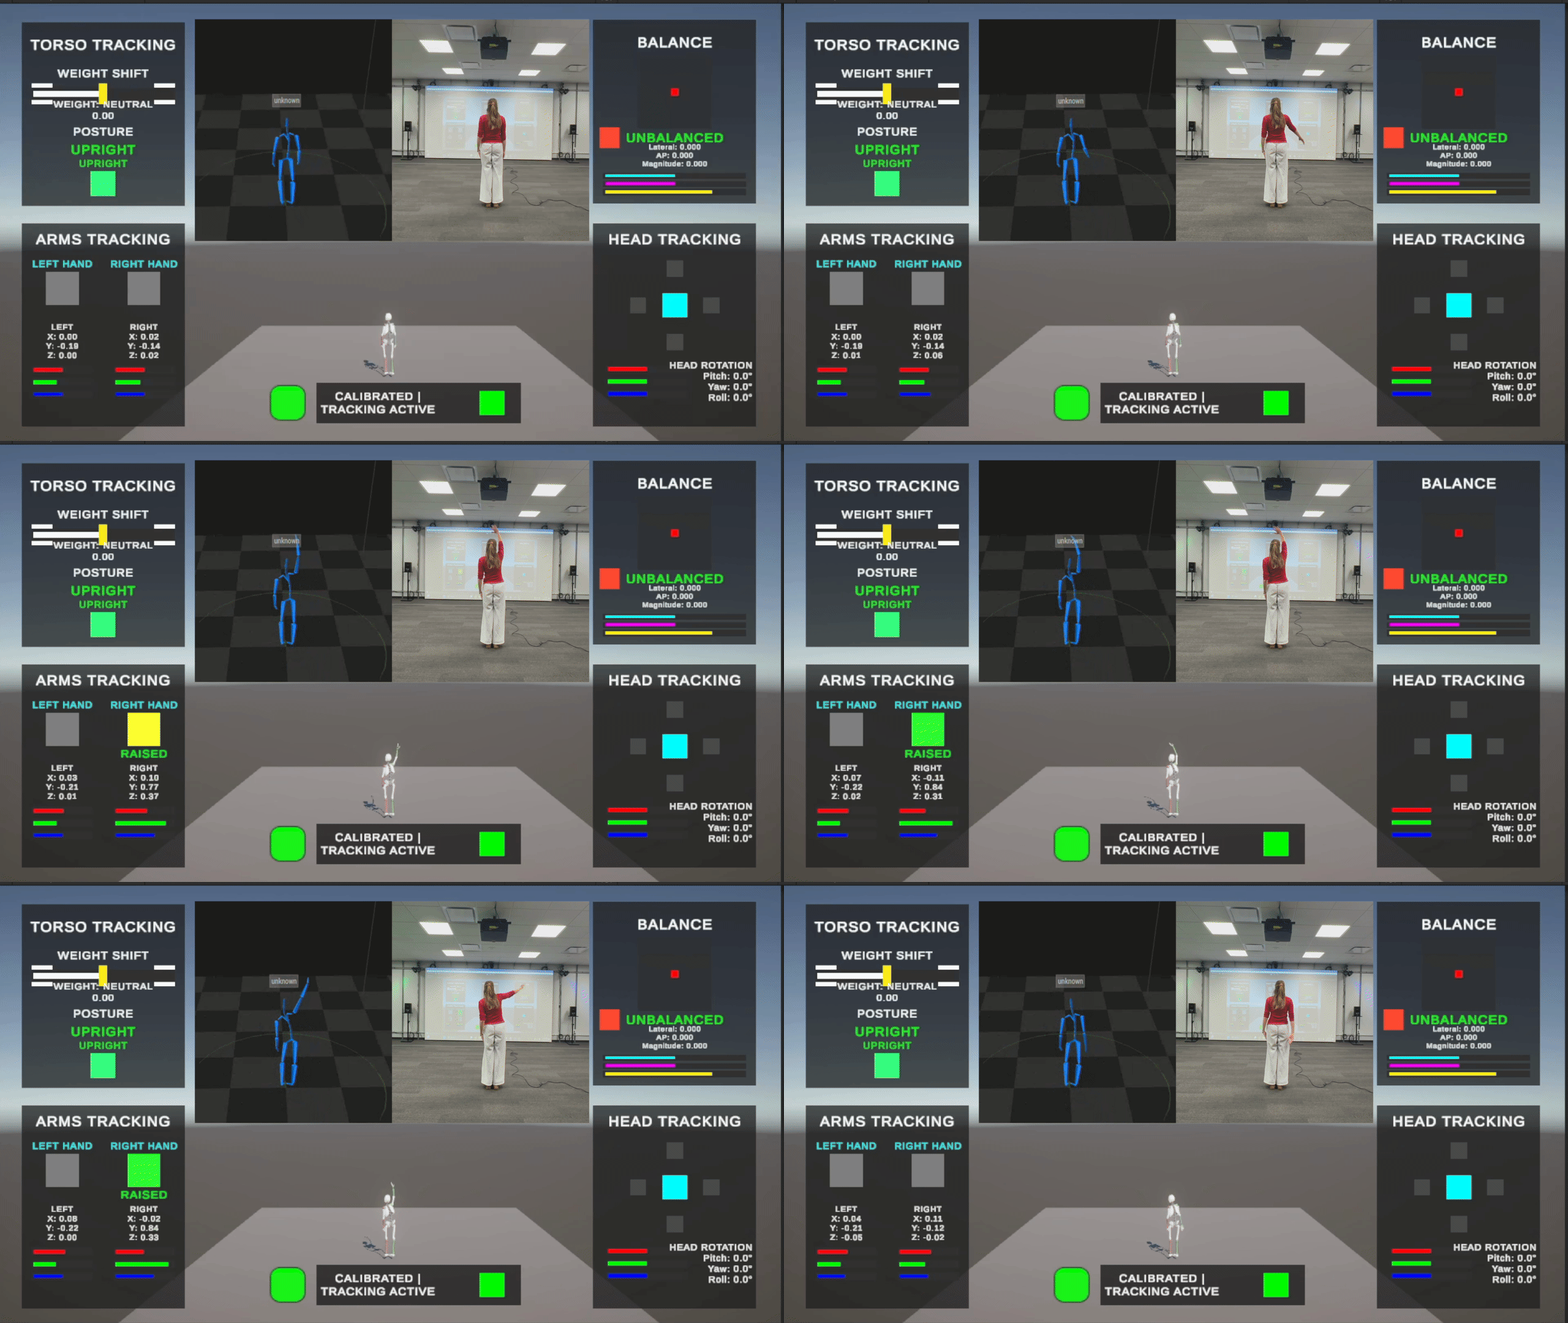
Hand raise detection
Requires two conditions: the hand must be above the shoulder by more than the threshold, AND the hand must have gained at least a minimum height from its neutral position. In testing, this worked well, though I noted that people may want to lower the threshold depending on their game.
Head Module
The Head module tracks head position, rotation, and directional states. Joints tracked are the head and neck.
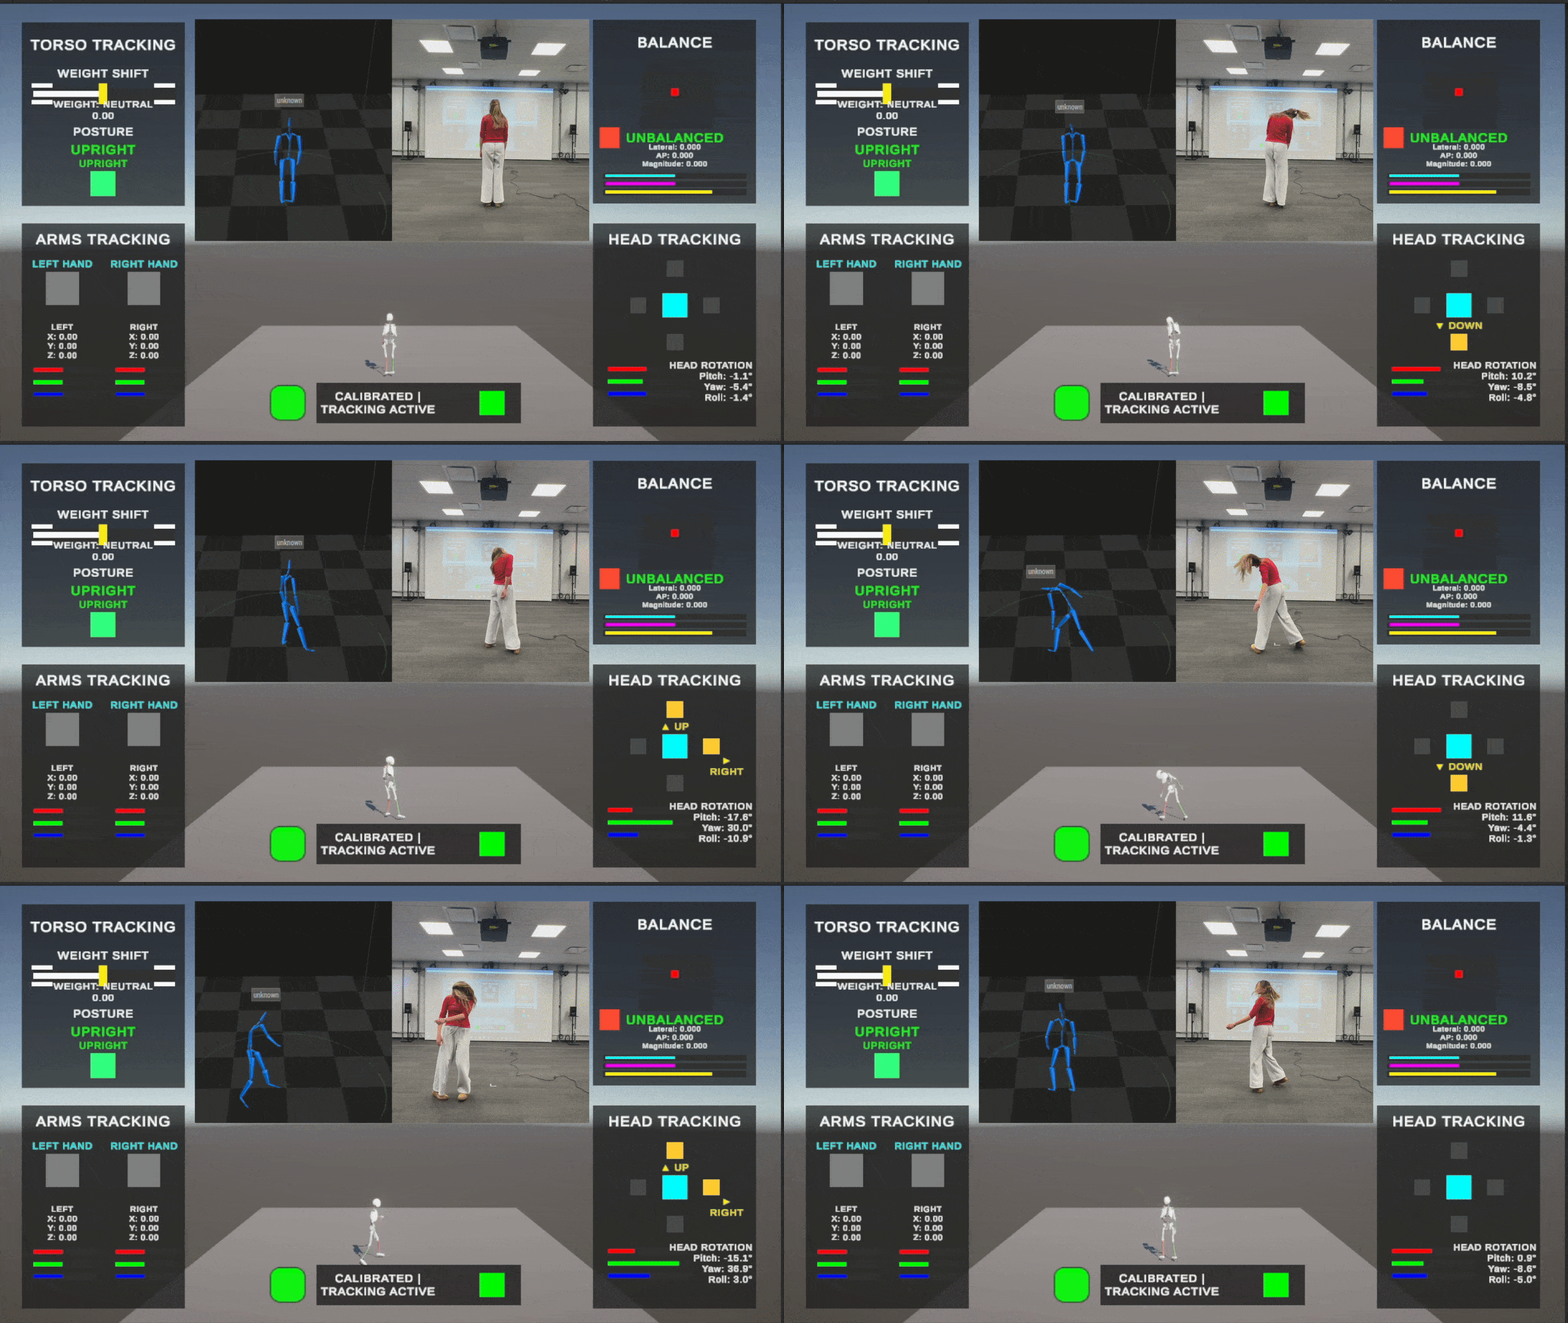
I went through several iterations. First I tried tracking nodding and shaking — detecting when rotation on an axis passed a threshold. Shaking worked; nodding was weird. I started wondering if simple directional states (up, down, left, right) would be better, since nodding and shaking can be derived from those anyway.
Second pass: simpler directional detection. Up/Down used pitch, Left/Right used yaw. But Up/Down didn’t work — same issue as weight shift, where the detection could be cheated by turning to the side. I needed everything relative to another bone.
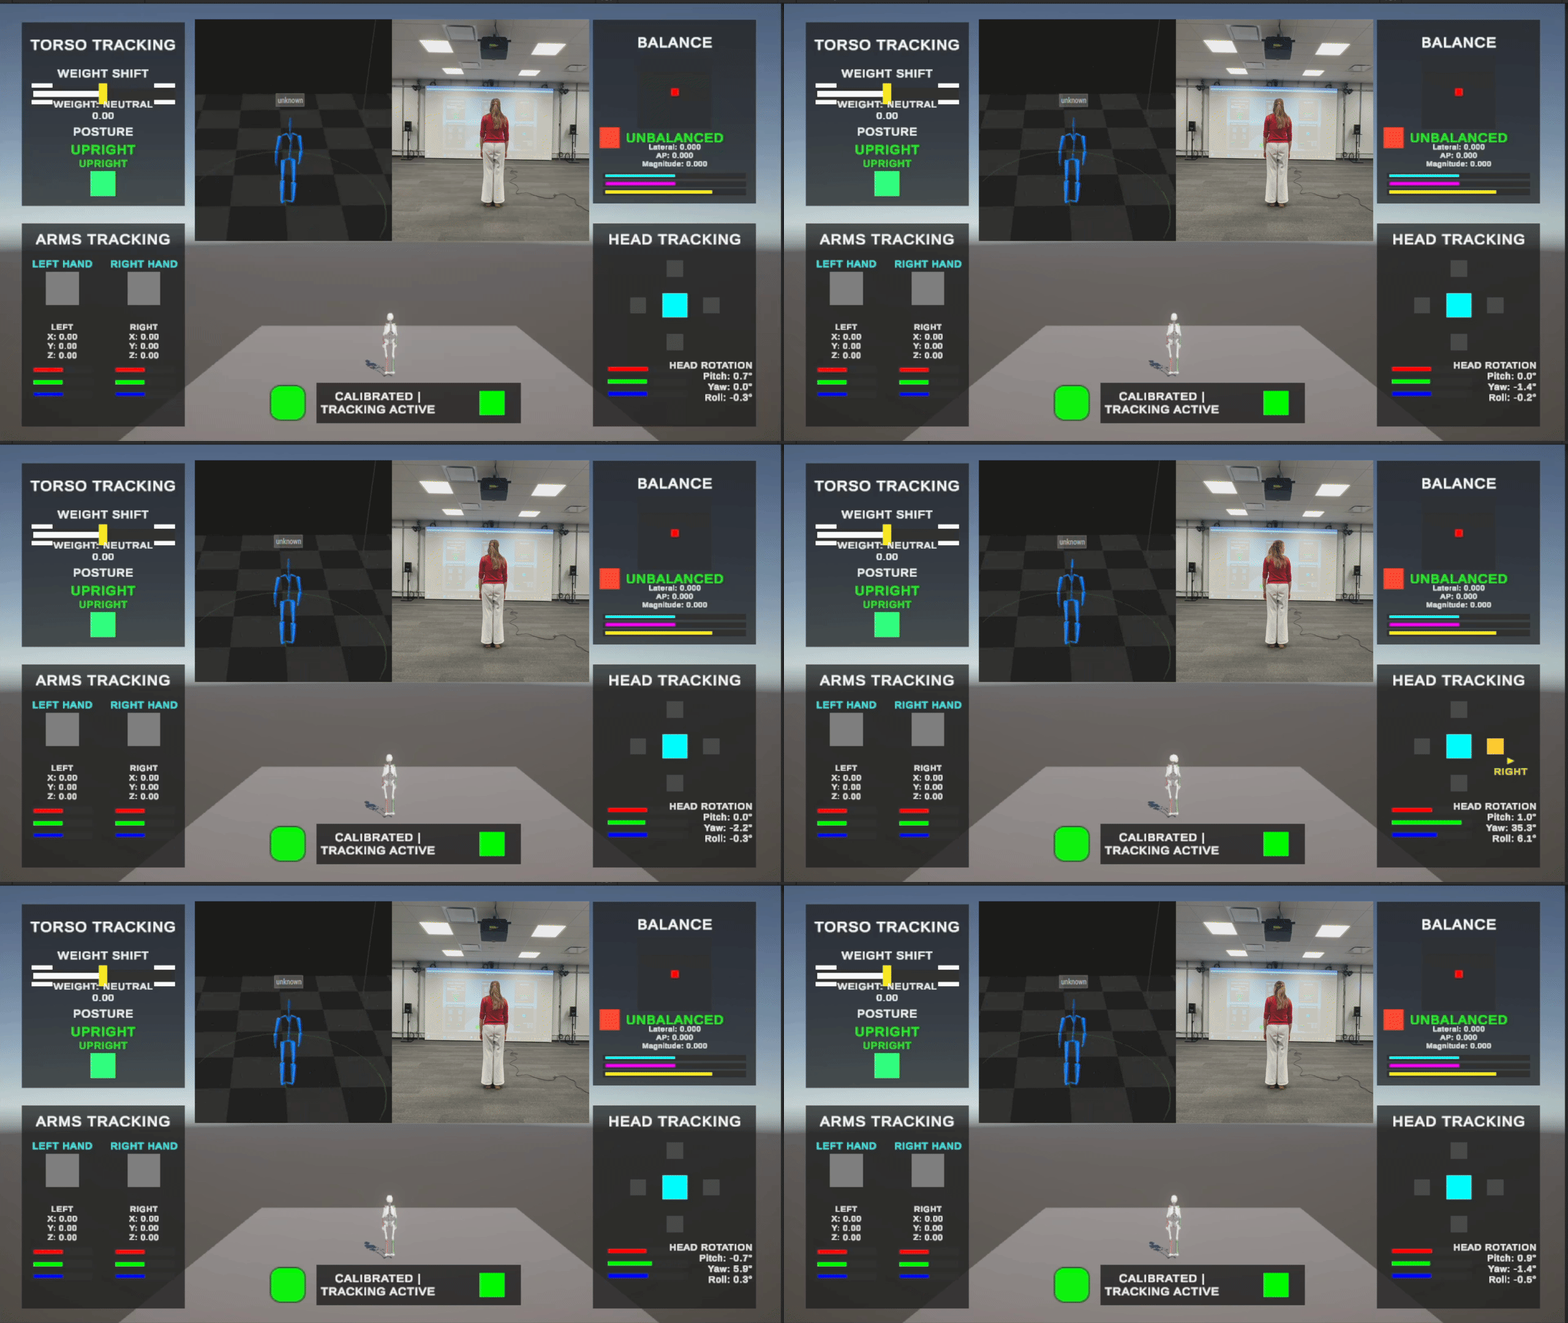
Third pass solved it by tracking the difference between head and neck. Head position now tracks the head-to-neck offset minus the calibrated neutral; head rotation works the same way. For gestures, up/down uses roll (positive = down, negative = up) and left/right uses yaw (positive = right, negative = left).
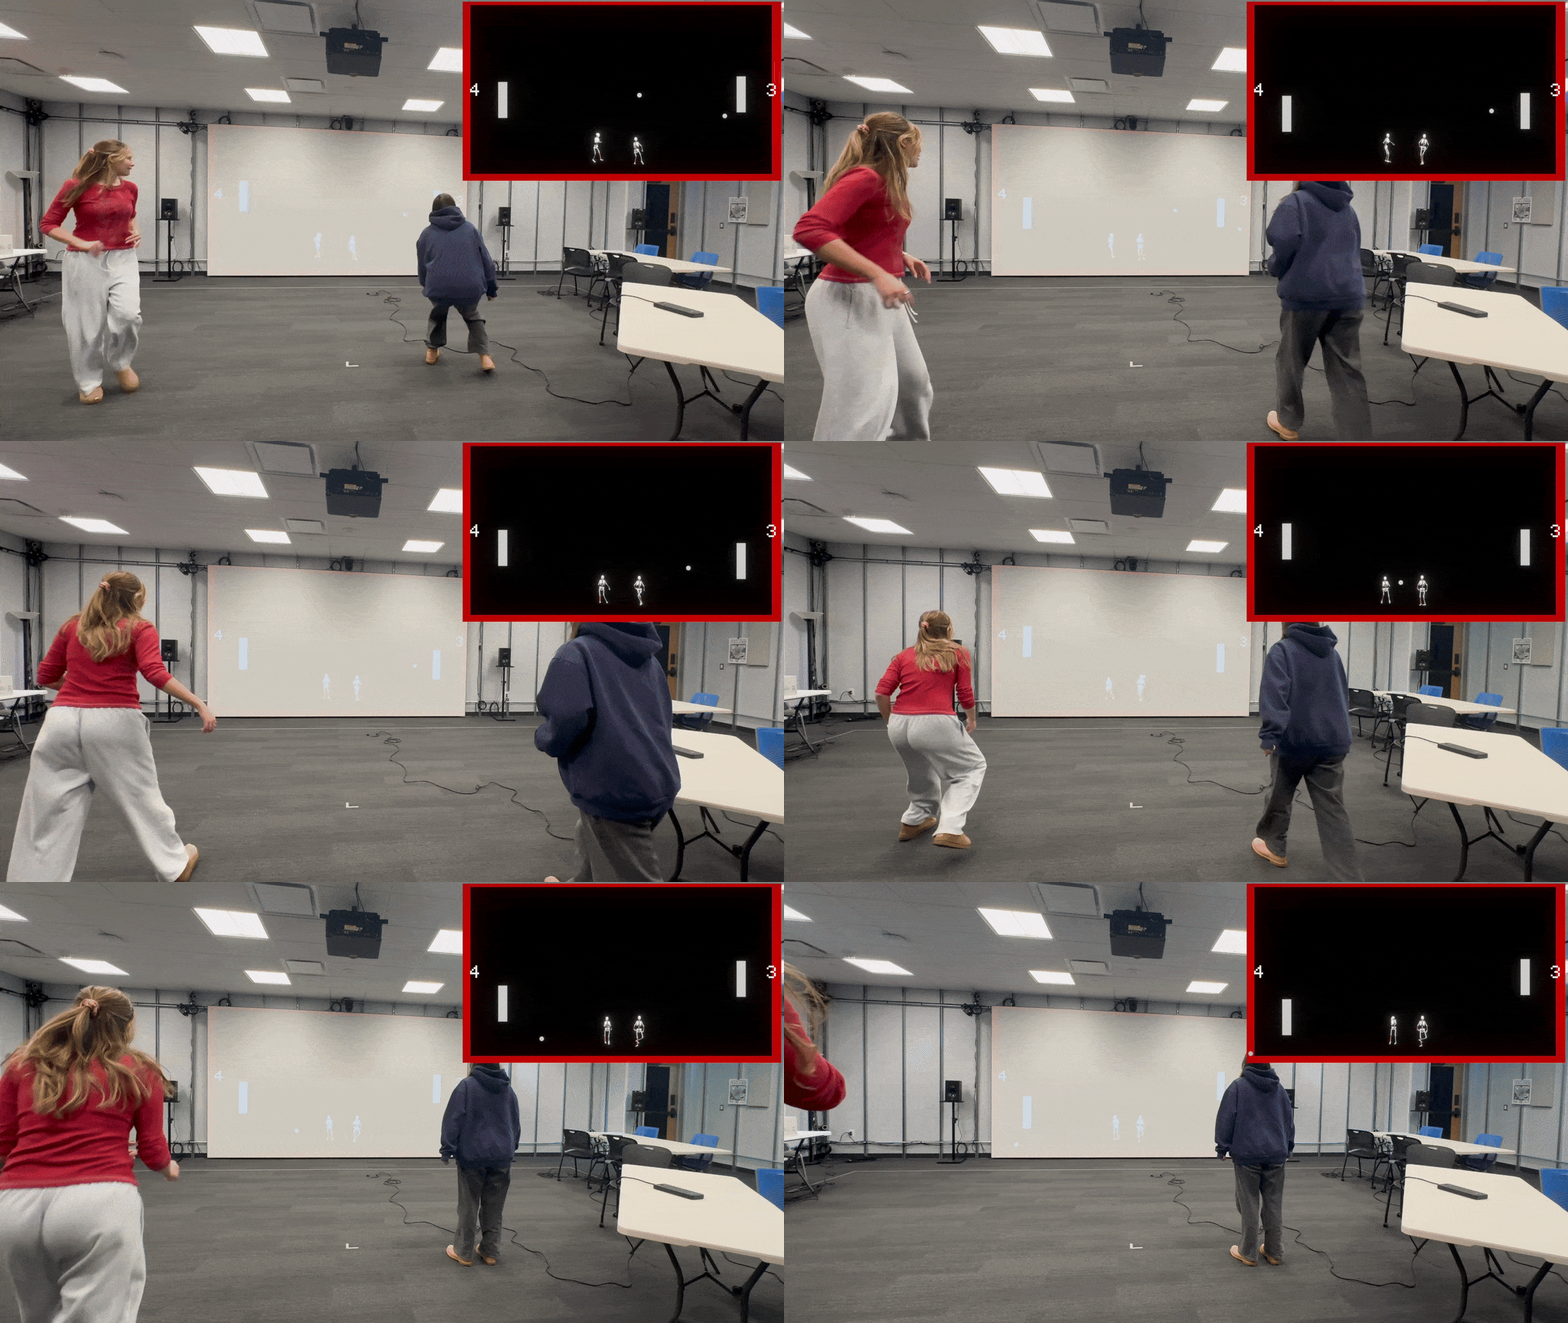
Why Head Tracking for Multiplayer
Head tracking turned out to be perfect for multiplayer because the head is always visible, stable, predictable, and provides fast response. I used it for the 4-player Pong demo where each player controls their paddle by turning their head.
Balance Module
The Balance module was the biggest technical challenge of the project, taking about 40% of my 8-week production time. Balance isn’t tracking one joint — it’s biomechanics.
The module tracks: center of mass position, lateral and anterior-posterior sway, sway magnitude, CoM velocity, balance stability state.
Joints required (7 total): Trunk (Spine1), both forearms, both lower legs, both toe bases.
The key insight from biomechanics literature is that your center of mass should not fall outside your base of support. I chose to track center of mass rather than center of gravity because mass is evenly distributed throughout the body, and I found papers confirming CoM can be estimated from cameras alone for dynamic movement. Using body segment mass fractions from Harvard’s BioNumbers database (trunk ~50%, each forearm ~1.6%, each lower leg ~4.65%), I could calculate CoM from a weighted average of joint positions.
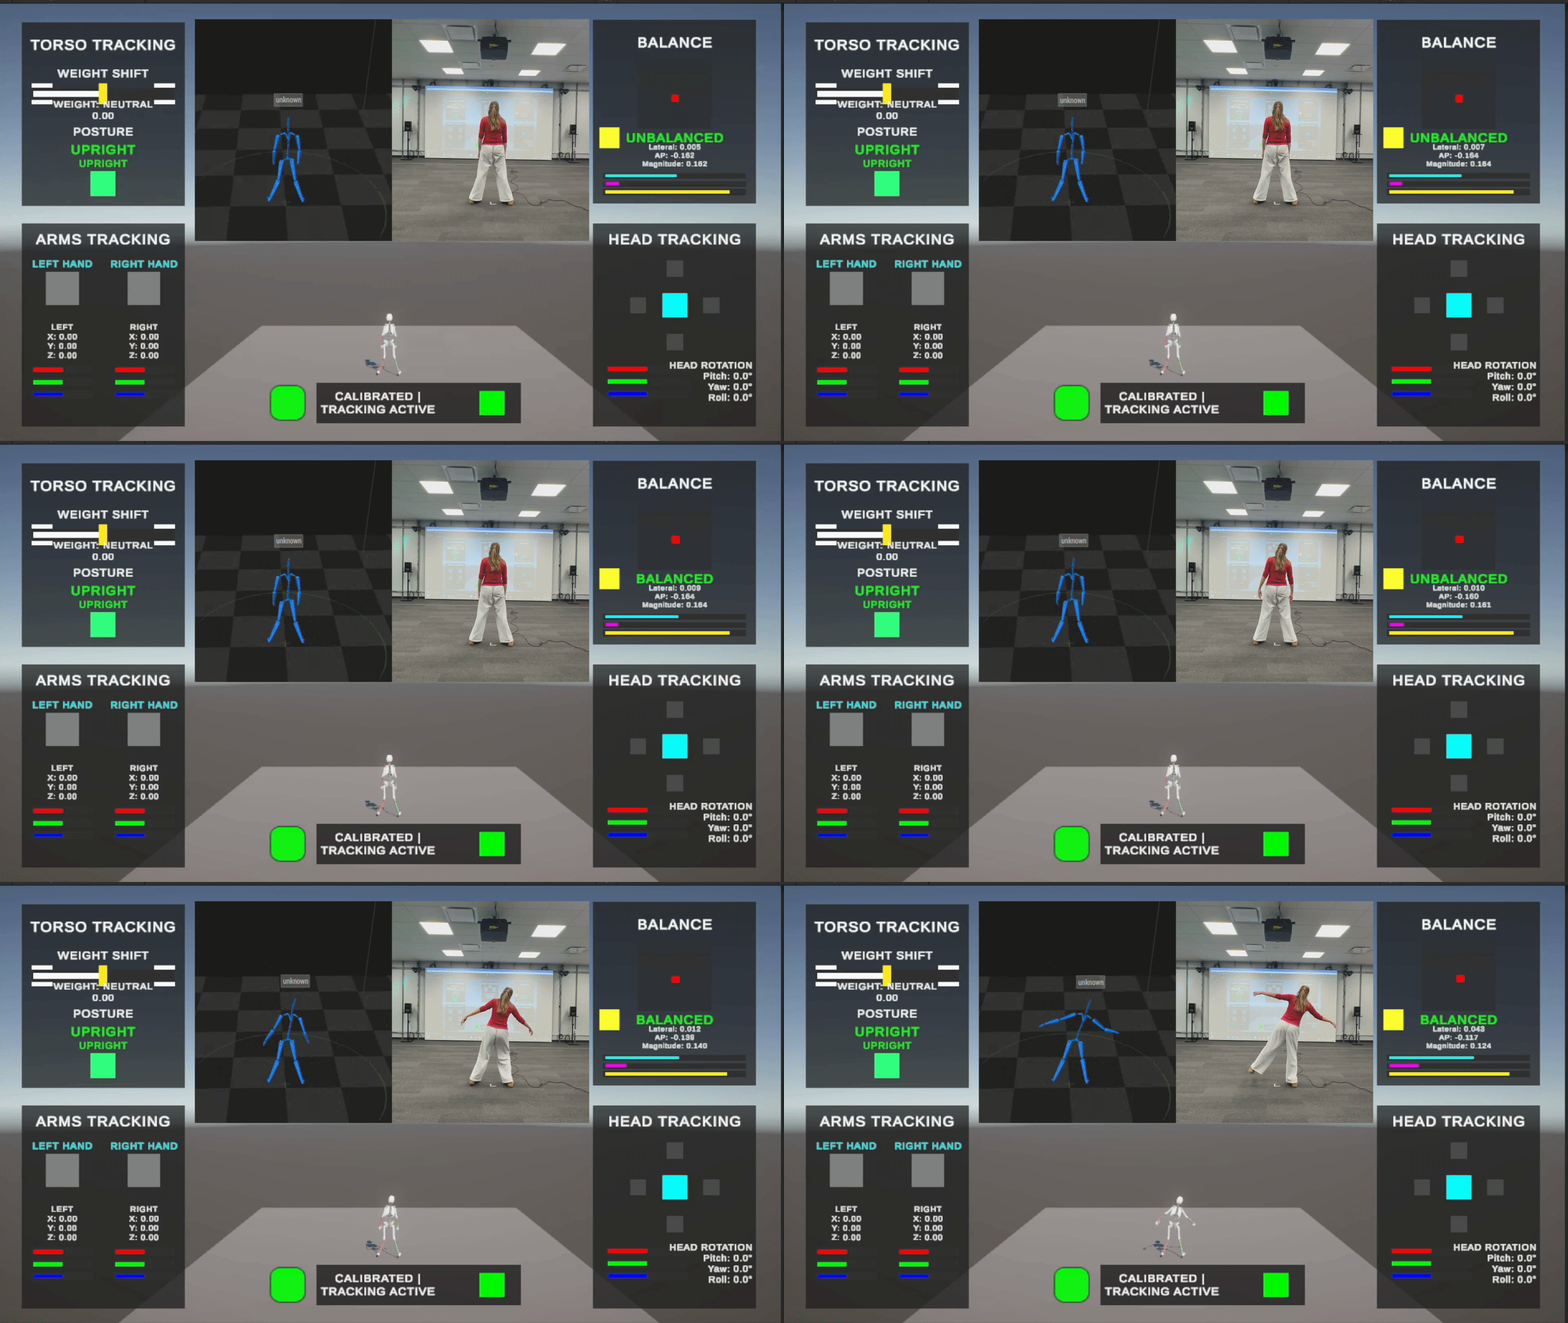
Iteration process
First pass: Results were all over the place — I realized I wasn’t comparing the CoM to anything. It needed to be compared to foot position.
Second pass: Better. I compared CoM to the base of support, then worked on making foot detection robust so raising a foot wouldn’t break the calculation.
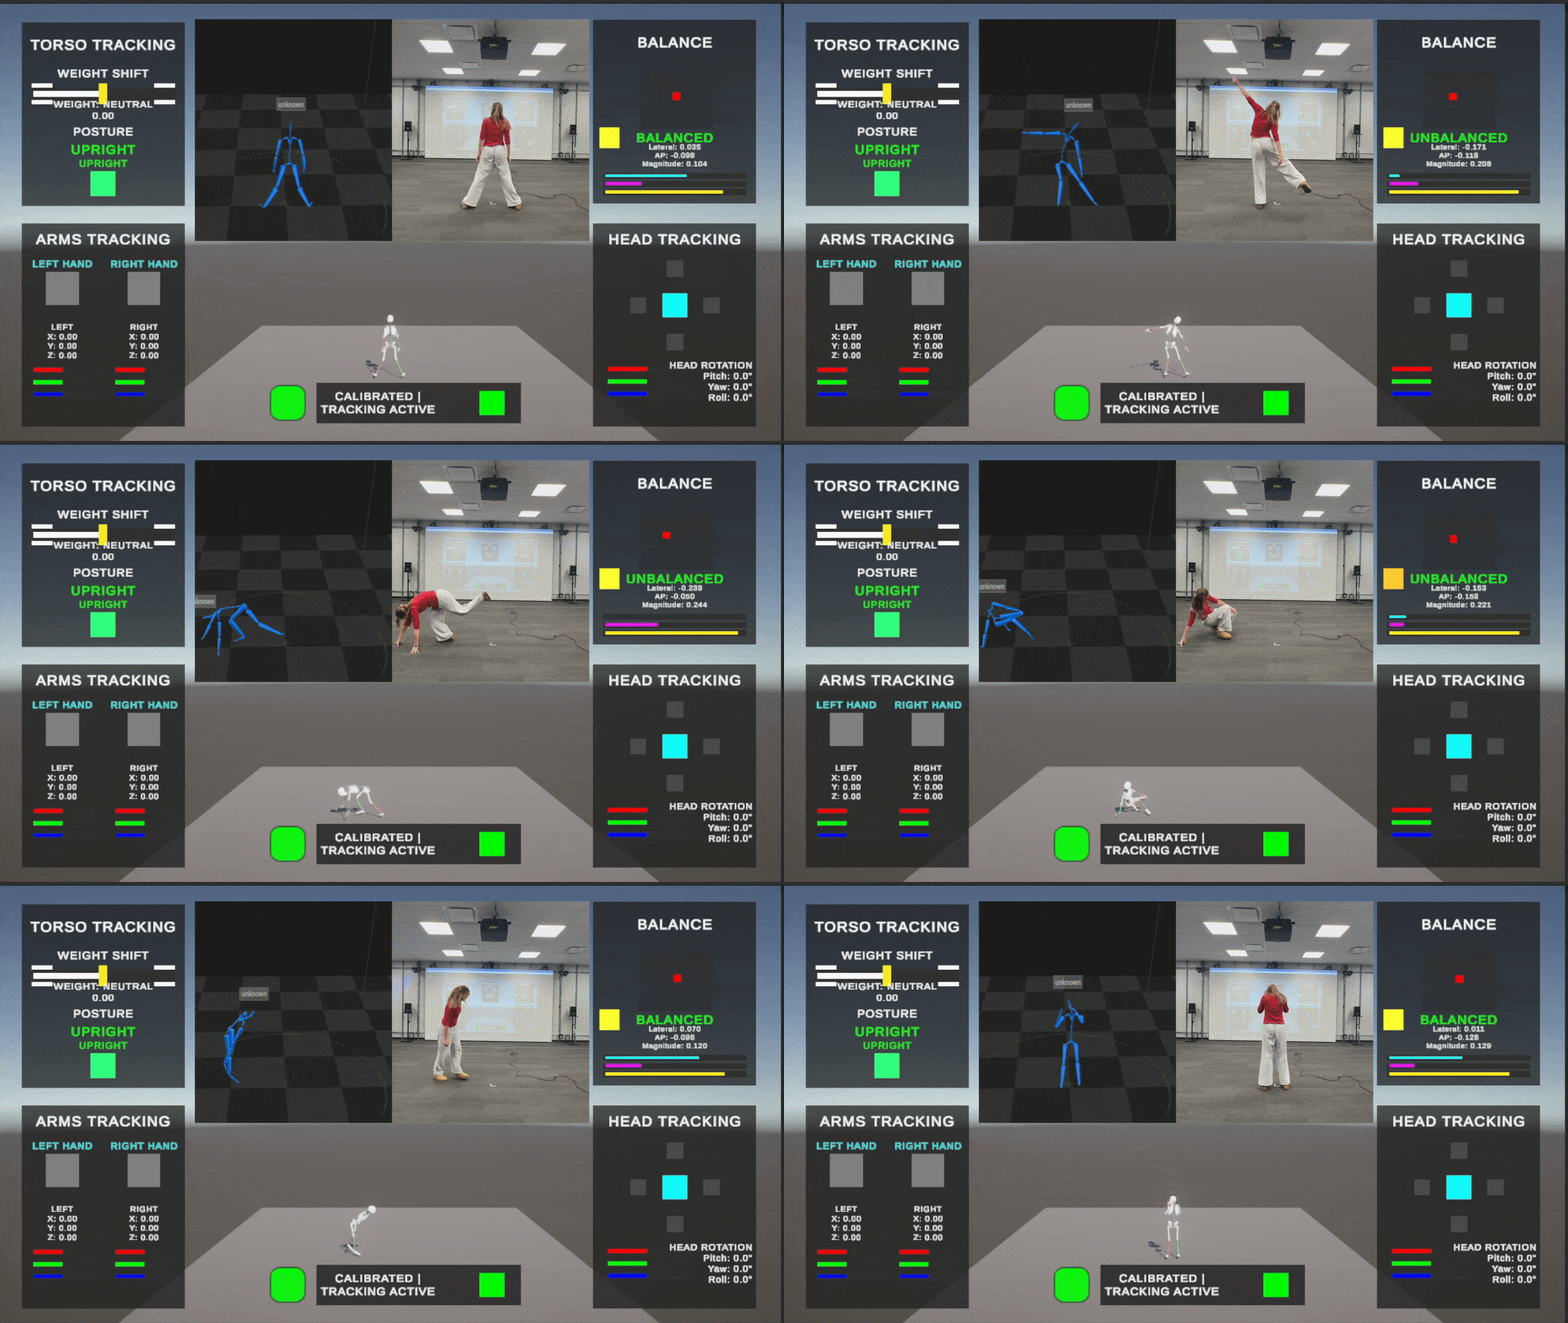
Third pass: The full system. I calculate CoM via weighted average, check foot contact (both feet down, left only, right only, or none — jumping/falling) to update the base of support, then measure the distance from CoM to the base center.
Sway tracking
I project the CoM onto the ground plane and calculate a 2D vector from the base of support center. I separate this into lateral and anterior-posterior components, normalize the magnitude, and divide by the base width to make it relative to stance. The threshold is more forgiving for two feet (60% of base width) than for one foot (80%).
Stability detection
I calculate CoM velocity — slower movement means more stable. If velocity is over the threshold or if the CoM is too far from the base center, you’re not balanced. The allowed distance adapts based on contact state: 40% of base width for two feet, 60% for one foot. You’re balanced if you have low velocity and you’re within your base of support.
Multiplayer System
The Captury system supports tracking multiple people simultaneously, but my toolkit was built entirely around single-player use. I wanted to add multiplayer without breaking anything for developers who’d already built games on the single-player MotionTrackingManager.
The core problem: my architecture assumed one skeleton, one set of modules, one input device, all stored as single references. For multiplayer I needed to track multiple skeletons, each with their own modules, calibration state, and input device — while keeping the modules themselves unchanged. A TorsoTrackingModule shouldn’t need to know whether it’s running in single- or multiplayer mode.
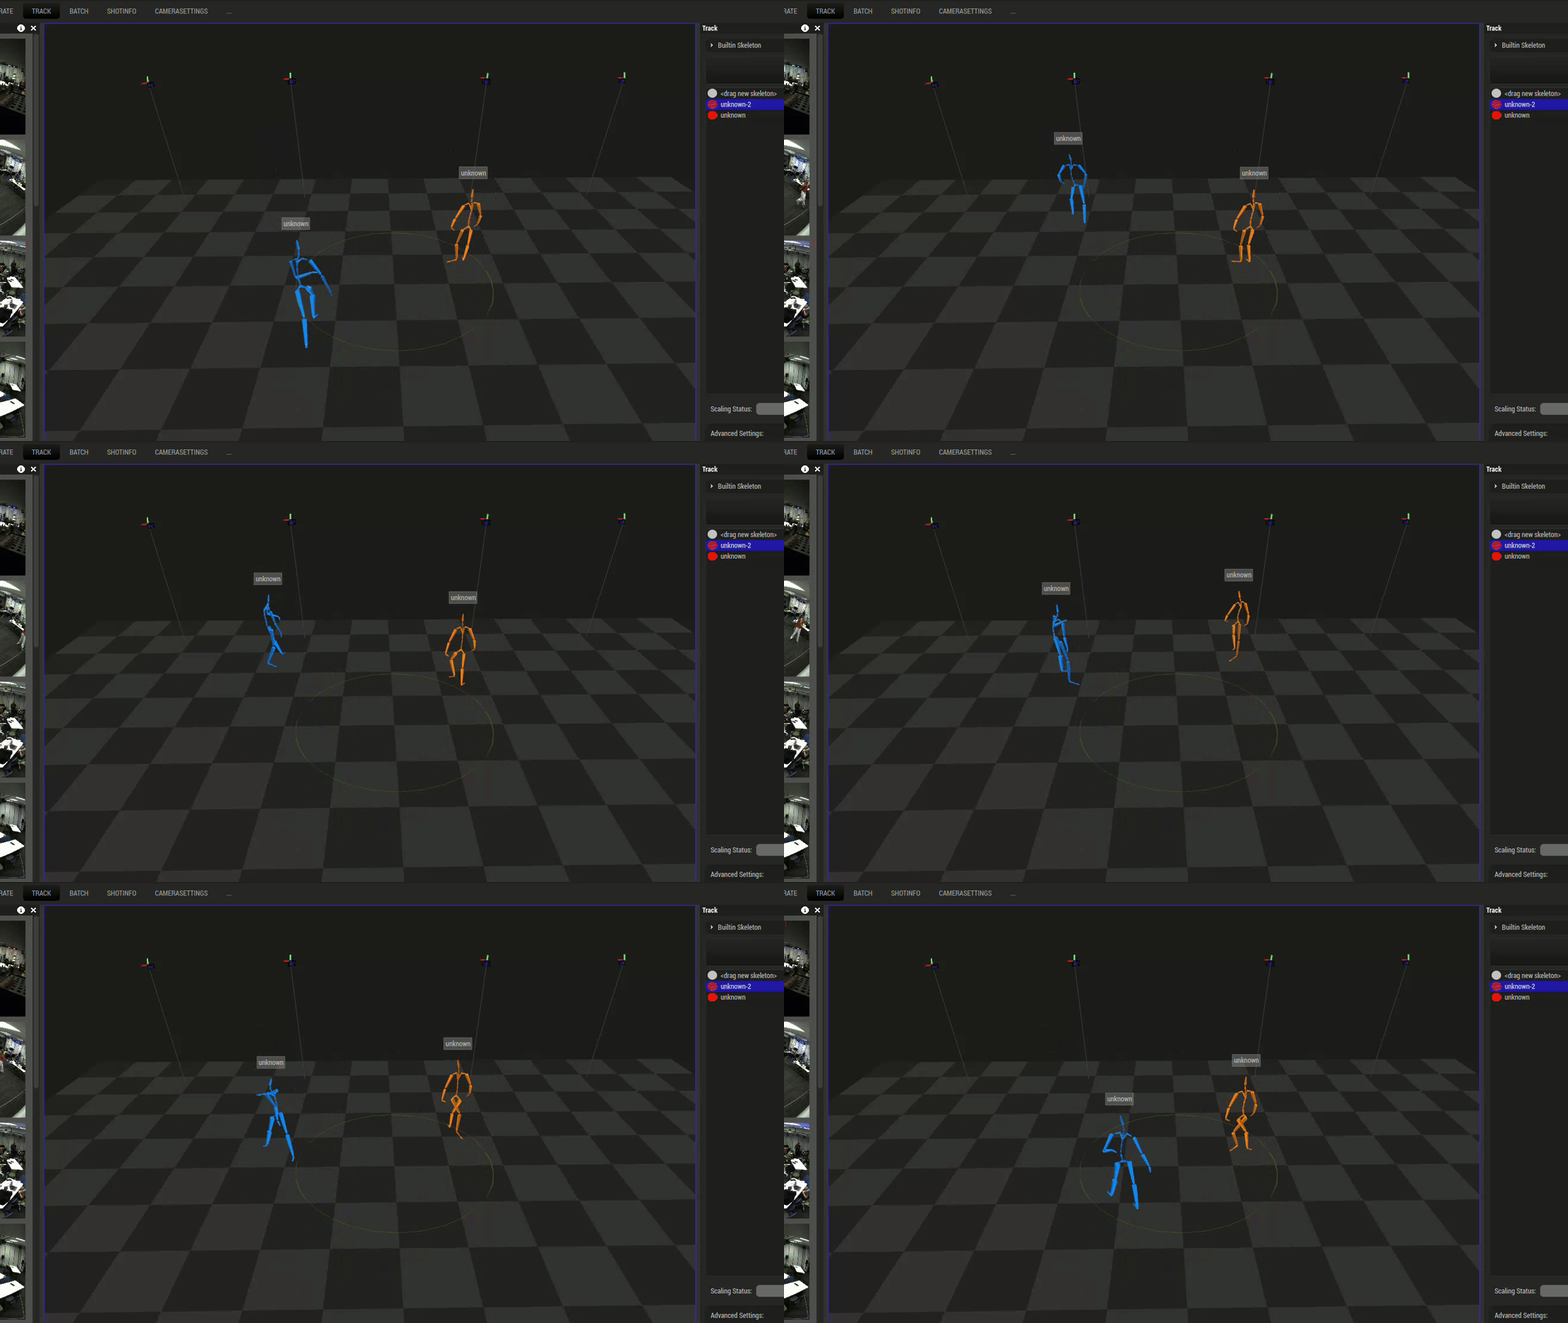
Architecture solution
I created the IMotionTrackingManager interface that both MotionTrackingManager and the new MultiplayerMotionTrackingManager implement, exposing the configuration and a method to retrieve joints by name. Modules can be initialized with either manager type and work identically.
For the multiplayer manager, I created a SkeletonTrackingData structure holding everything for one tracked person: Captury ID, player number, joint dictionary, modules, input device, and calibration state. The manager maps skeleton IDs to these structures, so when a new person steps into the volume, they get their own complete tracking setup.
Context wrapper pattern
Each skeleton also needs its own SkeletonMotionTrackingContext, which implements IMotionTrackingManager but knows which skeleton it belongs to. When a module calls GetJointByName, the context routes the request to the correct skeleton’s joint dictionary. This is what lets modules work unchanged — they think they’re talking to a manager, but it’s a skeleton-specific wrapper handling the routing.
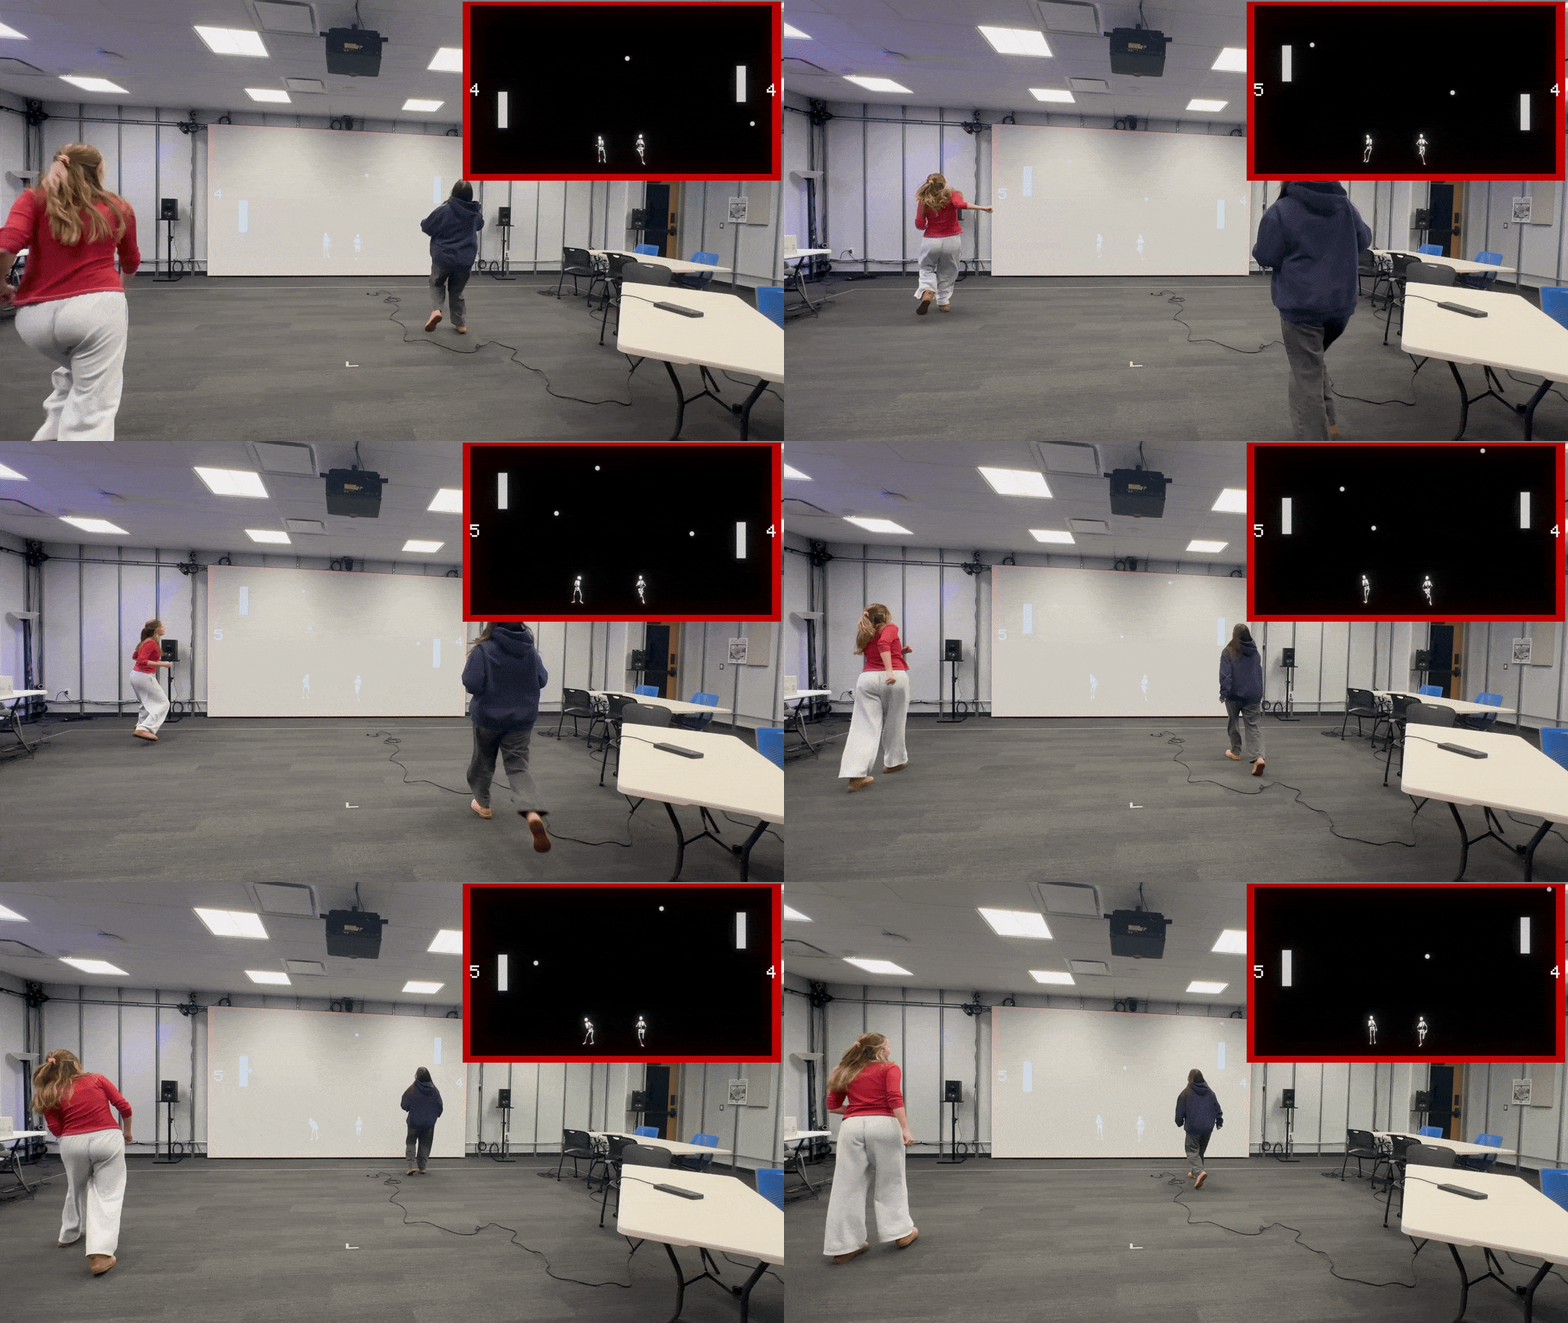
Input device differentiation
Unity’s Input System supports device usages. When I create a CapturyInput device for each skeleton, the manager automatically tags it with a usage like “Player1” or “Player2” using the next available player number. Games filter by usage to get a specific player’s input.
Breakthrough Moment
Creating the multiplayer Pong demo taught me about input map instancing. I initially tried to have all players share the same Input Action Asset, but Unity’s Input System doesn’t work that way. Each PongPlayer script needs its own instance of the action asset, which it creates by calling Instantiate on the serialized reference. Then each player finds their specific CapturyInput device by checking which one has their player usage tag. Once I understood instancing, the whole multiplayer input pipeline clicked into place.
The manager supports up to four players by default (configurable). It handles players entering and leaving the volume dynamically — cleaning up their modules and devices on exit, creating new ones on entry. Configuration swapping works across all active skeletons, and recalibration can be triggered per-player or for everyone at once.
07 / Debug UIDebug UI System
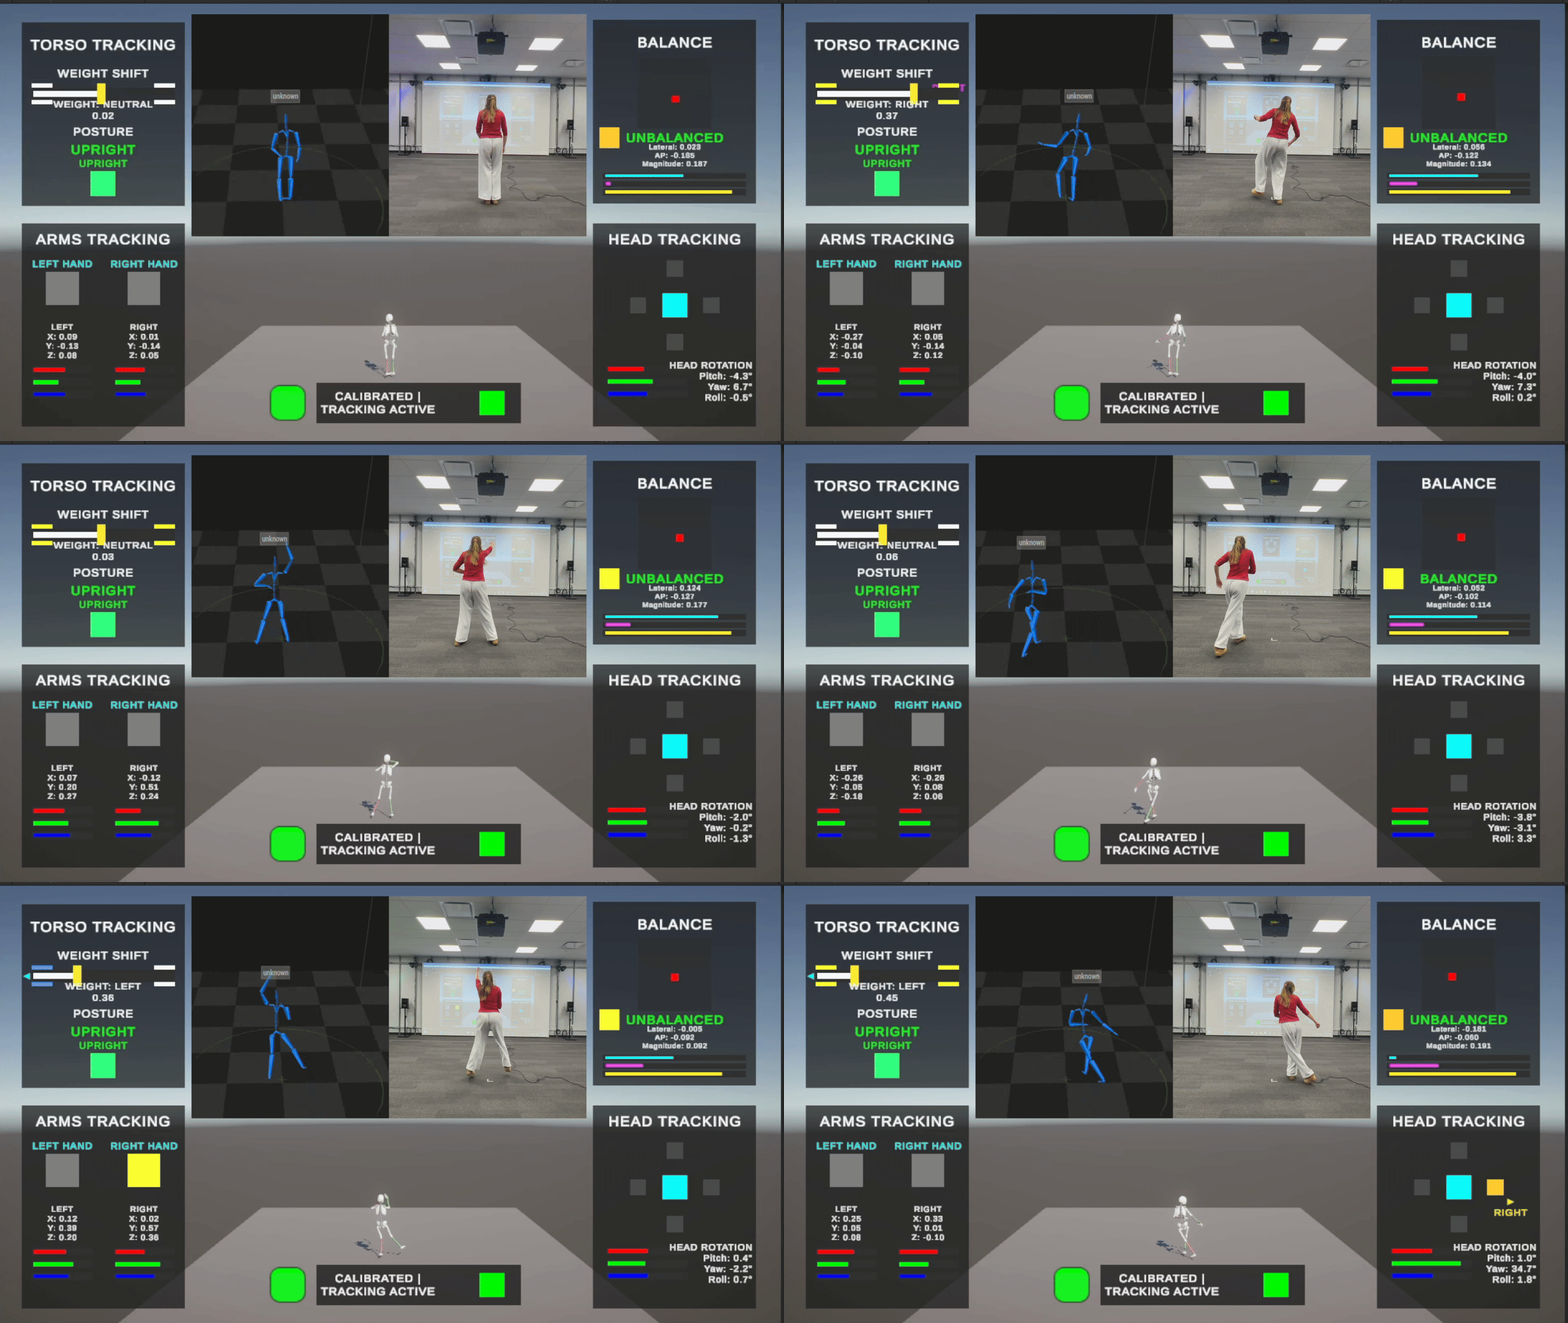
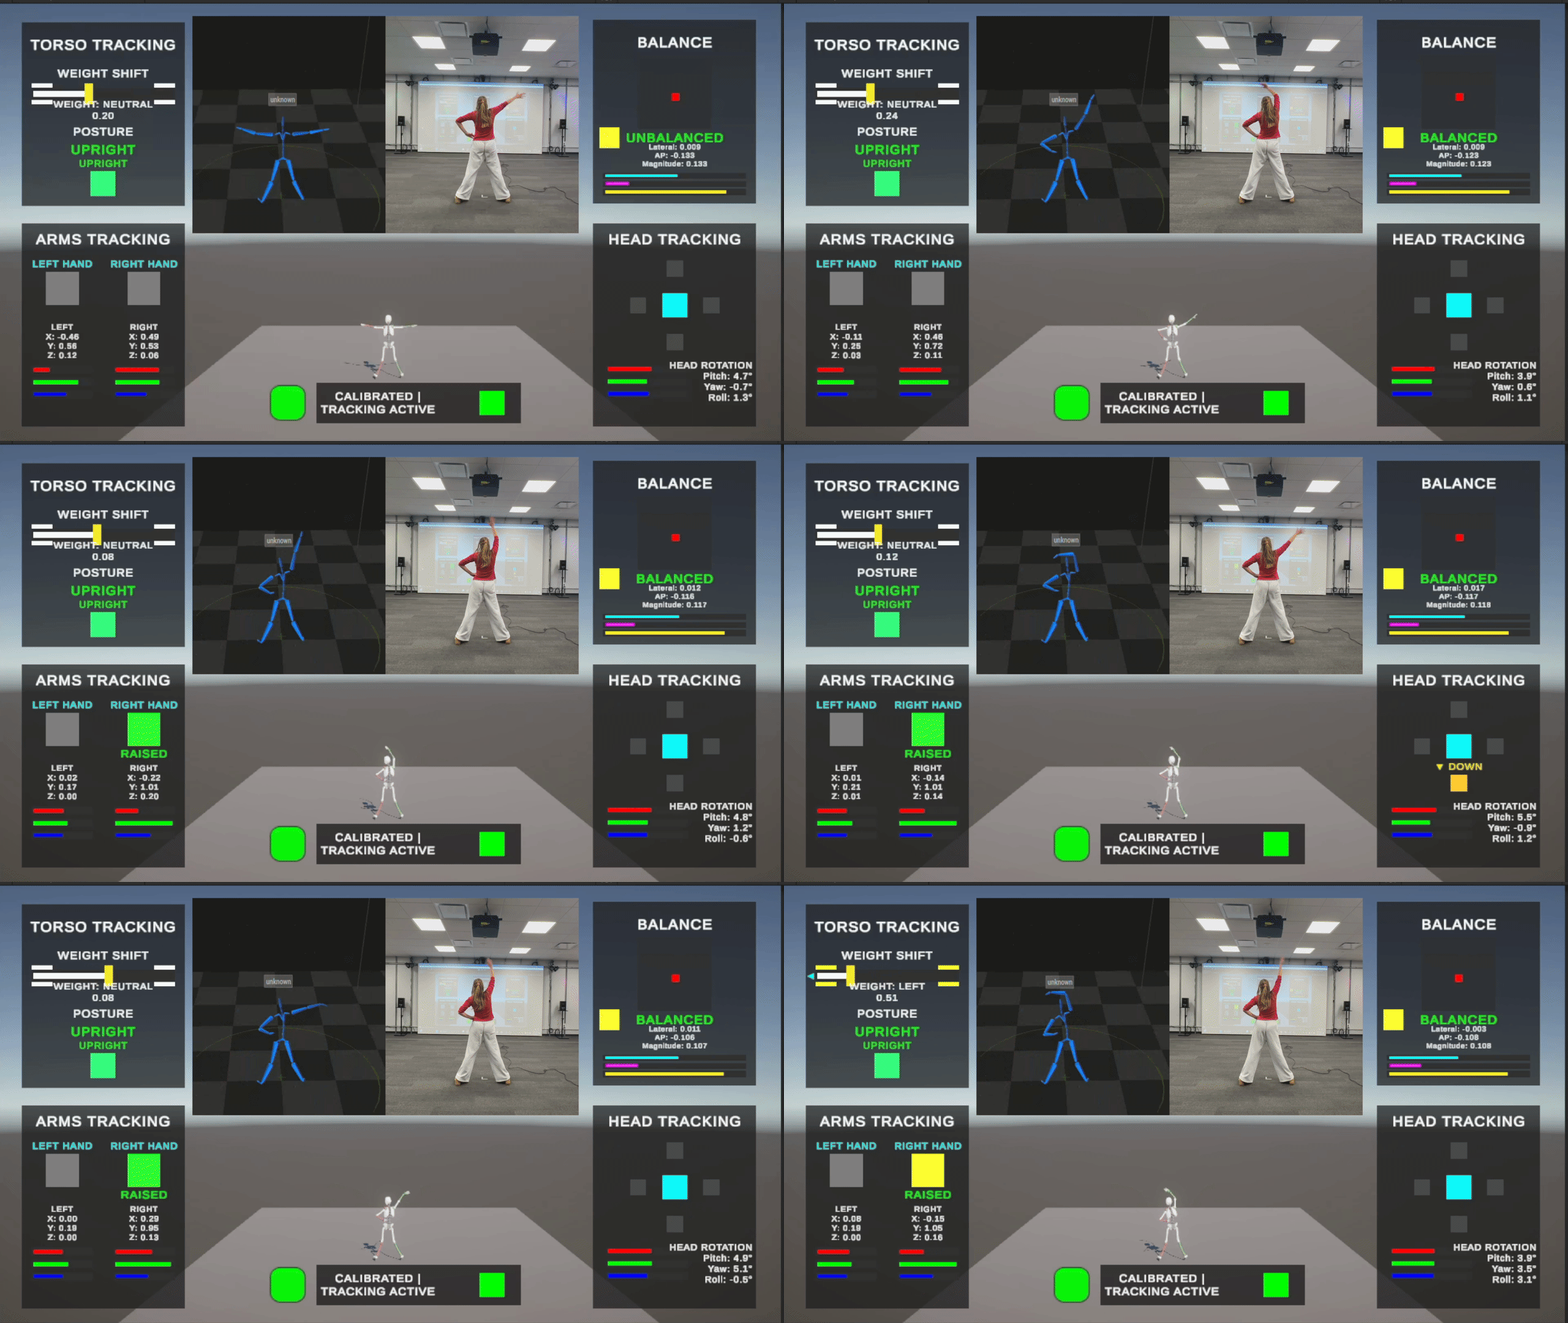
I built a debug UI system initially for my own presentation demo, but it became a useful development tool for toolkit users.
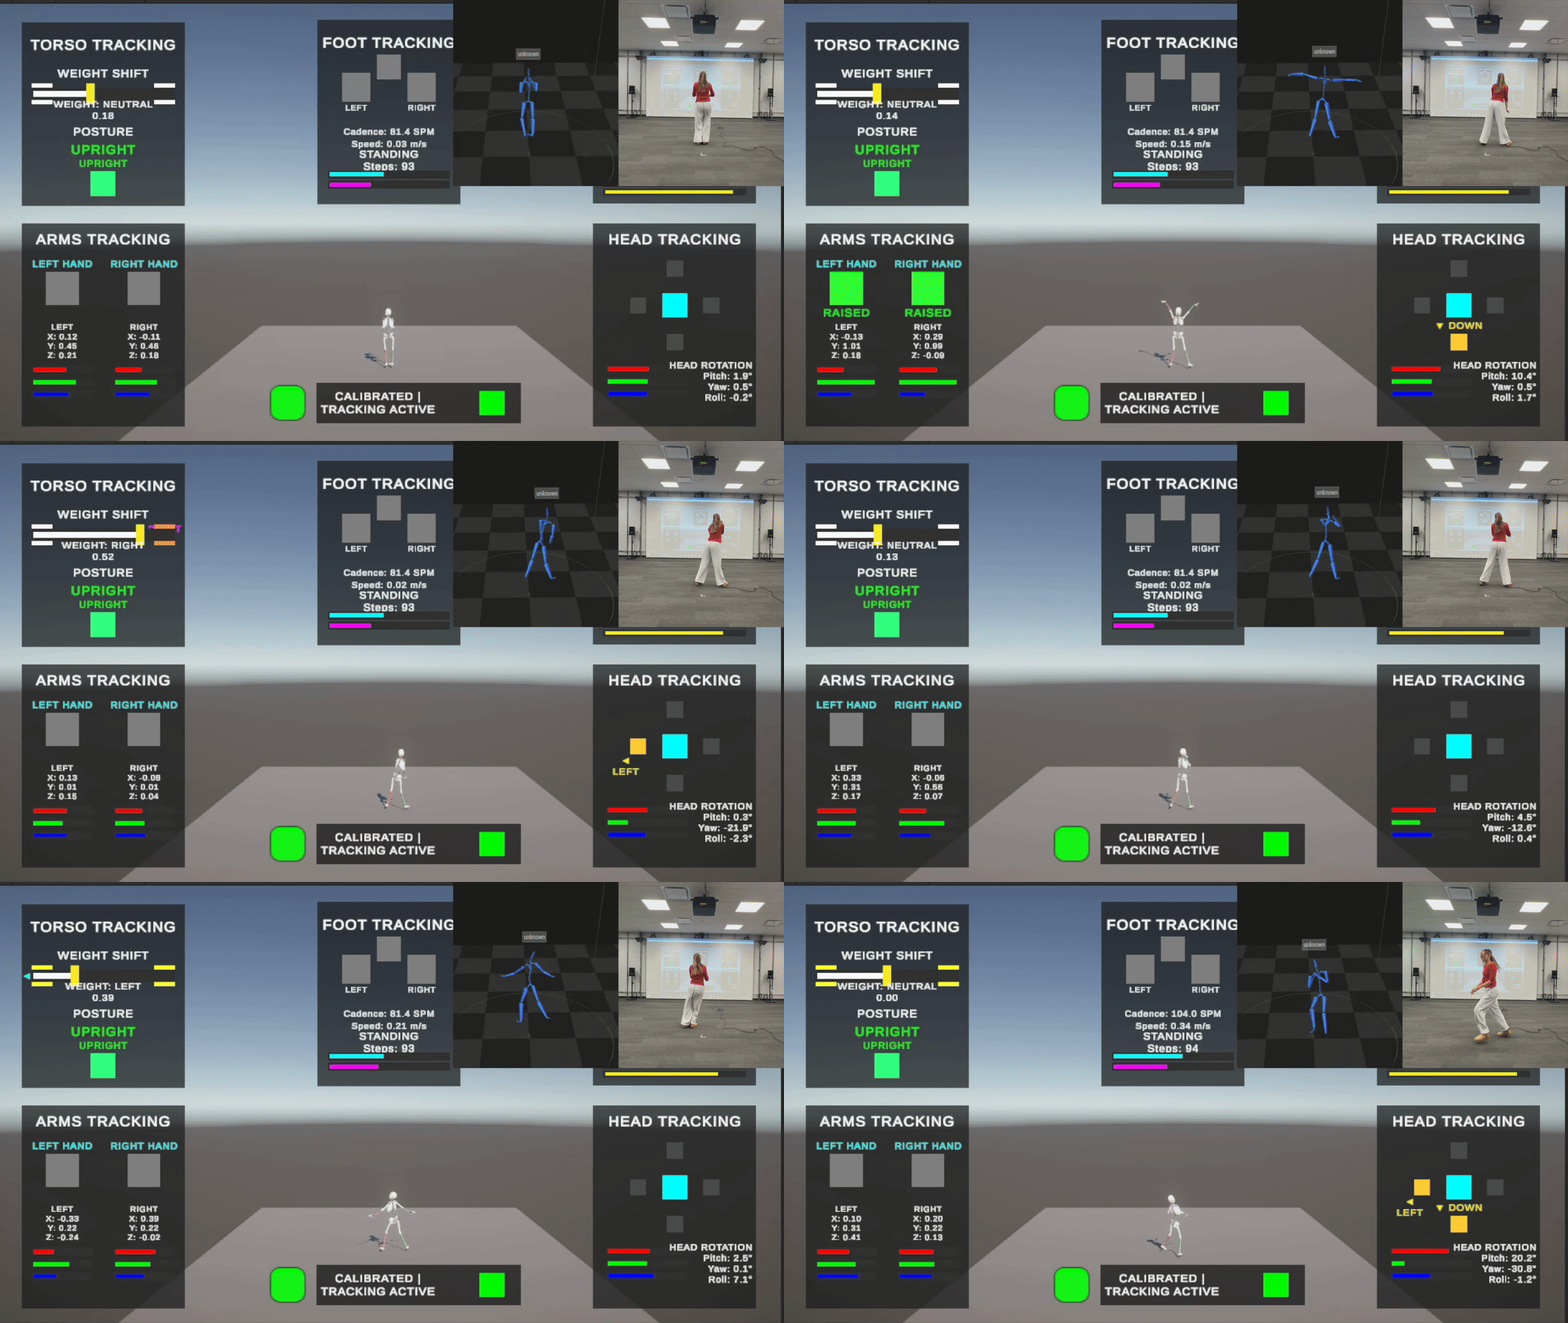
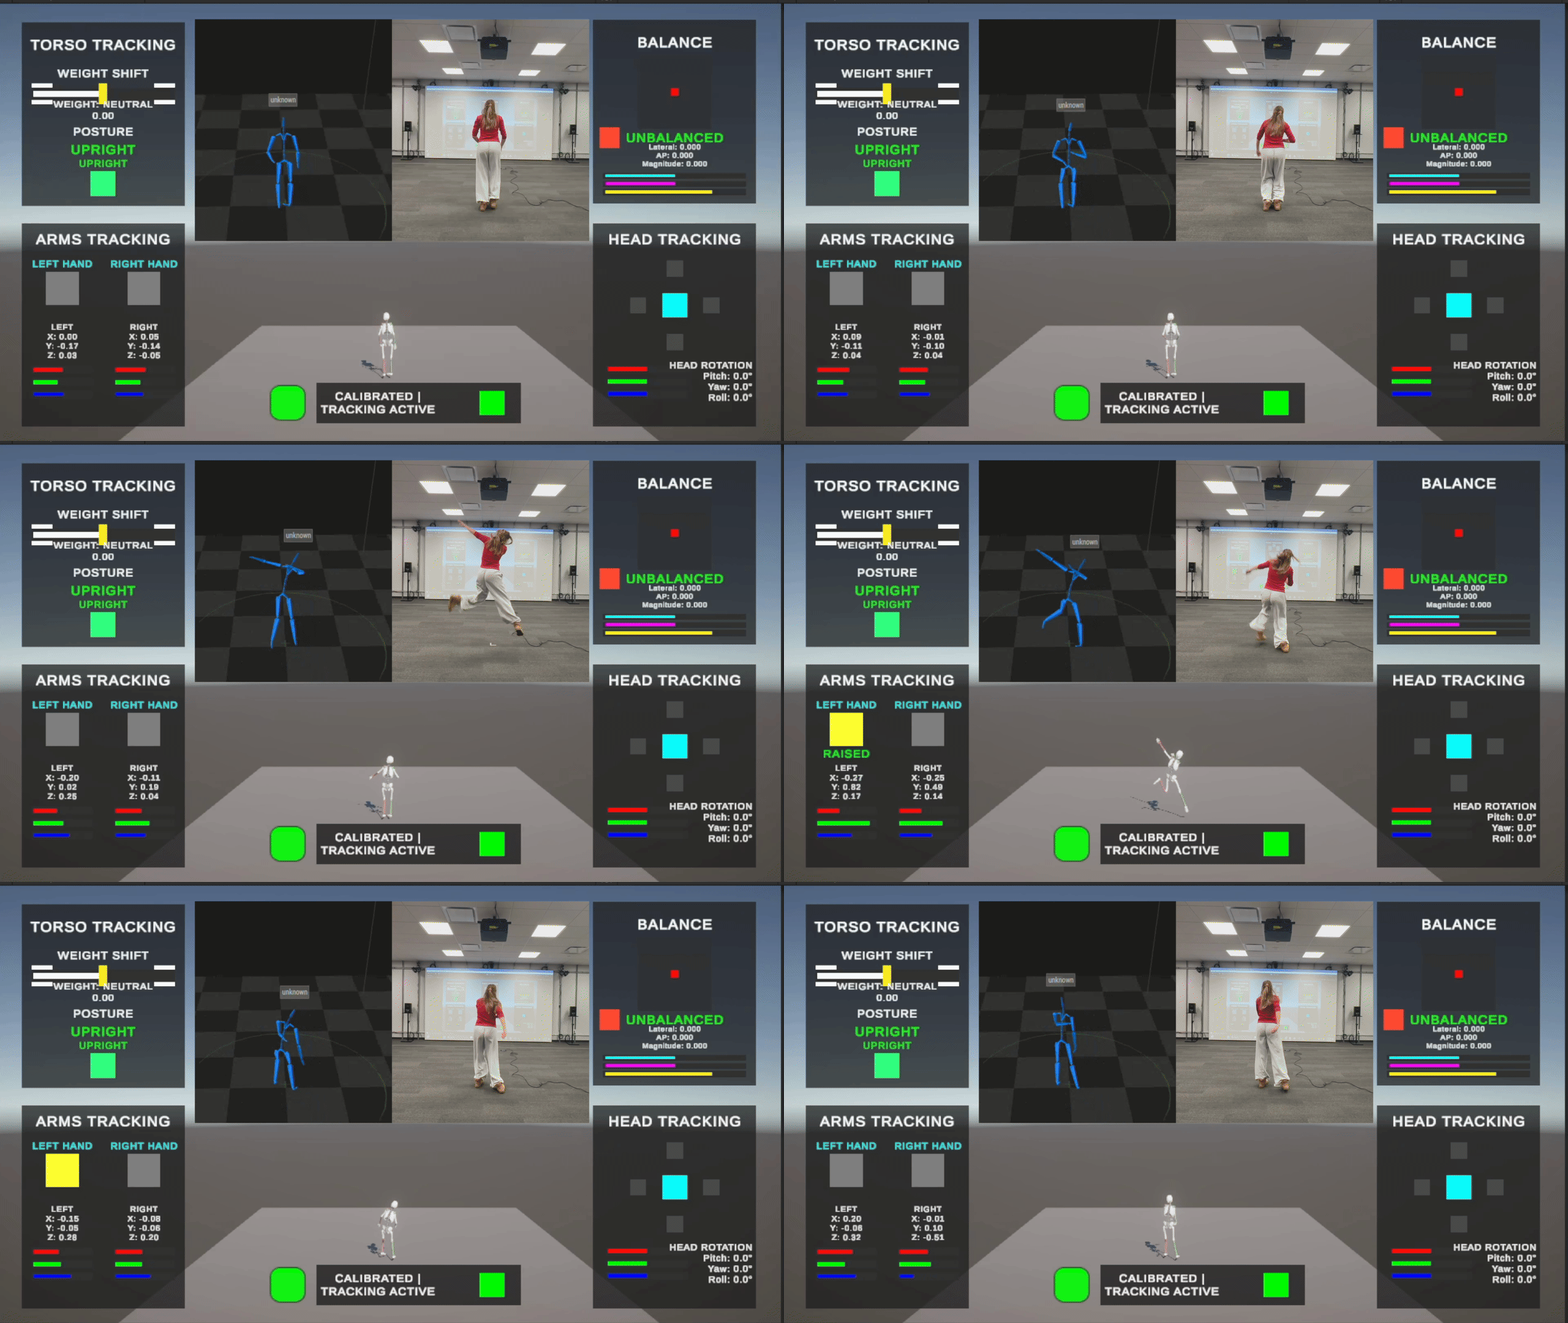
A central manager reads from the Input System and updates a UI panel per module, visualizing each module’s data in real time: sliders for continuous values like weight shift and sway, indicators that light up on boolean states, text for numerical data like cadence and walk speed, and icons that flash on state changes.
Visual feedback system
The feedback system uses timers for brief visual pulses — raise your hand and the hand icon flashes yellow before returning to its state color; detect a step and the foot icon pulses. This immediate feedback made it much easier to verify thresholds and confirm state transitions were firing as expected.
Module-specific panels
Each panel mirrors what its module tracks: the balance panel shows center of mass relative to the base of support, the foot panel shows cadence and walk speed scaled to clinical ranges, the torso panel has a balance bar that moves with weight shift, the head panel shows directional arrows that activate on rotation thresholds.
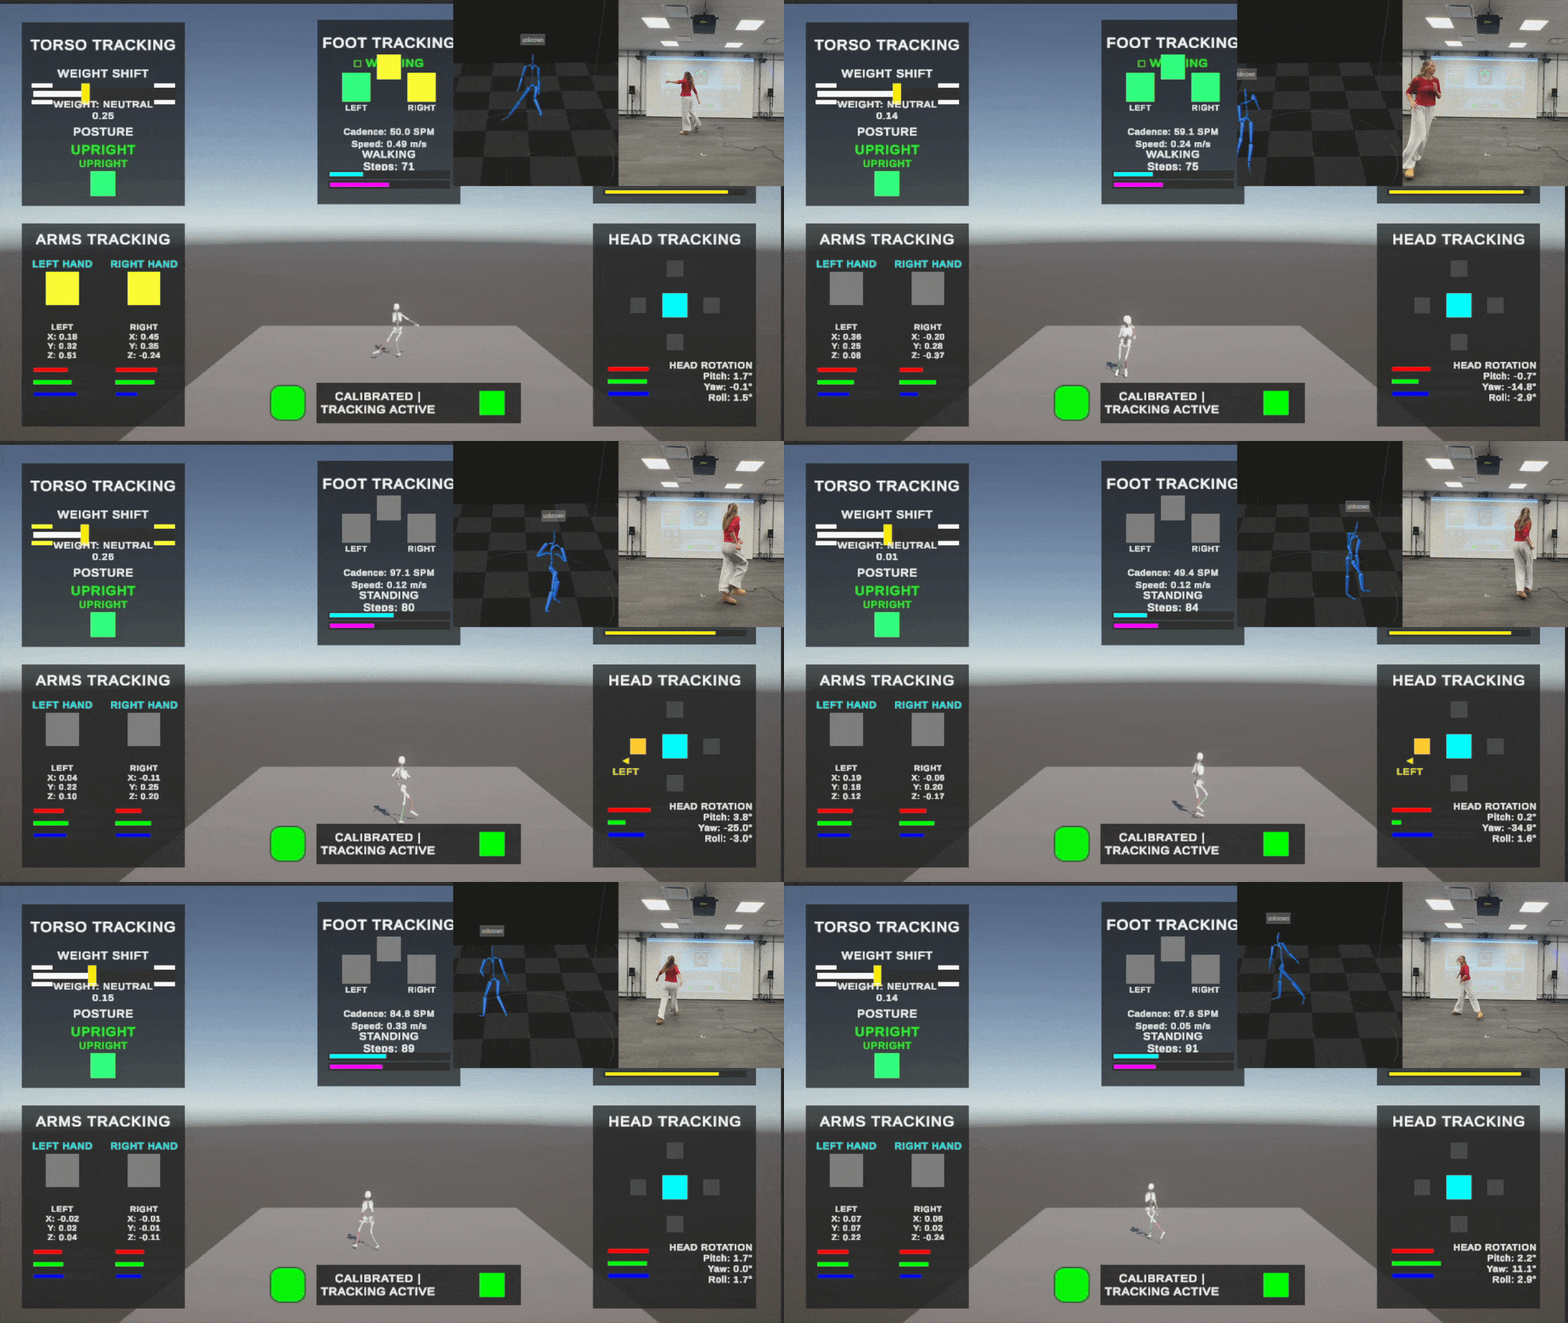
The system drops into any game scene — enable it during playtesting to see exactly what the tracking detects, then disable it for the final build.
08 / ImpactValidation and Impact
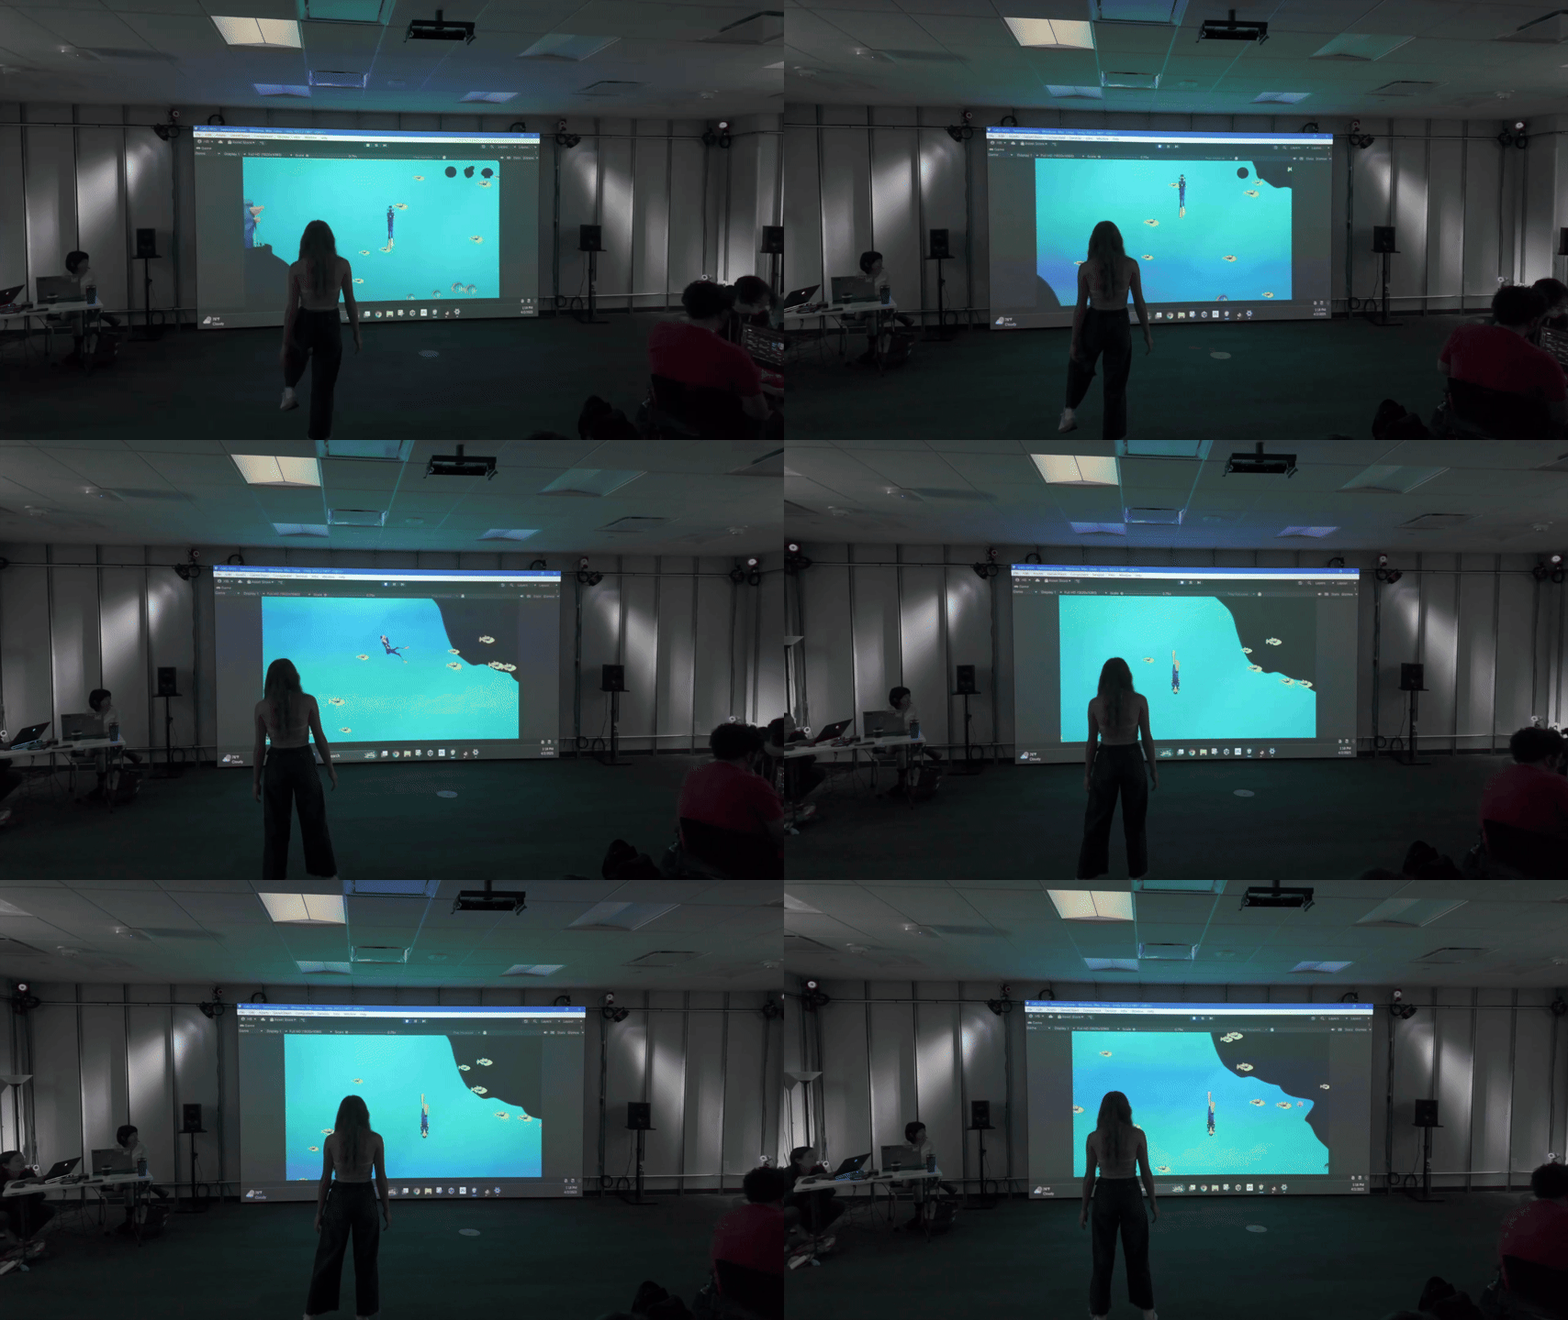
The real test came when Prof. Cohen’s Games for Good class used the toolkit for their projects — around thirty students building motion-controlled rehabilitation games, most of whom had never worked with motion capture before.
Before the toolkit
Setting up motion capture input in Unity required understanding the Captury SDK, writing code to find and subscribe to skeleton events, manually tracking joint transforms, implementing calibration logic, and then building actual game mechanics on top of all that.
Estimated setup time: 11–22 hours (depending on programming experience)
After the toolkit
Students drag the MotionTrackingManager prefab into their scene, assign a configuration asset that enables the modules they need, and start reading values through Unity’s Input System. The motion capture system becomes an input device like a keyboard or gamepad.
Setup time: 10–15 minutes
Code reduction
Implementing basic motion controls like detecting when someone raises their hand or shifts their weight requires roughly 50 lines of game code when using the toolkit. Doing the same thing from scratch requires approximately 500 lines, and that code is fragile, hard to debug, and specific to a single game.
Accessibility impact
Before the toolkit, only students with strong programming backgrounds would attempt motion capture projects. After the toolkit, any student with basic Unity knowledge can build motion-controlled games. The barrier moved from “can you write complex event-driven skeleton tracking code” to “can you read a value from an input device.”
Student feedback
Jo
“The motion capture toolkit was honestly one of the easiest systems I’ve worked with. As a programmer, I immediately knew where to find the configs because everything was clearly labeled and well organized. It made setup fast and let me focus on actually building things instead of fighting with the tools.”
Jo
09 / Outcomes
“Helena’s motion capture setup in Unity was one of those projects where you can instantly tell how much work went into it. The whole system felt intentional and refined. Everything connected smoothly, the structure made sense, and it never felt like I had to guess what anything did. It’s the kind of setup that makes you respect the person who built it.”
Outcomes and Deliverables
Over the course of this independent study, I built a complete motion tracking toolkit consisting of several interconnected components.
Five production-ready tracking modules
- Torso: Weight shift and posture
- Foot/Leg: Walking detection and gait analysis
- Arm: Hand position and raise detection
- Head: Rotation and directional states
- Balance: Center of mass and stability tracking
Supporting systems
- Multiplayer system: Supports 1–4 players simultaneously with automatic skeleton detection, per-player calibration, and device tagging
- Configuration system: ScriptableObject assets that can be swapped at runtime
- Debug UI system: Real-time visualization of all tracking data
- Example project: 1–4 player Pong game demonstrating multiplayer head tracking
- Documentation: Comprehensive coverage of installation, configuration, and module usage
Broader Impact
Motion capture game development went from being accessible only to seasoned programmers willing to spend days on setup to being accessible to any Unity developer in minutes. The toolkit enabled projects that previous groups could not have attempted, and it will remain available for future classes working with the Captury system.
Bibliography
Gait Analysis
- Hausdorff, J. M. (2005). Gait variability: Methods, modeling and meaning. Journal of NeuroEngineering and Rehabilitation, 2, 19.
- Patterson, K. K., et al. (2010). Evaluation of gait symmetry after stroke: A comparison of current methods and recommendations for standardization. Gait & Posture, 31(2), 241–246.
- Tudor-Locke, C., et al. (2018). How fast is fast enough? Walking cadence (steps/min) as a practical estimate of intensity in adults. British Journal of Sports Medicine, 52(12), 776–788.
Balance Module
- BioNumbers, Harvard Medical School. Masses and mass densities of body segments (Table 1.7).
- Tisserand, R., et al. (2022). Comparison of marker-based methods for estimating center of mass during walking. arXiv preprint.
- Mapelli, A., et al. (2022). Estimation of center of mass, base of support, and center of pressure using markerless motion capture. arXiv preprint.